Indezine Logo


Adding Shapes to Existing SmartArt Graphics in PowerPoint 2013 for Windows

Learn how you can add more shapes to existing SmartArt graphics in PowerPoint 2013 for Windows. You can add shapes before and after existing shapes, or even above and below shapes.


Author:

Product/Version: PowerPoint 2013 for Windows

OS: Microsoft Windows 7 and higher


Learn PowerPoint

Do you know how to use animation for individual bullets by using multiple text boxes in PowerPoint?


Once you insert a SmartArt graphic within PowerPoint or convert some bulleted text to SmartArt, you may want to add more shapes to your SmartArt graphic. Fortunately, the SmartArt feature allows you to make these additions and later edit them too. You can add more shapes to your existing SmartArt graphics either from within the SmartArt graphic itself, or through the Text Pane. Note that adding a new shape to a SmartArt graphic entirely depends on the SmartArt variant that you are using. Some variants offer more options than the others.

Follow these steps to add more shapes to your existing SmartArt graphics in PowerPoint 2013 for Windows:
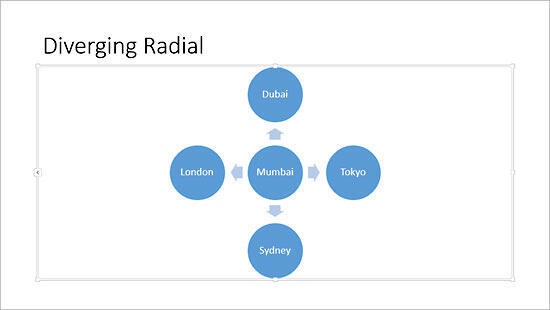
  1. Select your existing SmartArt graphic, as shown in Figure 1, below. The SmartArt graphic variant that we have selected is the Diverging Radial.
  2. Diverging Radial SmartArt
    Figure 1: Diverging Radial SmartArt
  3. When the SmartArt graphic is selected, you'll find two contextual tabs activated on the Ribbon. These are the SmartArt Tools Design and the SmartArt Tools Format tabs, as shown highlighted in red within Figure 2, below.
  4. SmartArt Tools Design and Format tabs on the Ribbon
    Figure 2: SmartArt Tools Design and Format tabs on the Ribbon
  5. Contextual Tabs

  6. The SmartArt Tools Design tab and SmartArt Tools Format are contextual tabs. These tabs are special tabs in the Ribbon that are not visible all the time. They only make an appearance when you are working with a particular slide object which can be edited using special options.
  7. Select any individual shape within the SmartArt graphic and click the SmartArt Tools Design tab on the Ribbon, as shown in Figure 2, above.
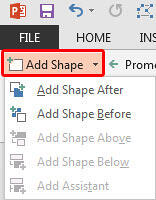
  8. Within this SmartArt Tools Design tab, click the Add Shape button, as shown highlighted in red within Figure 3, below, to bring up a drop-down gallery, as shown in Figure 3.
  9. Add Shape button
    Figure 3: Add Shape button
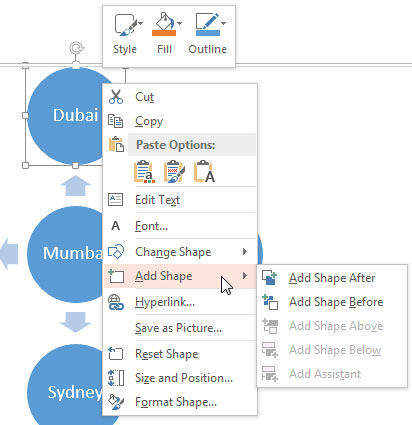
  10. Alternatively, you can right-click the selected shape to get the resultant contextual menu, as shown in Figure 4, below. Here, choose the Add Shape option. Note that the options here are exactly the same as shown within the Add Shapes drop-down gallery, as shown in Figure 3, above.
  11. Add Shape
    Figure 4: Add Shape
  12. These options are explained below:
  13. Add Shape After

  14. Inserts a shape at the same level after the selected shape.
  15. Add Shape Before

  16. Inserts a shape at the same level before the selected shape.
  17. Add Shape Above

  18. Inserts a shape one level above the selected shape.
  19. Add Shape Below

  20. Inserts a shape one level below the selected shape.
  21. Add Assistant

  22. This option places a shape which is hierarchically lower than the selected shape. Shape Assistant is only available if you have chosen an organization chart layout.
  23. Grayed Out Options

  24. You'll see that last three options in Figures 3 and 4 are grayed out. This is because these options logically don't work with the SmartArt graphic variant being used (Diverging Radial). Each SmartArt graphic variant will allow some options, and gray out the others.

See Also:

Working with SmartArt: Adding Shapes to Existing SmartArt Graphics (Glossary Page)

Adding Shapes to Existing SmartArt Graphics in PowerPoint 2016 for Windows
Adding Shapes to Existing SmartArt Graphics in PowerPoint 2011 for Mac
Adding Shapes to Existing SmartArt Graphics in PowerPoint 2010 for Windows
Adding Shapes to Existing SmartArt Graphics in PowerPoint 2007 for Windows

You May Also Like: Three Ways to Make a Presentation Effective | Cucumber PowerPoint Templates


Popular Posts

Create Animated GIFs from PowerPoint Slides
Explore ways to create animated GIFs from PowerPoint slides.

PowerPoint Tutorials
These PowerPoint tutorials have many screen shots that show you exactly what you see in your computer!

Use Safe Fonts Available on All Systems in PowerPoint
Learn about using safe fonts in PowerPoint.

10 Tips for Pecha Kucha
Read 10 amazing Pecha Kucha tips that will help you create and deliver a better Pecha Kucha presentation.


PowerPoint Keyboard Shortcuts and Sequences:
PowerPoint 2016, 2013, 2011, 2010, 2007 and 2003 for Windows
PowerPoint 2016 and 2011 for Mac
PowerPoint Online for Windows and Mac

Have your ever used keyboard shortcuts and sequences in PowerPoint? Or are you a complete keyboard aficionado? Do you want to learn about some new shortcuts? Or do you want to know if your favorite keyboard shortcuts are documented?

Go and get a copy of our PowerPoint Keyboard Shortcuts and Sequences ebook.


Microsoft and the Office logo are trademarks or registered trademarks of Microsoft Corporation in the United States and/or other countries.

Home | PowerPoint | Photoshop | PowerPoint Templates | PowerPoint Tutorials | Blog | Notes | Ezine | Media Kit | Feedback | Site Map | About Us | Contact Us

Link to Us | Privacy | Testimonials

PowerPoint Backgrounds | Christian PowerPoint Backgrounds | Business PowerPoint Presentation Templates

Plagiarism will be detected by Copyscape

©2000-2023, . All rights reserved.