Indezine Logo


Adding Shapes to Existing SmartArt Graphics in PowerPoint 2011 for Mac

Learn how you can add more shapes to existing SmartArt graphics in PowerPoint 2011 for Mac. You can add shapes before and after existing shapes, or even above and below shapes.


Author:

Product/Version: PowerPoint 2011 for Mac

OS: Mac OS X


Learn PowerPoint

Explore text shadows withIn shapes in PowerPoint


While many of PowerPoint's SmartArt graphic variants are so usable, there may be times when you want to add an extra shape or two to your SmartArt graphic. At this point of time, we are assuming that you already know how to insert a new SmartArt graphic or convert existing bulleted text to SmartArt. Fortunately, the SmartArt feature allows you to make these additions and edits with just a click or two. You can add one or more shapes to your existing SmartArt graphics either from within the SmartArt graphic itself, or through the Text Pane. Whether you can add a new shape to a SmartArt graphic or not depends entirely on the SmartArt variant that you are using. Some variants offer more options than the others.

Follow these steps to add more shapes to your SmartArt graphics in PowerPoint 2011 for Mac:
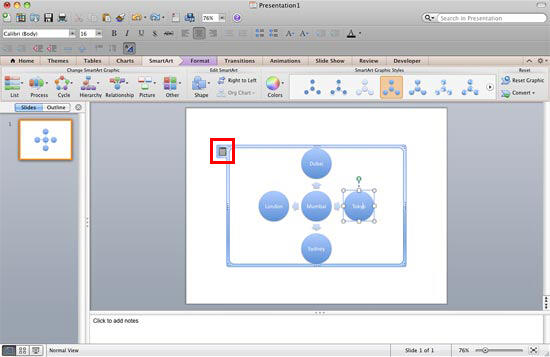
  1. Select your existing SmartArt graphic, as shown in Figure 1, below. The SmartArt graphic variant that we have selected is the Diverging Radial. Next, select a shape within the SmartArt graphic depending upon where you want to insert a new shape. We selected the rightmost shape, as you can see.
  2. Shape selected in Diverging Radial SmartArt
    Figure 1: Shape selected in Diverging Radial SmartArt
  3. SmartArt Ideas

    See more SmartArt graphic samples here.
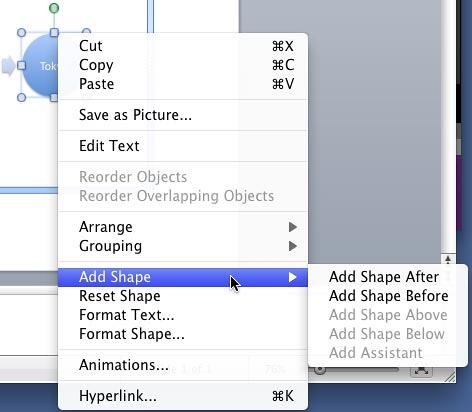
  4. Right-click the selected shape to summon the contextual menu, as shown in Figure 2, below. From the contextual menu, choose the Add Shape option to bring up a sub-menu.
  5. Add Shape sub-menu options to add a new shape to the SmartArt
    Figure 2: Add Shape sub-menu options
  6. Add Shape sub-menu options are explained below:
  7. Add Shape After

  8. Inserts a shape at the same level after the selected shape.
  9. Add Shape Before

  10. Inserts a shape at the same level before the selected shape.
  11. Add Shape Above

  12. Inserts a shape one level above the selected shape.
  13. Add Shape Below

  14. Inserts a shape one level below the selected shape.
  15. Add Assistant

  16. Inserts a shape which is hierarchically lower than the selected shape. Add Assistant is only available for SmartArt graphics from the Hierarchy category, such as an organization chart.
  17. Grayed Out Options

  18. As you can see, the last three options in Figure 2 are grayed out. This is because these options logically don't work with the SmartArt graphic variant being used (Diverging Radial). Each SmartArt graphic variant will allow some options, and gray out the others.
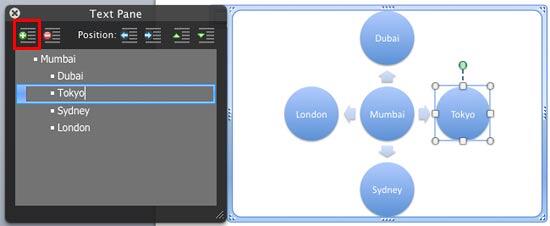
  19. You can also add a shape to the selected SmartArt graphic through Text Pane. To access the Text Pane, click the Text Pane icon, as shown highlighted in red within Figure 1, above. In the resultant Text pane, as shown in Figure 3, below, make sure that the line representing your shape in the bulleted list is active. Then, click the Add button, as shown highlighted in red within Figure 3, below. Doing so adds a new shape within your SmartArt graphic and a new line in the bulleted text within the Text Pane. You can also press the Return / Enter key, and you'll see that your SmartArt graphic has a new shape added.
  20. Add button in the Text Pane
    Figure 3: Add button in the Text Pane
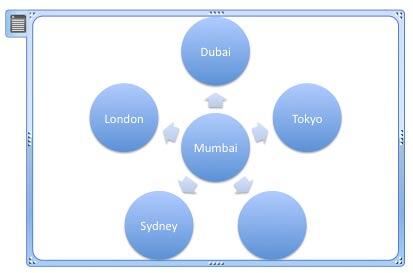
  21. Figure 4, below, shows a new shape has been added within the previously selected Diverging Radial SmartArt. Compare it with Figure 1, as shown previously on this page.
  22. New shape added within the SmartArt graphic
    Figure 4: New shape added within the SmartArt graphic

See Also:

Working with SmartArt: Adding Shapes to Existing SmartArt Graphics (Glossary Page)

Adding Shapes to Existing SmartArt Graphics in PowerPoint 2016 for Windows
Adding Shapes to Existing SmartArt Graphics in PowerPoint 2013 for Windows
Adding Shapes to Existing SmartArt Graphics in PowerPoint 2010 for Windows
Adding Shapes to Existing SmartArt Graphics in PowerPoint 2007 for Windows

You May Also Like: Show Websites in PowerPoint | Corn PowerPoint Templates


Popular Posts

Creating Slide Backgrounds in Photoshop for PowerPoint
Learn how to create slide backgrounds for PowerPoint in Photoshop.

Formatting Arrows (Arrowheads) in PowerPoint 2016 for Windows
Learn how to format arrowheads for lines in PowerPoint 2016 for Windows.

Creating Semi-Circles in PowerPoint 2013
Learn how to create a semi-circle in PowerPoint 2013.

Apply Two or More Animations to One Object at the Same Time in PowerPoint
Apply multiple animations to one slide object in PowerPoint, and make all animations play together.


Organic Shapes with Brush Edges

You get 8 shape types plus lines as part of this Organic Shapes collection. Each of these 8 shape types have 10 variants. So you end up with 80 hand-drawn shape options! Again each of these 80 shapes have 12 brush stroke styles! Plus you get the lines and arrows in 12 brush stroke styles too. Combine all variations to end up with more than 3000 possibilities.

Buy and Download for $99+ (83 MB)


Microsoft and the Office logo are trademarks or registered trademarks of Microsoft Corporation in the United States and/or other countries.

Home | PowerPoint | Photoshop | PowerPoint Templates | PowerPoint Tutorials | Blog | Notes | Ezine | Media Kit | Feedback | Site Map | About Us | Contact Us

Link to Us | Privacy | Testimonials

PowerPoint Backgrounds | Christian PowerPoint Backgrounds | Business PowerPoint Presentation Templates

Plagiarism will be detected by Copyscape

©2000-2023, . All rights reserved.