Indezine Logo


Add Office.com SmartArt Graphics in PowerPoint 2010 for Windows

Learn how you can use Office.com SmartArt Graphics in PowerPoint 2010 for Windows. These SmartArt graphics show up as a new category in the SmartArt dialog box.


Author:

Product/Version: PowerPoint 2010 for Windows

OS: Microsoft Windows XP and higher


Learn PowerPoint

Explore 3D in PowerPoint and Microsoft Office.


SmartArt is the successor of the older diagram options in previous versions of PowerPoint and has more features. For example, SmartArt also allows you to replace bullet points with info-graphic content using text-within-shapes that's more logical to view and present. In Figure 1, below, you can see the types of SmartArt graphics you can see when you access the Choose a SmartArt Graphic dialog box. The categories for SmartArt graphics can be seen within the left pane.

Choose a SmartArt Graphic dialog box with default SmartArt types
Figure 1: Choose a SmartArt Graphic dialog box with default SmartArt types

The different categories for SmartArt graphics can be seen within the left pane, as shown in Figure 1, above. In addition to these categories, you can also add an additional SmartArt category that shows content from Office.com. However, before you can access this SmartArt option, you need to change some settings within PowerPoint.

Follow these steps to add the new Office.com category to your SmartArt graphics in PowerPoint 2010 for Windows:
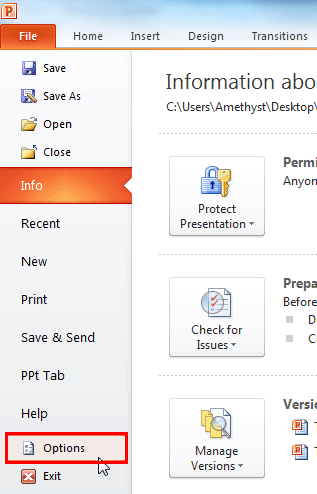
  1. Launch PowerPoint 2010. Access the File menu, and choose Options, as shown highlighted in red within Figure 2, below.
  2. Select File | Options
    Figure 2: Select File | Options
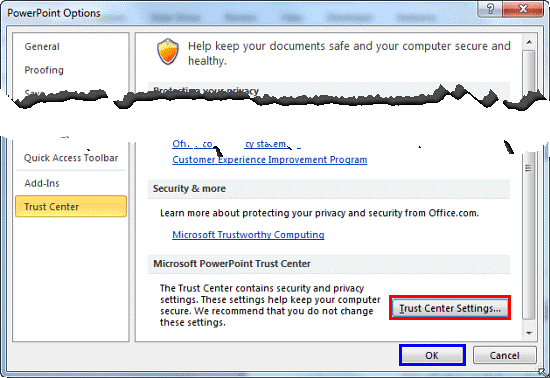
  3. Doing so opens the PowerPoint Options dialog box, as shown in Figure 3, below. Within this dialog box, select the Trust Center option within the sidebar, as shown highlighted in red within Figure 3.
  4. Trust Center option within the PowerPoint Options dialog box
    Figure 3: Trust Center option within the PowerPoint Options dialog box
  5. Within the resultant window, click the Trust Center Settings button, as shown highlighted in red within Figure 4, below.
  6. Trust Center Settings button
    Figure 4: Trust Center Settings button
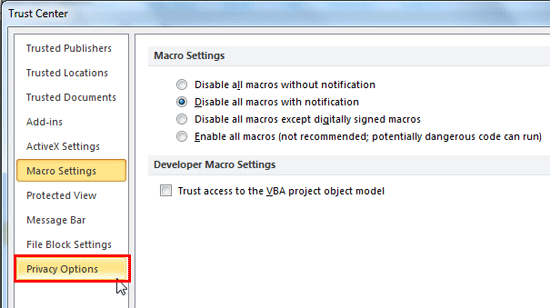
  7. Doing so opens the Trust Center dialog box, as shown in Figure 5, below. Now, select Privacy Options in the sidebar, as shown highlighted in red within Figure 5.
  8. Trust Center dialog box
    Figure 5: Trust Center dialog box
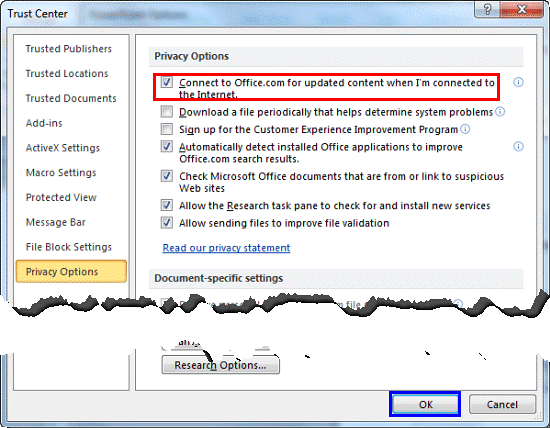
  9. Within the Privacy Options list, make sure that the Connect to Office.com for updated content when I’m connected to the Internet check-box is selected, as shown highlighted in red within Figure 6, below.
  10. Privacy Options
    Figure 6: Privacy Options
  11. Then, click the OK button within the Trust Center dialog box, as shown highlighted in blue within Figure 6, above. Doing so will take you back to PowerPoint Options dialog box. Next, click the OK button, as shown highlighted in blue within Figure 4, previously on this page.
  12. Close PowerPoint.
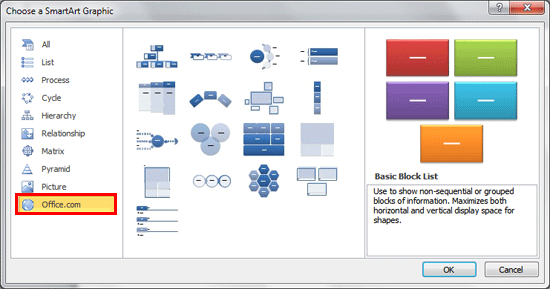
  13. Re-launch PowerPoint. Now, if you summon the Choose a SmartArt Graphic dialog box, you can see the new Office.com category, as shown highlighted in red within Figure 7, below.
  14. Office.com option within the Choose a SmartArt Graphic dialog box
    Figure 7: Office.com option within the Choose a SmartArt Graphic dialog box

Troubleshooting

Did you follow all steps and then found that no Office.com category shows up within the Choose a SmartArt Graphic dialog box? Then, try the following troubleshooting steps to access the Office.com option:

  1. Deselect the Connect to Office.com for updated content when I’m connected to the Internet check-box.
  2. Close PowerPoint.
  3. Now, follow Steps 1 to 8 again as explained in this tutorial, and you will possibly see the new Office.com category.

11 03 07 - Advanced SmartArt: Add Office.com SmartArt Graphics (Glossary Page)

You May Also Like: Build-a-Graphic: Conversation with Mike Parkinson | Food - R PowerPoint Templates


Popular Posts

Ten Easy Topics for Pecha Kucha
But what are simple topics, that excite you, and are interesting to your audiences? Of course, if you already have a topic, you need not read further, but if you are still looking for ideas, here are ten easy topics that you can use for your Pecha Kucha presentations.

Drawing Arcs in PowerPoint
Explore how you can draw an Arc shape in PowerPoint.

Set Minimum and Maximum Values on Value Axis in PowerPoint 2013 for Windows
Learn how to set the Minimum and Maximum values on Value Axis of Charts in PowerPoint 2013 for Windows.

Crop Pictures (Mask to Shape) in PowerPoint 2011 for Mac
Learn how to crop pictures using Mask to Shape option in PowerPoint 2011 for Mac.


Gears for PowerPoint (Series 01)

All these gears are native PowerPoint shapes. You can recolor them, add effects, and do more, all inside PowerPoint. Results which would have taken hours to achieve now take less than a minute! Have fun using the gear graphics, and make your audience take notice! All these gears can be rotated and resized, as required. Since they are essentially pictures, all types of edits that you can do with pictures work with them too!

Get this complete kit now, you’ll save so much time that you can use doing something else!


Microsoft and the Office logo are trademarks or registered trademarks of Microsoft Corporation in the United States and/or other countries.

Home | PowerPoint | Photoshop | PowerPoint Templates | PowerPoint Tutorials | Blog | Notes | Ezine | Media Kit | Feedback | Site Map | About Us | Contact Us

Link to Us | Privacy | Testimonials

PowerPoint Backgrounds | Christian PowerPoint Backgrounds | Business PowerPoint Presentation Templates

Plagiarism will be detected by Copyscape

©2000-2023, . All rights reserved.