Once you insert a table in PowerPoint, you will certainly want to fill it with some content. However that does not mean your table is done and may never require any more changes to be made. Like anything else in life, tables need to grow and accommodate more content, or they may even need to shed some of it. Adding or removing content within a table usually entails adding and removing table rows and columns, as required. You can add or remove these from the edges of the table, or even somewhere right in middle of the existing rows and columns.
Follow these steps to learn more in PowerPoint 2011 for Mac:
- Open your presentation, navigate to a slide containing the table you need to edit. Select the table, as shown in Figure 1. Then, select the Table Layout tab of the Ribbon (highlighted in
red within Figure 1).
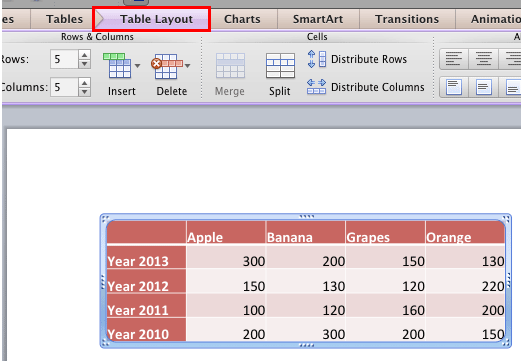
Figure 1: Table Layout tab of the Ribbon
Note: Table Layout tab is a
Contextual tab. These tabs are special tabs in the
Ribbon that are not visible all the time. They only make an appearance when you are working with a particular slide object which can be edited using these options.
- Within the Table Layout tab, locate the Rows & Columns group as shown in Figure 2. This group includes two numbered list boxes named Rows and Columns (highlighted in red within Figure 2) and five buttons named Above, Below, Left, Right, and Delete (highlighted in blue within Figure 2). These options will help you add and remove rows and columns.

Figure 2: Rows and Columns group within the Table Layout tab Add/Remove Table Rows/Columns in the Bottom/Right Ends
- Digits shown within the Rows and Columns numbered list boxes (highlighted in red within Figure 2, above) represent the total number of rows and columns within the selected table. Follow these guidelines to use these numbered list boxes:
- Click the up-arrow within the Rows numbered list box once to increase the number of rows in the table by adding a new row at the end.
- Click the down-arrow within the Rows numbered list box once to reduce the number of rows in the table by deleting the last (bottom-most) row.
- Click the up-arrow within the Columns numbered list box once to increase the number of columns in the table by adding a new column at the end (towards the right of the table).
- Click the down-arrow within the Columns numbered list box once to reduce the number of columns in the table by deleting the last (right-most) column.
Add or remove table rows and columns in the end as required, following the above guidelines. If you directly typed a number into the Rows and Columns numbered list boxes, the selected table will be immediately updated by adding or deleting the rows/columns as required, so that the number of rows and columns within the table match the typed number.
Add Table Rows/Columns in the Middle
- Follow these guidelines to add a new Table row somewhere in between the table:
- To add a row above a particular row, select an adjacent row. Then click the Above button (highlighted in red within Figure 3) within the Table Layout tab, as shown in Figure 3.
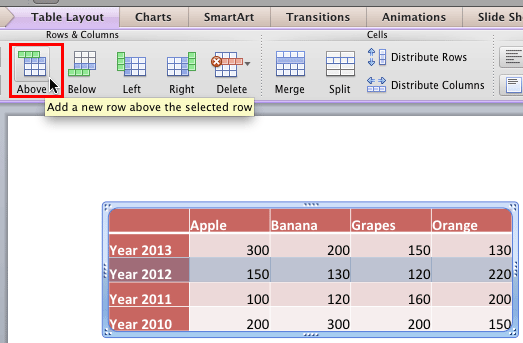
Figure 3: Insert a new row above the selected row - Similarly, clicking the Below button (highlighted in red within Figure 4) with a row selected, will add a new row below the selected row.
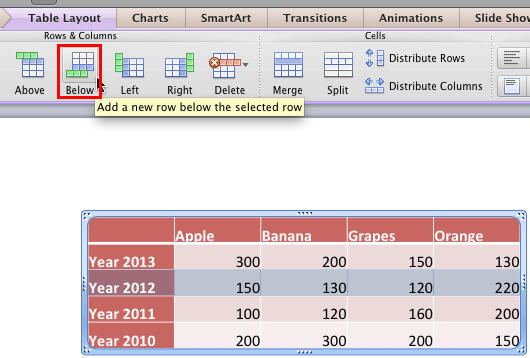
Figure 4: Insert a new row below the selected row - To add a column before a particular column, select the column and click the Left button (highlighted in red within Figure 5), as shown in Figure 5.
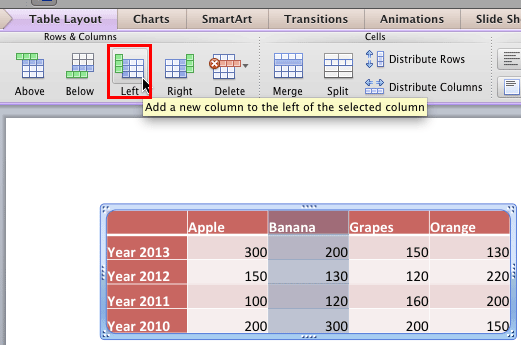
Figure 5: Insert a new column before the selected column - Similarly, clicking the Right button (highlighted in red within Figure 6) with a column selected, will add a new column after the selected column.
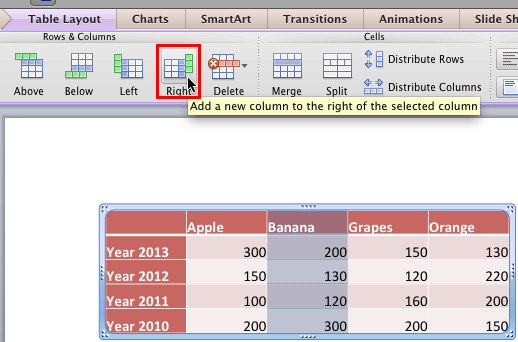
Figure 6: Insert a new column after the selected column
Delete Table Rows and Columns in the Middle
- Follow these steps to delete a row or a column:
- To delete a particular row(s) select the corresponding row(s) and click the Delete button, as shown highlighted in red within Figure 7. From the resultant drop-down gallery, selectthe Delete Rows option (refer to Figure 7 again).
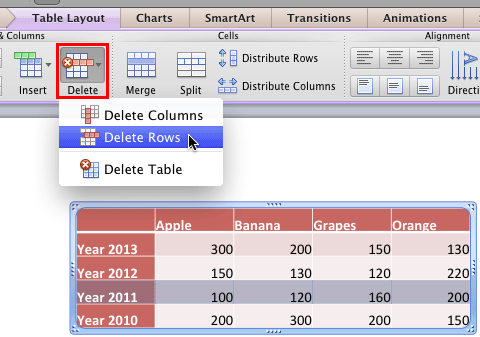
Figure 7: Delete a row within a table - To delete a particular column(s) select the corresponding column(s) and click the Delete button, as shown highlighted in red within Figure 8. From the resultant drop-down gallery, select the Delete Columns option (refer to Figure 8 again).
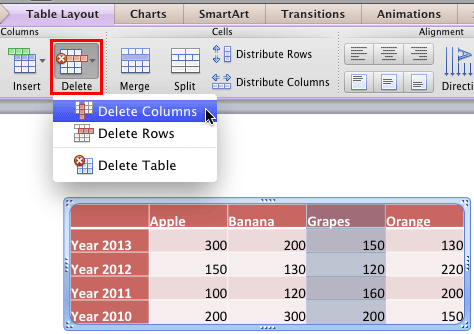
Figure 8: Delete a column within a table
Note: Delete drop-down gallery, you'll end up deleting the entire table.
- Add or remove table rows and columns as required.
- Save your presentation often.


