Indezine Logo


Add and Rename Slide Masters in PowerPoint 2013 for Windows

Learn how to add and rename Slide Masters in PowerPoint 2013 for Windows.


Author:

Product/Version: PowerPoint 2013 for Windows

OS: Microsoft Windows 7 and higher


Learn PowerPoint

Learn how to use output Notes from PowerPoint.


In your presentation, a Slide Master is the element that influences everything, be it the slide background or the fonts used for text. Despite having different layouts, all slides in a presentation share a common look, which is provided by the Slide Master. There will be at least one Slide Master in every presentation. However, while adding slides from other presentations, you may end up adding more Slide Masters inadvertently to your presentation. So how do you know how many Slide Masters your presentation contains? And how do you add another one? In fact, why do you need another Slide Master at all?

Those are great questions, and we shall explore all answers. First things first though, let us find out how many Slide Masters your presentation contains. To find out, access the Home tab of the Ribbon, and click the Layout button. This brings up the Layout drop-down gallery you see in Figure 1, below.
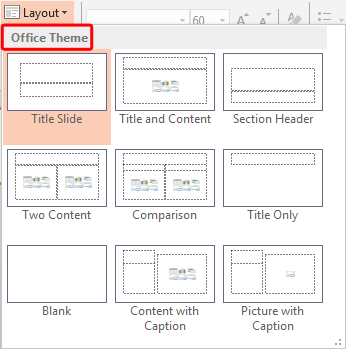
The Layout gallery
Figure 1: The Layout gallery

Notice that most new presentations you create in PowerPoint contain just one Slide Master based on the Office Theme. You can see the Theme name highlighted in red within Figure 1, above. Now that we have established the fact that most new presentations contain at least a single Slide Master, why would you need to add a new Slide Master? The reasons may differ but for most users that's because they want their slides to contain two or more different looks (backgrounds, colors, fonts, effects, etc.). For design purists, it is difficult to justify this as a reason. Most professional PowerPoint template designers will only add a second Slide Master for small and subtle differences. Whatever your opinion may be, it's actually quite easy to add a new Slide Master:
Adding a New Slide Master

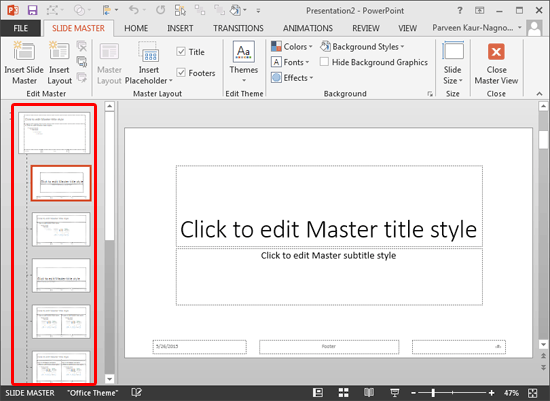
  1. Launch PowerPoint 2013 and open the presentation that needs a new Slide Master. Next, access the View tab of the Ribbon, and click the Slide Master button. This opens the Slide Master View, as shown in Figure 2. Here, within the pane on the left, you'll find the default Slide Master with associated layouts (highlighted in red within Figure 2).
  2. Default Slide Master
    Figure 2: Default Slide Master
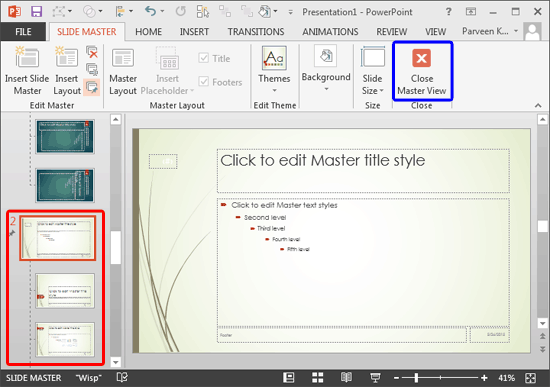
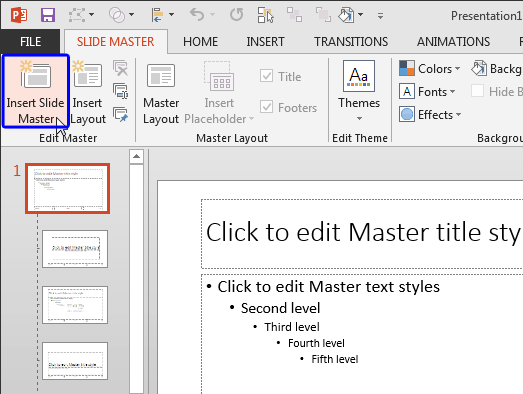
  3. To add a new Slide Master, click the Insert Slide Master button, as shown highlighted in blue within Figure 3.
  4. Insert Slide Master button
    Figure 3: Insert Slide Master button
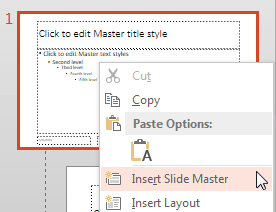
  5. Alternatively, right-click the existing Slide Master, and choose the Insert Slide Master option from the contextual menu that appears, as shown in Figure 4, below.
  6. Insert Slide Master option within the contextual menu
    Figure 4: Insert Slide Master option within the contextual menu
  7. You can also press the Ctrl + M keyboard shortcut in Slide Master view to add a new Slide Master.
  8. PowerPoint Keyboard Shortcuts

    PowerPoint Keyboard Shortcuts

    Do you want more keyboard shortcuts?

    Explore our PowerPoint Keyboard Shortcuts and Sequences Ebook that is updated for all PowerPoint versions.
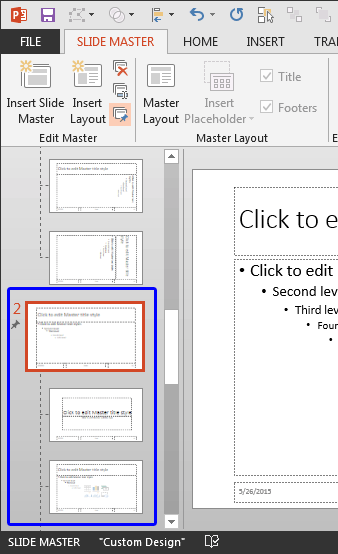
  9. Either of these options will add a new Slide Master, as shown highlighted in blue within Figure 5. Notice that this new Slide Master is numbered 2, since this is the second Slide Master of your presentation.
  10. New Slide Master inserted
    Figure 5: New Slide Master inserted

Adding a Slide Master Applied With a Theme

You can also add a Slide Master from any of existing Themes within PowerPoint. This can be helpful if you want the new Slide Master to be based on a Theme that's not part of the current presentation. To learn how you can do so, follow these steps:
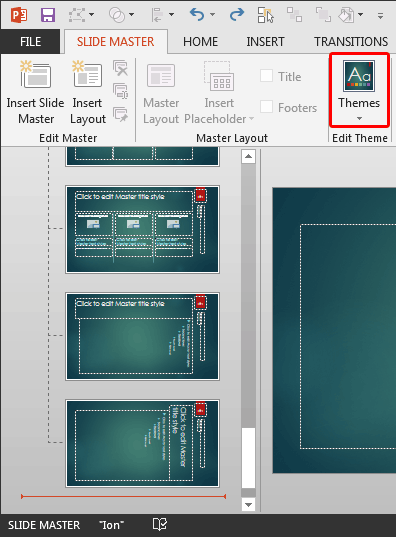
  1. Access the Slide Master view as explained in Step 1 in the preceding section. Thereafter, click at the end of your existing Slide Master (below the last Slide Layout thumbnail) to place an insertion cursor, as shown in Figure 6. Now click the Themes button, as shown highlighted in red within Figure 6.
  2. Themes button
    Figure 6: Themes button
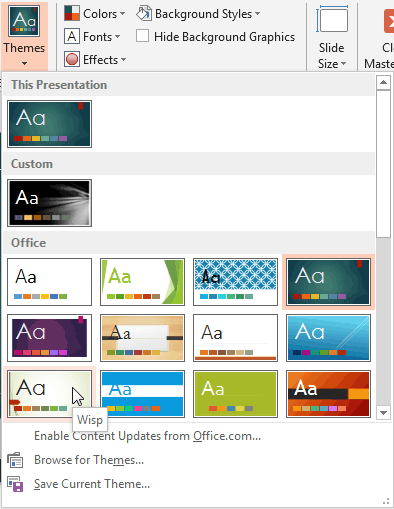
  3. This brings up the Themes drop-down gallery, as shown in Figure 7. Click on a Theme of your choice.
  4. Themes drop-down gallery
    Figure 7: Themes drop-down gallery
  5. This will add a new Slide Master with the selected Theme applied, as shown highlighted in red within Figure 8. Notice that this new Slide Master is numbered 2, since this is the second Slide Master of your presentation.
  6. New Slide Master gets added along with the selected Theme applied
    Figure 8: New Slide Master gets added along with the selected Theme applied
  7. Once you have added the new Slide Master following any of the ways explained above, you can make changes to the newly added Slide Master as required.

Renaming the Slide Master

To rename the Slide Master follow these steps:
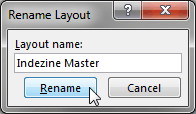
  1. Select and right-click the Slide Master and select the Rename Master option from the contextual menu that appears. This will bring up the Rename Layout window, as shown in Figure 9.
  2. Rename the new Slide Master
    Figure 9: Rename the new Slide Master
  3. Just type in the name you like and click the Rename button.

After adding and renaming the new Slide Master, click the Close Master View button (highlighted in blue within Figure 8). This will get you back to Normal View. Now access the Home tab of the Ribbon and click the Layout button to bring up the Layout drop-down gallery you see in Figure 10, below. Notice that now there are two Slide Masters within the Layout drop-down gallery (names highlighted in red within Figure 10, below). Compare Figures 10 and 1.

New Slide Master added within the Layout gallery
Figure 10: New Slide Master added within the Layout gallery

Keep on saving your presentation often.


See Also:

Slide Master and Slide Layouts: Add and Rename Slide Masters in PowerPoint (Index Page)

Add and Rename Slide Masters in PowerPoint 2016 for Windows
Add and Rename Slide Masters in PowerPoint 2016 for Mac
Add and Rename Slide Masters in PowerPoint 2011 for Mac
Add and Rename Slide Masters in PowerPoint 2010 for Windows

You May Also Like: The Sixth Success Factor for Startups: The Perfected Pitch | Banana PowerPoint Templates


Popular Posts

Pivot Tables in PowerPoint: by Kasper Langmann
One of the most commonly used features in Microsoft Excel is the Pivot Table. A Pivot Table simply allows you to make better sense of data by giving you different options of how to view that data.

Get More SmartArt Graphics
Learn how you can get more SmartArt graphic variants.

Character Spacing in PowerPoint 2013
Explore Character Spacing options in PowerPoint 2013.

Add Secondary Value Axis to Charts in PowerPoint 2013 for Windows
Learn how to add a Secondary Value axis to charts in PowerPoint 2013 for Windows.


Polygon Center Circles for PowerPoint

These special circles have polygon centers: the centers are made of triangles, squares, pentagons, and hexagons! And based on the sides of the polygon, the rest of the circle has that many segments.

Download and use these Polygon Center Circles in your slides for just $4.99


Microsoft and the Office logo are trademarks or registered trademarks of Microsoft Corporation in the United States and/or other countries.

Home | PowerPoint | Photoshop | PowerPoint Templates | PowerPoint Tutorials | Blog | Notes | Ezine | Media Kit | Feedback | Site Map | About Us | Contact Us

Link to Us | Privacy | Testimonials

PowerPoint Backgrounds | Christian PowerPoint Backgrounds | Business PowerPoint Presentation Templates

Plagiarism will be detected by Copyscape

©2000-2023, . All rights reserved.