Indezine Logo


Add and Rename Slide Masters in PowerPoint 2011 for Mac

Learn how to add and rename Slide Masters in PowerPoint 2011 for Mac.


Author:

Product/Version: PowerPoint 2011 for Mac

OS: Mac OS X


Learn PowerPoint

Learn how to pause slides, sounds, and movies – and resume!


The Slide Master is a very important part of your presentation that influences the appearance of everything you see on the slide. From the slide background to the fonts used for text. All slides in your presentation may have different layouts, and each of these layouts may have different placeholder arrangements. However, they all share a common look—that look is provided by the Slide Master. Every presentation has at least one Slide Master. However, if you constantly keep adding slides from other presentations, you may have inadvertently added more Slide Masters to your presentation. So how do you know how many Slide Masters your presentation contains? And how do you add another one? In fact, why do you need another Slide Master at all?

Let's explore answers to these questions. First, let us find out how many Slide Masters your presentation contains. To find out, access the Home tab of the Ribbon, and click the Layout button. This brings up the Layout drop-down gallery you see in Figure 1.
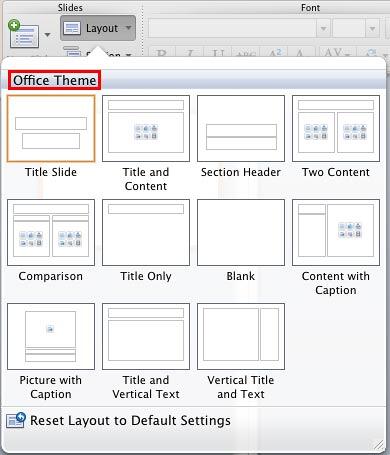
The Layout drop-down gallery
Figure 1: The Layout drop-down gallery

As you can see, our presentation contains just one Slide Master based on the Office Theme. You can see the Theme name highlighted in red within Figure 1, above. If your presentation has more than one Slide Master, then that would be obvious within the Layout gallery itself. We will revisit this gallery at the end of this tutorial.

After establishing the fact that most new presentations contain at least a single Slide Master, let us explore why would you need to add another one? The reasons may differ, but for most users that's because they want their slides to contain two or more different looks (backgrounds, colors, fonts, effects, etc.). For design purists, it is difficult to justify this as a reason—most professional PowerPoint template designers will only add a second Slide Master for small and subtle differences. Whatever your opinion may be, it's actually quite easy to add a new Slide Master as explained in the following steps:

Adding a new Slide Master

  1. Launch PowerPoint and open the presentation that needs a new Slide Master. Next, select the View | Master | Slide Master menu option. This opens the Slide Master View, as shown in Figure 2. Here, within the pane on the left, you'll find the default Slide Master (highlighted in red within Figure 2) along with associated layouts (highlighted in blue within Figure 2).
  2. Default Slide Master
    Figure 2: Default Slide Master
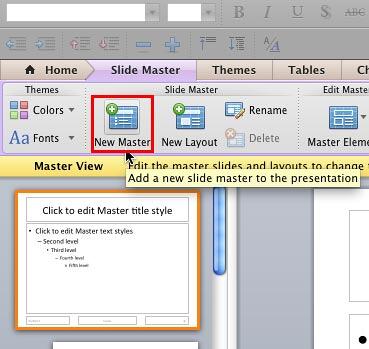
  3. To add a new Slide Master, click the New Master button within the Slide Master tab of the Ribbon, as shown highlighted in red within Figure 3.
  4. New Master button
    Figure 3: New Master button
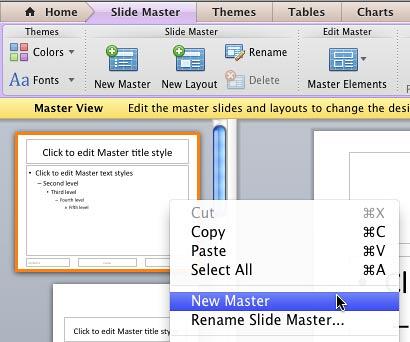
  5. Alternatively, right-click the existing Slide Master in the left pane, and choose the New Master option from the context menu that appears, as shown in Figure 4, below.
  6. New Master option within the context menu
    Figure 4: New Master option within the context menu
  7. Either of these options will add a new Slide Master, as shown highlighted in red within Figure 5.
  8. New Slide Master inserted
    Figure 5: New Slide Master inserted
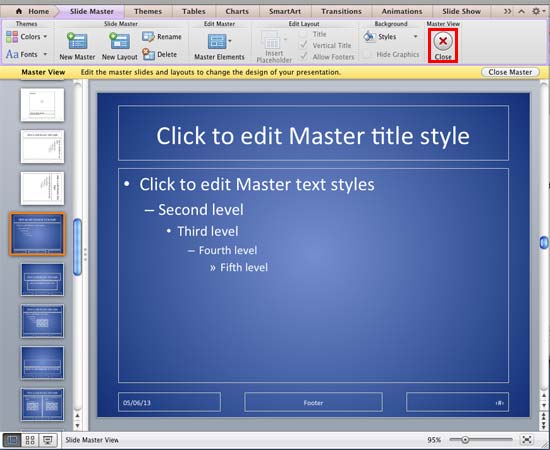
  9. Once you add a new Slide Master, you format it just like you make changes with any other Slide Master. You can choose a Background Style, add a custom background, add new Slide Layouts, etc. We changed the Background Style of our new Slide Master as you can see in Figure 6.
  10. New Slide Master formatted
    Figure 6: New Slide Master formatted

Adding a Slide Master applied with a Theme

You can also add a Slide Master from any of existing Themes within PowerPoint. This can be helpful if you want the new Slide Master to be based on a Theme that's not part of the current presentation. To learn how you can do so, follow these steps:
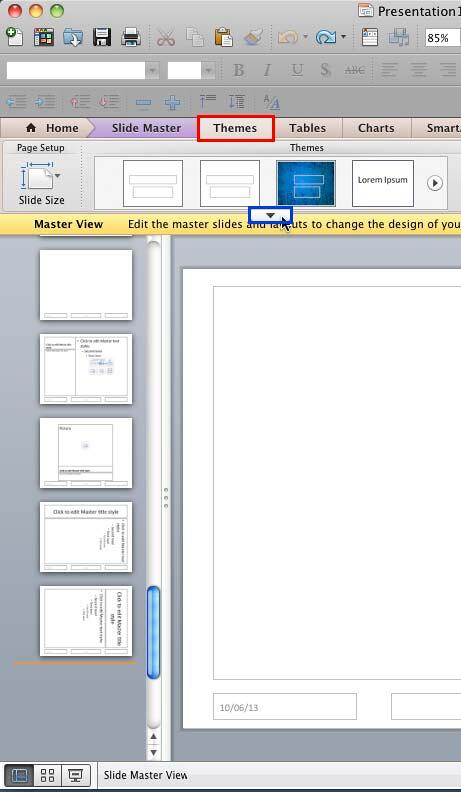
  1. Access the Slide Master view as explained in Step 1 in the preceding section. Thereafter, click at the end of your existing Slide Master (below the last Slide Layout thumbnail) to place an insertion cursor, as shown in Figure 7. Now select the Themes tab (highlighted in red within Figure 7) of the Ribbon and hover the cursor over the various Theme thumbnail previews to bring up a down-arrow (More button), as shown highlighted in blue within Figure 7—click it.
  2. Themes tab of the Ribbon selected
    Figure 7: Themes tab of the Ribbon selected
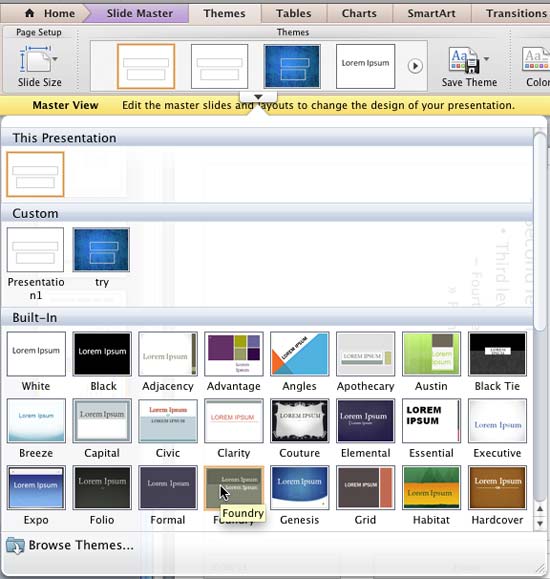
  3. This brings up the Themes drop-down gallery, as shown in Figure 8. Click on a Theme of your choice.
  4. Themes drop-down gallery
    Figure 8: Themes drop-down gallery
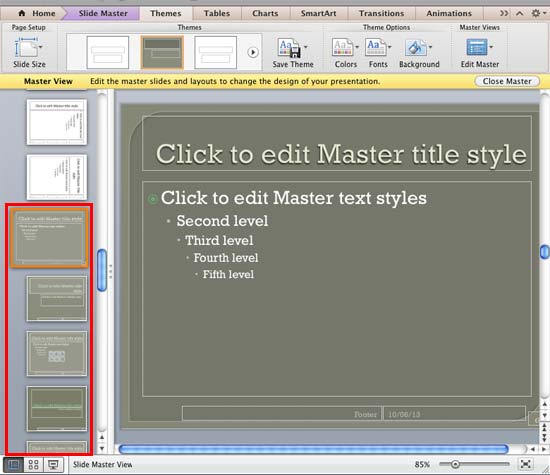
  5. This will add a new Slide Master with the selected Theme applied, as shown highlighted in red within Figure 9.
  6. New Slide Master gets added along with the selected Theme applied
    Figure 9: New Slide Master gets added along with the selected Theme applied
  7. Once you have added the new Slide Master following any of the ways explained above, you can make changes to the newly added Slide Master as required.

Renaming the Slide Master

To rename the Slide Master follow these steps:
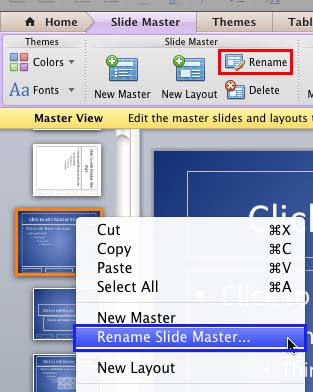
  1. Select the Slide Master and click the Rename button (highlighted in red within Figure 10 below). Alternatively, right-click the new Slide Master and choose Rename Slide Master option from the context menu, as shown highlighted in blue within Figure 10.
  2. Rename the new Slide Master
    Figure 10: Rename the new Slide Master
  3. Any of the options explained in the preceding step opens the Rename Slide Master window, as shown in Figure 11.
  4. Rename Slide Master Window
    Figure 11: Rename Slide Master Window
  5. Just type in the name you like and click the Rename button.

After adding and renaming the new Slide Master, click the Close button on the Slide Master tab of the Ribbon (highlighted in red within Figure 6 above). This will get you back to Normal View. Now, access the Home tab of the Ribbon and click the Layout button to bring up the Layout drop-down gallery you see in Figure 12, below. Notice that now there are two Slide Masters within the Layout drop-down gallery (names highlighted in red within Figure 12). Compare Figures 1 and 12.
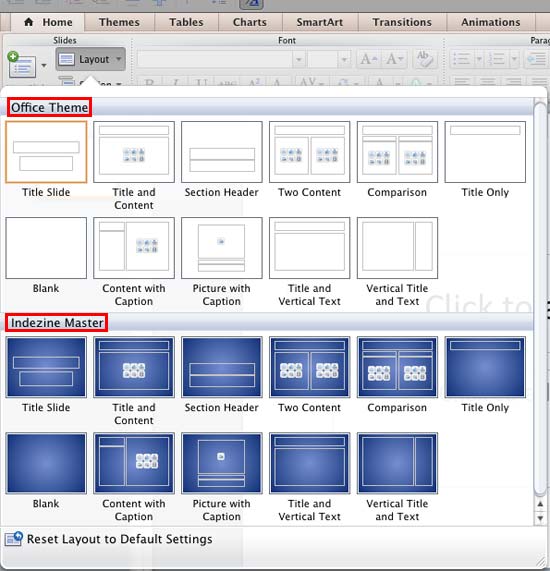
New Slide Master added shows within the Layout gallery
Figure 12: New Slide Master added shows within the Layout gallery

Save your presentation often.


See Also:

Slide Master and Slide Layouts: Add and Rename Slide Masters in PowerPoint (Index Page)

Add and Rename Slide Masters in PowerPoint 2016 for Windows
Add and Rename Slide Masters in PowerPoint 2016 for Mac
Add and Rename Slide Masters in PowerPoint 2013 for Windows
Add and Rename Slide Masters in PowerPoint 2010 for Windows

You May Also Like: Presentation Industry Standards: Conversation with Simon Morton | Food - B PowerPoint Templates


Popular Posts

Shapes
Shapes
Learn how you can create and manipulate shapes in PowerPoint -- knowledge of working with shapes is significant because they are the building blocks of creativity in PowerPoint.

Insert Picture from the Office ClipArt Collection in PowerPoint 2013
Learn how to insert picture using Office ClipArt in PowerPoint 2013.

Snow Effect in PowerPoint
Create a snow fall effect inside PowerPoint using animation techniques.

PowerPoint Transitions: Curtains
Explore the Curtains transition effect in PowerPoint.


Feature List 01 (Layout with Tabs)

The Feature List Layout comprises three sample PowerPoint presentations: one each to create a visual list for 4 features, 5 features, and 6 features. These work great when you have too much information to fit within one slide. This solution lets you use multiple slides, but the visual result is still that of one single slide!

Buy and Download Feature List 01 (Layout with Tabs) for $4.99+ (671 kb)


Microsoft and the Office logo are trademarks or registered trademarks of Microsoft Corporation in the United States and/or other countries.

Home | PowerPoint | Photoshop | PowerPoint Templates | PowerPoint Tutorials | Blog | Notes | Ezine | Media Kit | Feedback | Site Map | About Us | Contact Us

Link to Us | Privacy | Testimonials

PowerPoint Backgrounds | Christian PowerPoint Backgrounds | Business PowerPoint Presentation Templates

Plagiarism will be detected by Copyscape

©2000-2023, . All rights reserved.