Explore various Adjust Picture Options available in PowerPoint 2016 for Windows. These options allow you to remove backgrounds, make corrections and change color, add artistic effects, and apply compression.
Author: Geetesh Bajaj
Product/Version: PowerPoint 2016 for Windows
OS: Microsoft Windows 7 and higher
After a picture is inserted on your PowerPoint slide, you might want to make adjustments to the picture itself so that it looks distinctive and focused. You can change a picture's look by resizing, cropping, changing color values, adjusting saturation, or by applying artistic effects. In this tutorial, we'll explore the options available within PowerPoint 2016 for Windows to make these picture adjustments. Later, in subsequent tutorials of this series, you will learn more about the individual options we discuss in this tutorial.
When a picture is selected, the Picture Tools Format tab appears on the Ribbon as shown in Figure 1 (highlighted in red).

Figure 1: Picture Tools Format tab activated
Note: Not only can you make adjustments to pictures inserted on slides, but also to pictures used as fills for shapes. If a shape that has a picture fill is selected, the Ribbon area will show two contextual tabs: the Drawing Tools Format tab and the Picture Tools Format tab, as you can see in Figure 2.
Make sure that you select the Picture Tools Format tab (highlighted in red within Figure 2) which includes picture format options, and not the Drawing Tools Format tab which includes options to alter the container shape.

Figure 2: Two contextual tabs appear when a shape with a picture fill is selected
Within the Picture Tools Format tab, you can see the Adjust group (highlighted in blue within both Figures 1 and 2, above) which includes various options to make adjustments to the picture. Let's explore these options individually from left to right as shown in the Ribbon tab:
This feature figures out the boundaries of an object within the picture automatically, and allows you to keep some portion of the picture, and remove the rest. If you want to retain only some selected part of the picture, this is the best option to use. Note that this option doesn't work with texture fills and picture fills that are tiled. To learn how this option works, refer to our Remove Background from Pictures tutorial.
This option is used to adjust the sharpness, softness, brightness, and contrast values of the picture. To learn more about this option, refer to our Picture Corrections tutorial.
This option comes handy when you want to change the overall color feel of the picture, like a monochromatic tint. You can find more information about this option in our Changing Color of Pictures tutorial.
Here you can select various artistic effects from a Artistic Effects drop-down gallery. To learn more about this option, refer to our Artistic Effects for Pictures tutorial.
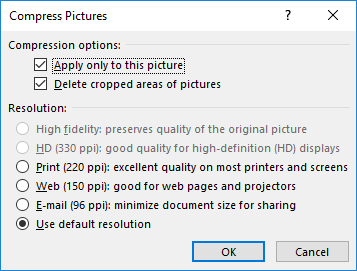
By default, PowerPoint embeds your inserted pictures into your presentation leaving the size and format largely unchanged. You can reduce the size of the inserted picture using the Compress option. Just select the picture, and click the Compress button within the Adjust group to summon the Compress Pictures dialog box that you can see in Figure 3.

Figure 3: Compress Pictures dialog box
Within the Compress Pictures dialog box, you can decide the quality of the inserted picture choosing between any of the four Target output options. Then, if you have cropped the picture, select the Delete cropped areas of picture check-box to remove the unused portions of the picture permanently. And select the Apply only to this picture check-box to apply the changes to only the selected picture. Once you are done, click the OK button. Learn more about compression in our Compress Pictures tutorial. Also, see our Set Document Resolution page.
This option enables you to change a picture on your slide with retaining all the effects or animations applied to the original picture. You don't need to delete the original picture and start all over again. Just change any existing picture into another with just a couple of clicks. Learn more in our Change Picture in PowerPoint 2016 tutorial.
This option resets the picture to its original state. however, this option will not do a full reset if you have already used the Compress Pictures option, explained earlier on this page. More in our Reset Pictures in PowerPoint 2016 tutorial.
Although this option is not within the Adjust group we'll explore the Crop option also. Instead of just one kind of crop, there are three crop variations which have been explained in the tutorials Crop Picture and Crop Pictures to Shape. Also refer to our Reposition Picture Fills with Crop tutorial to learn how you can adjust the picture fills using Crop option.
See Also:
Pictures Basics and Adjustments: Adjust Picture Options (Glossary Page)
Adjust Picture Options in PowerPoint 2013 for Windows
Adjust Picture Options in PowerPoint 2011 for Mac
Adjust Picture Options in PowerPoint 2010 for Windows
You May Also Like: Tango for Leaders: Conversation with Pablo Pugliese and Nancy Ancowitz | Myanmar (Burma) Flags and Maps PowerPoint Templates


Microsoft and the Office logo are trademarks or registered trademarks of Microsoft Corporation in the United States and/or other countries.