The Animation Pane allows you to perform many tasks such as adding animation to any slide object, changing the animation event, and setting the speed of the animation, as required. Most of the time, that may be all you need. However, at other times, you may want more minute control. You might want two animations to start at the same time but may want one of them to start just two seconds before the other. In situations like these, you'll need to use the Advanced Timeline option.
Follow these steps to make the Advanced Timeline visible or invisible in PowerPoint 2013 for Windows:
- Open your PowerPoint presentation which at least has one slide object animation. Now, access the Animations tab of the Ribbon, and click the Animation Pane button, as shown highlighted in red within Figure 1, below. Remember that this is a toggle button. So, if your Animation Pane is already visible, then clicking this button will make the pane disappear.
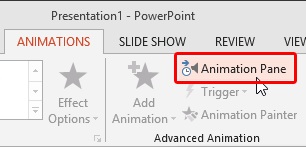
Figure 1: Animation Pane button - You should now see the Animation Pane, with any animations on the slide visible, as shown in Figure 2, below. If you see no animations listed, this means that none of the slide objects on your active slide are animated. Go ahead and add at least one animation.
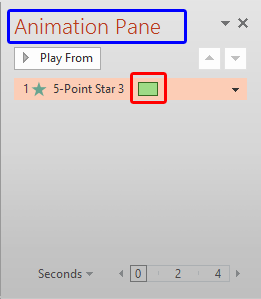
Figure 2: Animation Pane with animation list - Within the Animation Pane, the Advanced Timeline is visible displaying the Timeline of the selected animation, as shown highlighted in red within Figure 2, above. To ascertain whether this is indeed the Advanced Timeline, select any animation in the list, and click the down-arrow, as shown highlighted in red within Figure 3, below. Alternatively, just right-click on the animation. Either way you will reveal a drop-down menu as shown in Figure 3. Within the drop-down menu, do you see the Hide Advanced Timeline option, as shown highlighted in blue within Figure 3? In that case, you are already seeing the Advanced Timeline. You can go ahead and click the Hide Advanced Timeline option.
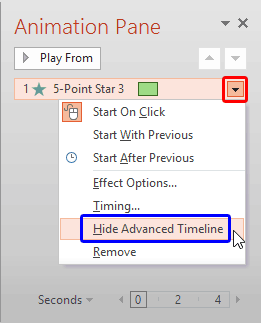
Figure 3: Hide Advanced Timeline option to be selected - Your Timeline will now no longer show the Advanced Timeline, as shown in Figure 4, below. Compare Figures 2 and 4. Whereas Figure 2 showed the Advanced Timeline, Figure 4 shows you the Basic Timeline.
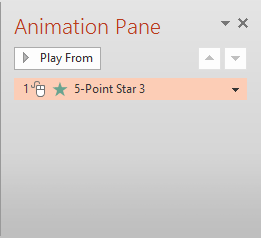
Figure 4: Basic Timeline - To quickly switch back to the Advanced Timeline first select any animation in the list, and click the downward arrow, as shown highlighted in red within Figure 5, below. Alternatively, just right-click on the animation. Either way you will reveal a drop-down menu, as shown in Figure 5, below. Within the drop-down menu, do you see the Show Advanced Timeline option, as shown highlighted in blue within Figure 5? In that case, you are not seeing the Advanced Timeline. You can go ahead and select the Show Advanced Timeline option now to go back to the Advanced Timeline.
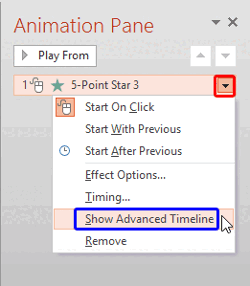
Figure 5: Show Advanced Timeline option to be selected - At this point in time, the Timeline is not too easy to edit since it is restricted to a very thin pane. Fortunately, you can click on the handle of the Animation Pane, highlighted in blue within Figure 2, as shown previously on this page, and drag it off to a new area on the screen that provides enough space for a longer Timeline.
- In Figure 6, below you can see that the Animation Pane is moved to the bottom of the Slide Area. This will provide a longer area to tweak the Timeline. Compare Figures 2 and 6 to see how the same Timeline now is placed in a less restrictive area. Also if you are working on an extended display system with multiple monitors, you can drag off the Timeline to a second display.
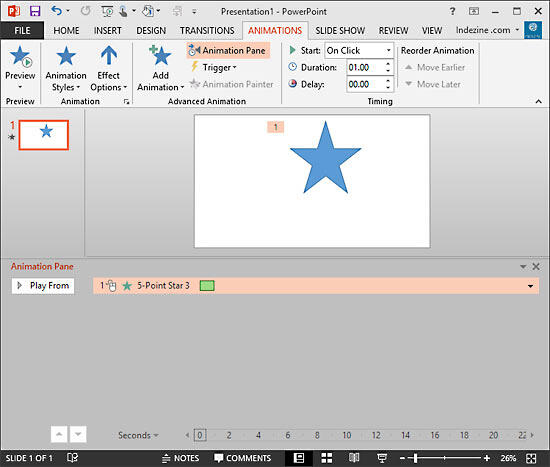
Figure 6: Animation Pane moved to the bottom of the slide
Dock and Undock the Animate Pane
Once you are done using the Timeline, you can drag the Animation Pane back so that it's docked to its default position in the same way as you dragged it away earlier.
- Save your presentation often.


