Introduction
AKVIS Pastel is an Adobe Photoshop-compatible plug-in that converts your pictures into pastel art. Once you apply the effect, you can adjust the effect parameters to control the output as desired. Additionally, the advanced brush tools help you to refine the result and you can also apply the pastel painting to any surface such as: sanded paper, MDF board, brick wall, etc. Add a signature, a title, or a greeting to personalize your artwork. The add-in provides the batch processing option which saves lot of time if working on multiple pictures.
AKVIS Pastel is from AKVIS, a company based in Russia that specializes in graphic programs. Apart from Pastel, AKVIS also creates other Photoshop plug-ins like OilPaint, AirBrush, Sketch, ArtWork, Refocus, Retoucher, Chameleon, MultiBrush, Enhancer, Decorator, Coloriage, etc.
You can download a free 10-days trial version of Pastel from the AKVIS site.
My contact at AKVIS for this review was Kat Kharina. Thank you, Kat.
Back
How To Use
Once the Pastel is installed, follow these steps or just read along to do a quick walkthrough of Pastel.
- Launch an image editor such as Adobe Photoshop (where you installed the Pastel plug-in) and open any picture.
- Choose the Filter | AKVIS | Pastel option, as shown in Figure 1, below.

Figure 1: Pastel plug-in within the Filter menu - Doing so opens the image within the AKVIS Pastel interface, as you can see in Figure 2, below.

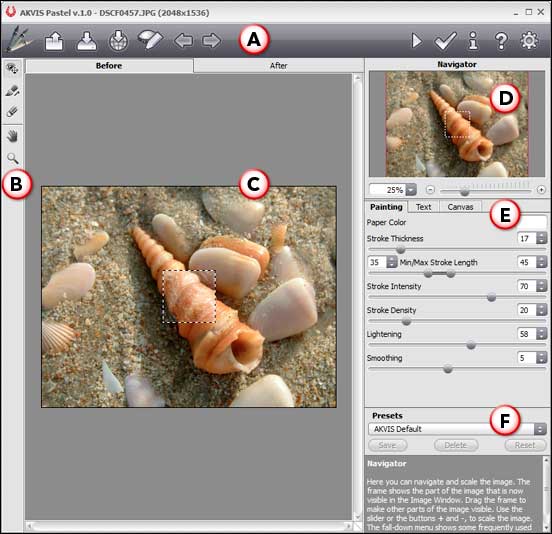
Figure 2: AKVIS Pastel interface - The AKVIS Pastel interface is explained below. Each area corresponds to an area marked in Figure 2 above:
A. Buttons
- The section of interface is the Control Panel with buttons on both the left and right sides representing the options to undo/redo, show/hide strokes, import and export presets, to start processing the image, and to apply the results to the image. There are also buttons to launch the information dialog, help files, open the AKVIS Pastel web page, and the Preferences dialog box.
B. Tools
- Here you can access the following selection tools:
Preview Window
- Preview Window tool enables you to show or hide the preview window. A square frame outlined with a dotted line (marching ants).
Stroke Direction
- Stroke Direction is for drawing guiding lines. Note that this tool only works in Home Deluxe or Business licenses of Pastel. An explanation of these licenses can be found on the AKVIS site.
Eraser
- Eraser is used to erase the guiding lines, either partially or completely.
Hand
- Hand to pan the picture within the preview section if it’s zoomed.
Zoom
- Zoom is used to zoom-in the picture.
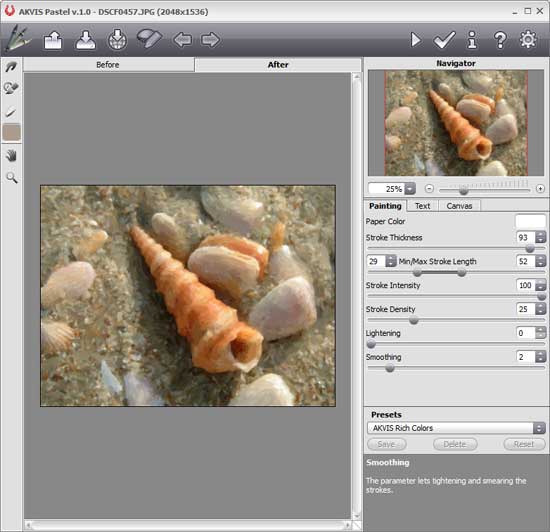
- There are some post-processing tools also which appears within the After tab (only for the Deluxe/Business version). These can be seen in Figure 5, later on this page:
Smudge
- Smudge is for mixing colors in the picture and removing irregularities.
History Brush
- History Brush enables you fade the pastel effect and restore the image to its original state.
Pastel Chalk
- Pastel Chalk lets you draw soft textured strokes. The tool imitates a pastel stick and helps to strengthen the hand-made effect.
Color
- The color square under displays the color of the chalk. Click on the button to activate the Eyedropper tool that allows you to pick a color from the image.
C. Preview
- Preview has two tabs: Before and After, to show the previews of both the original and changed images.
D. Navigator
- On the top right, you'll find the Navigator. This also lets you chose the area of the image to be shown in the Preview pane.
E. Settings Panel
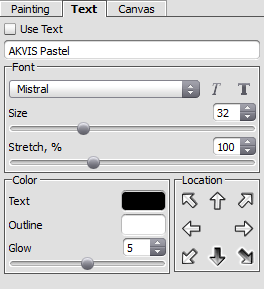
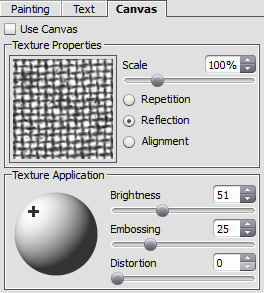
- Settings Panel has three tabs of settings: Painting, Text, and Canvas:
- Within the Painting tab you can adjust the settings for photo-to-oil paint conversion (refer to Figure 2, above).
- Text tab (see Figure 3, below) allows you to add an inscription to your oil painting.

Figure 3: Text tab within the Settings Panel - In the Canvas tab (see Figure 4, below) you can adjust the settings for the canvas, to which the resulting image is applied.

Figure 4: Canvas tab within the Settings Panel F. Presets
- The Presets area enables you to save the current settings as a preset to use them in the future. There are 14 ready-to-use presets.
- Play with the parameters, or choose from any of the available presets. When you get the result you want, apply the changes to the preview by clicking the Run button (located within the Control Panel on the top) that you can see below.

- This applies the effect and creates a preview of the changed image in the After tab, as shown in Figure 5, below.

Figure 5: Preview the changes - Once you’re happy with the preview, apply the result to the image by clicking the Apply button located within the Control Panel on the top (shown below) to return to the image editor.

Here are some Before and After samples created using AKVIS Pastel:


Back
Specifications
| Photoshop Versions: |
Photoshop 6 and higher |
| Platforms: |
Windows, Mac |
| Site: |
AKVIS |
| Price: |
USD $49 and above |
| Trial Version: |
Available
|
Back


