Introduction
AKVIS Refocus is an Adobe Photoshop-compatible plug-in that improves sharpness of out-of-focus images. You can also use AKVIS Refocus on images which are sharp enough, to create special effects and draw attention to certain details, so as to create selective focus.
Refocus is from AKVIS, a company based in Russia that specializes in graphic programs. Apart from Refocus, AKVIS also creates other Photoshop-compatible plug-ins like Retoucher, Chameleon, MultiBrush, Sketch, Enhancer, Decorator, Coloriage, MakeUp, etc.
You can download a free 10-day trial version of Refocus from the AKVIS site.
My contact at AKVIS for this review was Kat Kharina. Thank you, Kat.
Back
How To Use
Follow these steps to use AKVIS Refocus:
- Open an image you want to use inside Adobe Photoshop or a similar program.
- Choose the Filter | AKVIS | Refocus option, as shown in Figure 1, below.

Figure 1: AKVIS Refocus plug-in within the Filter menu - Doing so opens the selected image within the Refocus interface, as you can see in Figure 2, below.

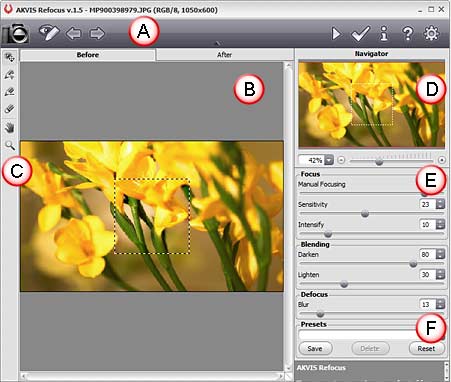
Figure 2: AKVIS Refocus interface - The AKVIS Refocus interface is explained below. Each area corresponds to the area marked in Figure 2, above:
A. Control Panel
- The upper part of interface is the Control Panel with buttons located on both the left and right sides. Options are available to undo/redo, to turn on/off the drawn strokes, to start processing the image, and to apply the result to the image. There are also buttons to launch the information dialog, help files, open the AKVIS Refocus home page, and the Preferences dialog box.
B. Preview
- Preview has two tabs: Before and After, which shows previews of both the original and changed images.
C. Tools
- Here you get three sets of tools which are
i. Preview Window Tool
- Preview Window Tool used to show/hide and move the Preview Window (a dotted frame) that displays the instant results of effects applied, within the dotted frame area (refer to Figure 2, above).
ii. Pencil Tools
- Pencil Tools are used to outline areas for processing. Use the pencil (with plus sign) to outline the areas that should be re-focused with the chosen settings (Focus Area). And use the pencil (with minus sign) to outline the parts that should not be re-focused (Background Area).
iii. Eraser Tool
- Eraser Tool is used to erase strokes.
- There are some other tools such as Hand and Zoom. These let you alter the viewing area of the open image.
D. Navigator
- On the top right, you'll find the Navigator. This also lets you chose the area of the image to be shown in the Preview pane.
E. Settings Panel
- Within this panel you can find all the parameters to adjust the settings of focusing.
F. Presets
- Presets allows you to save altered parameters which can be used in the future.
- Play with the parameters, and when you'll get the result you want, apply the changes within the plug-in by pressing the Run button.

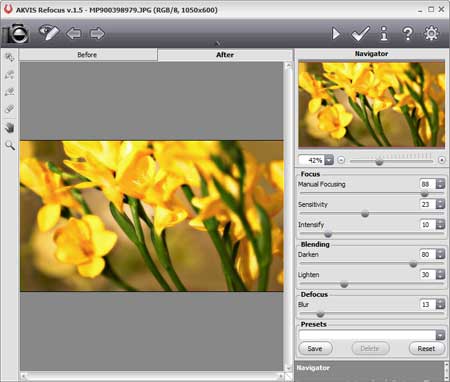
- This applies the effect and creates a preview of the changed image in the After tab, as shown in Figure 3, below.

Figure 3: Preview the changes - Once you’re done, apply the result to the image by pressing the Apply button to return to the image editor.

Here are some Before and After samples:


Back
Specifications
| Photoshop Versions: |
Photoshop 6 and higher |
| Platforms: |
Windows, Mac |
| Site: |
AKVIS |
| Price: |
USD $39 and above |
| Trial Version: |
Available for 10 days |
Back


