Learn to align and distribute pictures in PowerPoint 2010 for Windows. This positioning of slide objects makes your content look professionally designed.
Author: Geetesh Bajaj
Product/Version: PowerPoint 2010 for Windows
OS: Microsoft Windows XP and higher
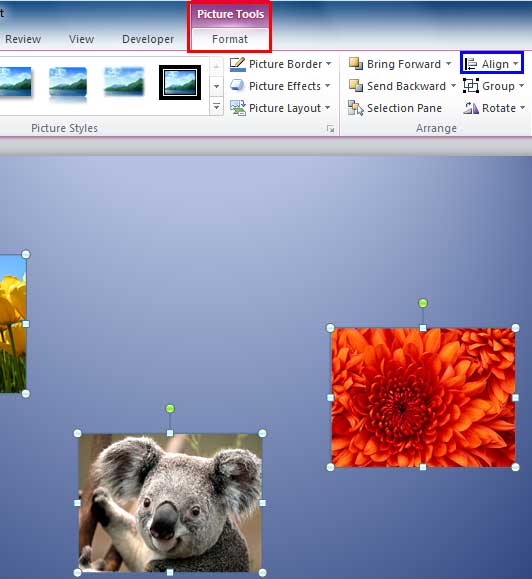
Whichever slide objects you place on your PowerPoint slide, their position and alignment matters a lot, be it shapes or even the many inserted pictures. In the example shown in Figure 1, you can see three pictures just randomly placed on the slide. In some cases, such a haphazard arrangement may work, but most of the time you will have to align objects in a proper way on your slide. Even before you align the pictures, you should explore whether all the pictures are the same size or not? We have already explained how you can resize pictures in our Resize, Rotate, and Flip Pictures tutorial.

Figure 1: Unaligned and undistributed pictures on the slide
We first resized all pictures so that they have the same height, as shown in Figure 2. We choose to give them the same height since we plan on aligning these pictures horizontally. If you plan on aligning pictures vertically, you will similarly want to make sure that they have the same width.

Figure 2: Unaligned and undistributed pictures resized to attain same height
Thereafter, all pictures were aligned to the middle, and distributed horizontally, as shown in Figure 3, below. Finally we inserted a shape (a rectangle), and sent it back so that it was placed behind the pictures.

Figure 3: Pictures aligned to the middle of the slide, and thereafter horizontally distributed
As you can see, the slide in Figure 3 looks more organized and interesting than the slide you saw in Figure 1. PowerPoint includes align and distribute options for all slide objects. In this tutorial, let's learn how to align and distribute pictures:


Sometimes, you may want to align just one picture to the exact center of the slide. Fortunately, that is as easy to achieve as well:

If you have several pictures which you want to align to the center of the slide, and also retain their spacing, then first group them. Then select the group and then follow the same procedure explained in the Align Pictures to the Center of the Slide section. Note that grouping of pictures makes them one slide object rather than multiple slide objects. To learn more, explore our Group, Ungroup, and Regroup Shapes tutorial. Do note that the linked tutorial uses shapes as examples for grouping, but the same techniques work for all slide objects including pictures.
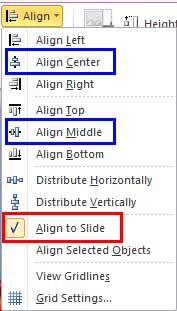
There are two Distribute options available for pictures as well as all other slide objects in PowerPoint which are used to distribute the selected picture so that there is equal spacing between them. These options are Distribute Horizontally and Distribute Vertically, as shown highlighted in red within Figure 7.

Figure 7: Distribute options within the Align drop-down gallery
This option is used on the pictures placed side by side. This option distributes the selected pictures equally on a horizontal plane so that the space between all of them is equal.
This option is used on the pictures that are placed vertically, above and below each other. This option distributes the selected pictures equally on a vertical plane so that the space between all of them is equal.
To explore more about how the Distribute options work, refer to our Distribute Shapes tutorial. This tutorial explains how to align shapes, but the same techniques work with other slide objects including pictures.
See Also:
Pictures - Position and Order: Align and Distribute Pictures (Glossary Page)
Align and Distribute Pictures in PowerPoint 2016 for Windows
Align and Distribute Pictures in PowerPoint 2013 for Windows
Align and Distribute Pictures in PowerPoint 2011 for Mac
You May Also Like: How to Pitch and Win People Round | Transnistria Flags and Maps PowerPoint Templates


Microsoft and the Office logo are trademarks or registered trademarks of Microsoft Corporation in the United States and/or other countries.