Depth in PowerPoint 2013 for Windows plays a very important role when you are working with 3-D objects. Depth is the distance from the top or surface of something to its bottom. For example, even though you can rotate any shape that has a Depth of zero, you really cannot see any Depth within a flat object. Thus although you can first rotate your object, you must thereafter add Depth.
Look at Figure 1 below, where you can see the original shape with a Bevel effect on the left. The shape thereafter has been applied some 3-D Rotation without any Depth. The final shape on the right has Depth added, and that's what we will explore within this tutorial.

Figure 1: Adding Rotation and Depth to a 3-D object
If you are familiar with 3-D programs, you will realize that depth in PowerPoint is similar to extrusion. To use an analogy, a thick book will show depth when placed on the shelf, a single sheet of paper on the other hand has almost no depth. You can add depth to your shapes using details provided in this tutorial.
Follow these steps to apply Depth to a shape:
- Select the shape and
apply 3-D Rotation effect to selected shape. Figure 2, below shows the shape with 3-D rotation effect applied.

Figure 2: Shape rotated without applying any depth gives a flat effect - As you can see in Figure 2 above, the shape rotated without applying any depth gives a flat effect. Now you can add depth to this rotated object.
- Make sure that the shape is still selected so that the Ribbon area shows the Drawing Tools Format tab, as shown highlighted in red within Figure 2. Activate this Ribbon tab by clicking on it. Within the Drawing Tools Format tab, click the Shape Effects button (highlighted in blue within Figure 2).
Note: The
Drawing Tools Format tab is a
contextual tab. These tabs are special tabs in the
Ribbon that are not visible all the time. They only make an appearance when you are working with a particular slide object which can be edited using special options.
- This brings up the Shape Effects drop-down gallery as you can see in Figure 3. Choose the Preset option, and then select 3-D Options from the sub-gallery, as shown highlighted in red within Figure 3.

Figure 3: 3-D Options within the Preset sub-gallery - This brings up the Format Shape Task Pane, with the Effects tab selected. Below 3-D Format section, you'll find the Depth option, as shown highlighted in red within Figure 4.

Figure 4: Depth option within Format Shape Task Pane - Depth options enable you to add or change the Depth Size and the Depth Color of the shape. Both the options are explained below:
Depth Size
- As you can see in Figure 4 above, Depth size is 0 pt. Change it to 50 pt. to see a prominent depth added to the shape. You can enter any values based on your requirement.
Depth Color
- This is optional, if you want you can add color to the depth. To do that, click the down-arrow next to color icon to access a fly out menu (as shown in Figure 5). Here you can choose any color for the depth. Note that this changes the color of the 3D additions of the selected shape rather than the shape itself.

Figure 5: Size and Color options for Depth Theme Colors
- Here you can select any of the colors which are from the active Theme of the presentation. You can also select any of the 5 tints or shades for any Theme color. Learn more about Themes here.
Standard Colors
- You can choose any of the ten standard colors available. These ten standard colors are just choices of colors that PowerPoint believes to be widely used. You don't have to limit yourself to either the Theme colors or Standard colors, as we'll show you in the next options. Although it's a good design idea to use theme colors as far as possible.
Recent Colors
- Here you will find the colors most recently used. If you have just launched PowerPoint and created a new presentation, then the Recent Colors option may be entirely absent since you haven't selected any color recently!
Automatic
- This is the default depth color.
More Colors
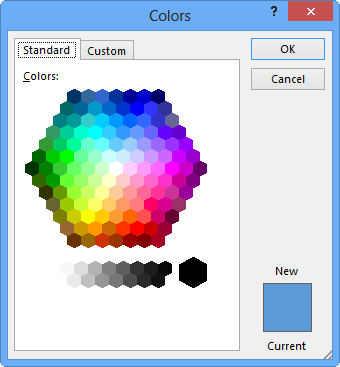
- Provides more color choices, selecting this option summons the Colors dialog box with two tabs: Standard and Custom, first select the Standard tab (see Figure 6).

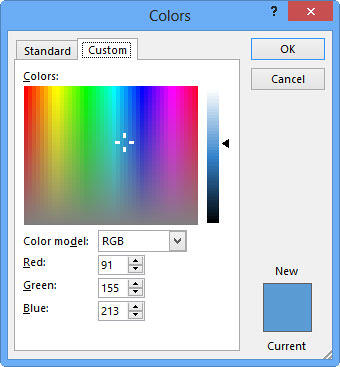
Figure 6: Standard tab of the Colors dialog box - This tab offers 127 colors in a honeycomb style palette, in addition to 14 gray shades, black and white. If you want more color choices, then select the Custom tab of the same dialog box, as shown in Figure 7.

Figure 7: Custom tab of the Colors dialog box - In this tab, you can choose any color from the spectrum and later adjust the selected color's luminosity with the slider on the right. You can even enter specific values of RGB and HSL to create a specific color. All these combinations provide 16 million color choices.
- Once you have chosen the color, click OK to exit this dialog box.
- Play around with Size and Color options. See a Live Preview while tweaking the parameters. In Figure 8, you can see that depth is added to the earlier rotated shape.

Figure 8: Depth applied to the selected Rectangle shape - Remember to save your presentation often.


