Indezine Logo


Automatic Text Hyperlinks in PowerPoint 2013 for Windows

Learn how you can control automatic text hyperlinking in PowerPoint 2013 for Windows. We also explore how you can change this setting back to the defaults.


Author:

Product/Version: PowerPoint 2013 for Windows

OS: Microsoft Windows 7 and higher


Learn PowerPoint

Five Best PowerPoint Add-ins for Everyday Use


Type or paste a web URL in your PowerPoint slide, and then press either the Enter or the Spacebar key. Presto, your web URL is now a live hyperlink, as shown in Figure 1, below.

Quick Link
Figure 1: Web URLs become hyperlinks

Now this automatic conversion to hyperlinks can be a mixed blessing. In some ways, it can be beneficial because most of the time, this automatic conversion may just be what you need! In other scenarios, you may get offended by PowerPoint's hand-holding. Luckily, there are ways in which you can control this automatic conversion. You can turn off this automatic hyperlinking for a single link, and you can also toggle on and off states for this conversion altogether!

First, let's explore the easy way. When you press Enter or Spacebar, your URL becomes a live hyperlink. Additionally, you will see an AutoCorrect Options tag, also known as a Smart tag, as shown in Figure 2, below. Clicking on the tag will bring up a small menu.
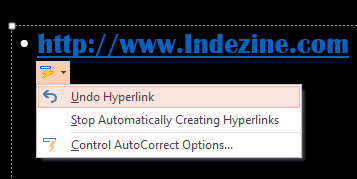
Smart tag
Figure 2: Smart tag

PowerPoint Keyboard Shortcuts

PowerPoint Keyboard Shortcuts

Do you want more keyboard shortcuts?

Explore our PowerPoint Keyboard Shortcuts and Sequences Ebook that is updated for all PowerPoint versions.

Options in this menu are explained below:

Undo Hyperlink

Undo Hyperlink lets you undo the action of creating an automatic hyperlink. This is the same as pressing the Ctrl + Z shortcut key, or even the Undo button in the Home tab of the Ribbon.

Stop Automatically Creating Hyperlinks

Stop Automatically Creating Hyperlinks does just that. It will no longer create automatic hyperlinks. To turn on automatic hyperlinking again, you will have to change an option that we will discuss later in this tutorial.

Control AutoCorrect Options

Control AutoCorrect Options opens up the AutoCorrect dialog box, as shown in Figure 3, below. Here you can deselect the check-box that says Internet and network paths with hyperlinks, as shown highlighted in red within Figure 3. Click the OK button when done.
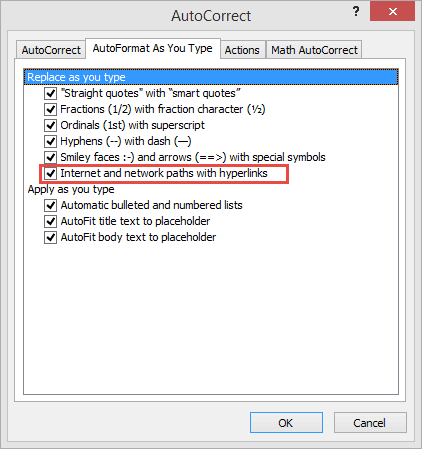
AutoCorrect dialog
Figure 3: AutoCorrect dialog

As you can see, you turn off the automatic hyperlink feature by using the second and third options in the preceding list!

Restoring Automatic Options

So what if you accidentally turn this option off? How do you turn it back? Here’s how:
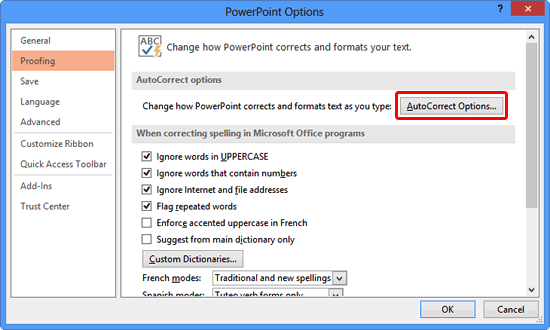
  1. Click the File tab, and from the resultant menu choose Options. Doing so opens the PowerPoint Options dialog box. Make sure you choose Proofing from the sidebar of this dialog box, as shown in Figure 4, below.
  2. Proofing panel selected within PowerPoint Options dialog box
    Figure 4: Proofing options
  3. Now, click the AutoCorrect Options button, as shown highlighted in red within Figure 4, above. Doing so opens the AutoCorrect dialog box. Select the AutoFormat As You Type tab, as shown in Figure 3, previously on this page.
  4. Make sure that the Internet and network paths with hyperlinks check-box is checked. Click the OK button. Now the automatic hyperlinking will happen again as usual!

15 02 06 - Hyperlinking: Automatic Text Hyperlinks in PowerPoint (Glossary Page)

You May Also Like: How to Make Your Presentation Fly | 10 Tips for Improving Your Public Speaking Skills


Popular Posts

Restoring Earlier Versions of Presentations in PowerPoint 2010 for Windows
Learn how to restore earlier versions of your current presentation in PowerPoint 2010.

What is Animation in PowerPoint?
Learn what animations is and how to effectively plan animation for PowerPoint.

Apply Bevel Effects to Shapes in PowerPoint 2016 for Windows
Learn how to apply bevel effects to shapes in PowerPoint 2016 for Windows.

Creating Curved Shapes in PowerPoint 2010 for Windows
Learn how to create curved shapes in PowerPoint 2010.s


Handmade Slides: Pushpins for PowerPoint

These “pushpin” graphics are already placed in PowerPoint slides. Just copy them and paste within your slides to create a look that makes a picture, shape, or anything else appear as if it has been pushed onto a surface, board, or wall with a pin! These ready-made pushpins are already within PowerPoint slides, and have been provided in five colors. Just copy them and paste them on your slides.

Download these Pushpins for just $19.99


Microsoft and the Office logo are trademarks or registered trademarks of Microsoft Corporation in the United States and/or other countries.

Home | PowerPoint | Photoshop | PowerPoint Templates | PowerPoint Tutorials | Blog | Notes | Ezine | Media Kit | Feedback | Site Map | About Us | Contact Us

Link to Us | Privacy | Testimonials

PowerPoint Backgrounds | Christian PowerPoint Backgrounds | Business PowerPoint Presentation Templates

Plagiarism will be detected by Copyscape

©2000-2023, . All rights reserved.