Indezine Logo


Info Tab of Backstage View in PowerPoint 365 for Windows

Learn about the various options available in the Info tab of Backstage view in PowerPoint 365 for Windows. This tab has many options, including those for protection, inspection, and management of PowerPoint presentations.


Author:

Product/Version: PowerPoint 365 for Windows

OS: Microsoft Windows 10 and higher


Learn PowerPoint

Learn how to pause slides, sounds, and movies – and resume!


In PowerPoint 365 for Windows, all information that you need about your currently active presentation is available in a single easily accessible location. This location is the Info tab of Backstage View. Using the options available within this tab, you can access information about permissions set for the active presentation, prepare your content for sharing, and also possibly recover older versions of unsaved files. In addition, the Info tab also provides access to many more properties that we will discuss on this page.

To access the Info tab, click the File tab of the Ribbon, as shown highlighted in red within Figure 1.

File tab in PowerPoint 365
Figure 1: File tab in PowerPoint 365

Tip: When you click the File tab, you essentially summon PowerPoint 365's Backstage View.

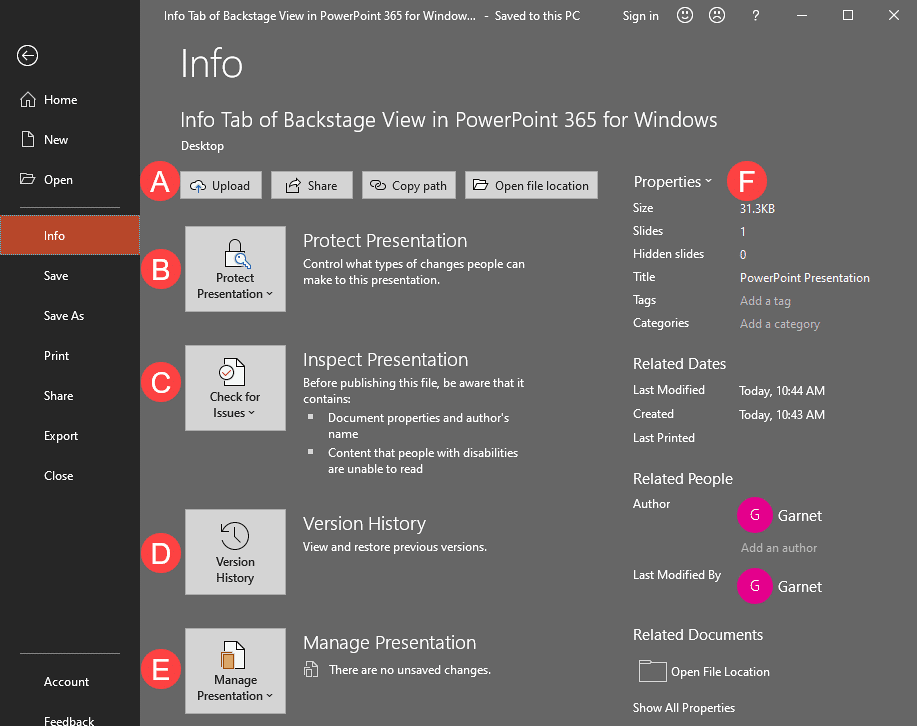
This brings up the Info tab of Backstage View in PowerPoint 365 for Windows, as shown in Figure 2.
Info tab of Backstage View in PowerPoint 365 for Windows
Figure 2: Info tab of Backstage View in PowerPoint 365 for Windows

All the options within the Info tab of Backstage View are explained below, as marked in Figure 2 above:

A. File Options

The four buttons here provide quick access to some useful options:
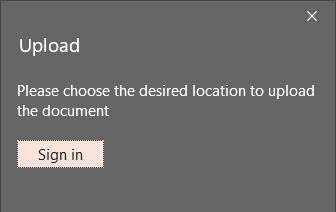
  1. Upload: This option is only available for local files. If you see no Upload button, you may have opened a file from your OneDrive account. For local files, clicking this button brings up the Upload dialog box, as shown in Figure 3, below.
  2. Upload dialog box
    Figure 3: Upload dialog box
  3. If you can see the Sign in button, as shown in Figure 3, it means that you haven't logged into your OneDrive account.
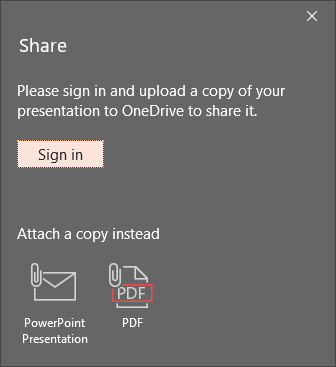
  4. Share: Clicking this button brings up the Share dialog box, as shown in Figure 4, below. Here again, you see the Sign in button.
  5. Share dialog box
    Figure 4: Share dialog box
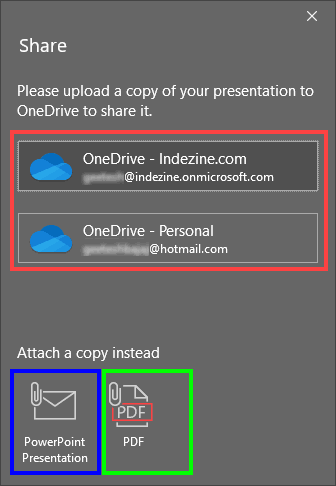
  6. Once we sign in to OneDrive (or multiple OneDrive accounts), you will see a slightly different Share dialog box, as shown in Figure 5, below.
  7. Share Task Pane with access to OneDrive
    Figure 5: Share dialog box with access to OneDrive
  8. You can upload your file to your OneDrive account to share it with others, highlighted in red within Figure 5, above. You can also attach a copy to an email as a PowerPoint Presentation (highlighted in blue), or even as a PDF (highlighted in green).
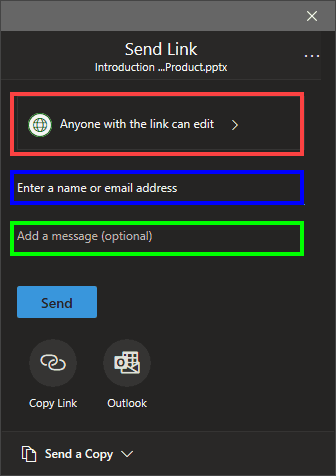
  9. However, what if your presentation has been opened from OneDrive? In that case, you no longer need the upload options, and PowerPoint shows you a different Share dialog box, as can be seen in Figure 6, below.
  10. Upload dialog box for files opened from OneDrive
    Figure 6: Upload dialog box for files opened from OneDrive
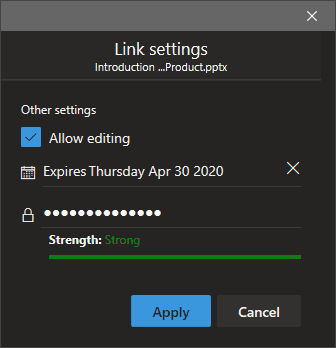
  11. You can first choose permissions by clicking on the Link Settings button, highlighted in red within Figure 6, above. Doing so shows other link options, as can be seen in Figure 7, below. You can prevent editing, expire your file on a particular date, and also set a password. These settings are optional.
  12. Link settings
    Figure 7: Link settings
  13. Copy path: Copies the path of the presentation file to the clipboard. This could be the local path or the path to the OneDrive location where your file is located or shared.
  14. Open file location: This button opens the local folder where the presentation is saved. For presentations on OneDrive, the local OneDrive folder is opened.

B. Protect Presentation

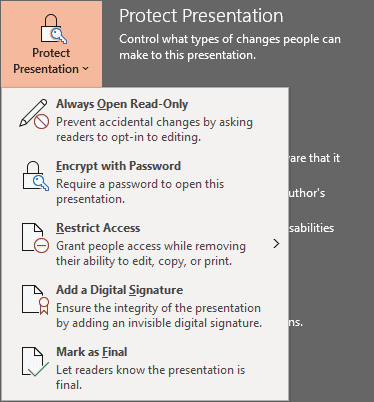
Brings up a flyout menu that provides several options to protect your presentation, as shown in Figure 8. Essentially, you can control the types of changes users can make to this presentation.
Protect Presentation option
Figure 8: Protect Presentation option

The links below provide detailed information about the Protect Presentation features:

  1. Always Open Read-Only: Opens your presentation as a read-only file as the default, so that accidental changes are prevented.
  2. Encrypt with Password
  3. Remove and Change Passwords
  4. Restrict Access: When clicked, it brings up a flyout menu, as shown in Figure 9, below. This flyout menu contains a single option that enables you to connect to Information Rights Management (IRM). Doing so lets users access the presentation with restrictive privileges to edit, copy, or print. WRM is a larger topic and is best addressed by your sysadmin or help desk staff.
  5. Restrict Access flyout menu
    Figure 9: Restrict Access flyout menu
  6. Add a Digital Signature
  7. Mark as Final
  8. Remove Mark as Final

Media Options

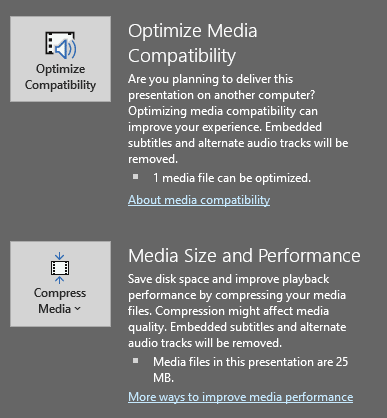
If you have some media files (audio or video) contained within your presentation, then you will see additional options within the Info tab called Optimize Compatibility and Compress Media, as shown in Figure 10, below. The Compress Media option lets you optimize any media files so that they take less space. More about this option is explained in our Video Compression Options in PowerPoint.
Media Options
Figure 10: Media Options

C. Inspect Presentation

If you are planning to share your presentation with others, you should inspect your presentation for confidential information, validate its accessibility, and check for compatibility with previous versions. You can also do a spell check, and examine the presentation for hidden data and personal information stored in comments, notes, or document properties. All these tasks can be performed within this area. Figure 11, below shows options within the Check for Issues flyout menu.
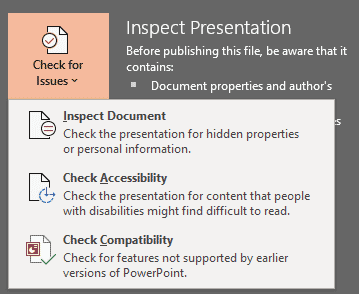
Inspect Presentation option
Figure 11: Inspect Presentation option

These links below provide detailed information about the options:

  1. Inspect Document
  2. Check Accessibility
  3. Check Compatibility

D. Version History

If you are not signed into your Microsoft account and open a local file, and not something that is from a OneDrive location, then clicking the Version History button will bring up the Turn on Version History? dialog box, as shown in Figure 12, below.
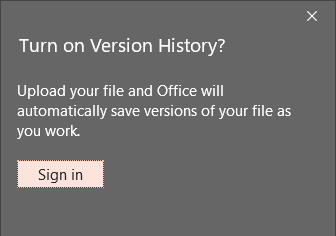
Turn on Version History? dialog box
Figure 12: Turn on Version History? dialog box

You are provided with an option to sign in to your Microsoft account and load up your connected OneDrive accounts.

However, if you are signed into your Microsoft account, you will see a variation of the same dialog box, as can be seen in Figure 13, below. You will see your OneDrive locations here and can choose where you want to upload your file.
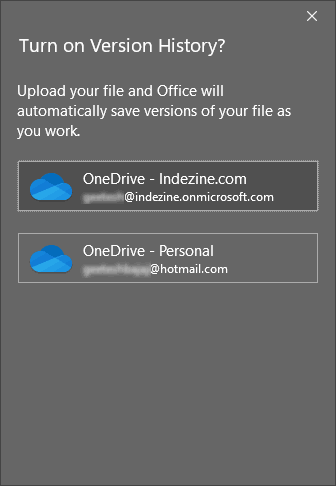
Version History dialog box
Figure 13: Version History dialog box

Once your file is uploaded to a OneDrive location, and you click the Version History button, you will see the Version History Task Pane that you can see highlighted in red within Figure 14, below.
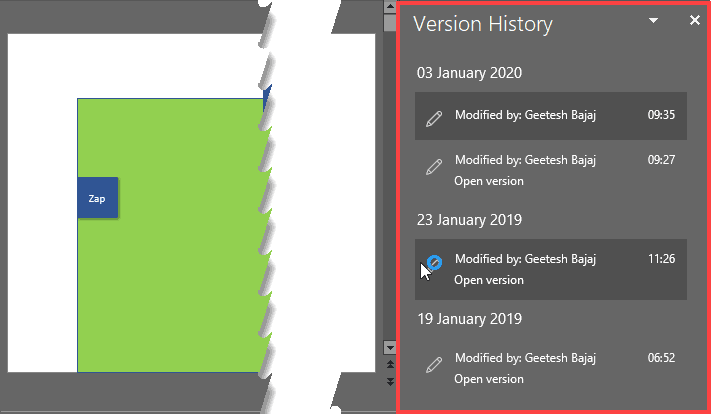
Version History Task Pane
Figure 14: Version History Task Pane

You'll see the history of any versions available to restore. You can click on any of the Open version links to bring up an older version of the opened file.

E. Manage Presentation

In this section (see Figure 15), you are provided with options to recover your unsaved presentations. This can be so helpful if you inadvertently closed your file without saving it, or if your computer or application crashed.
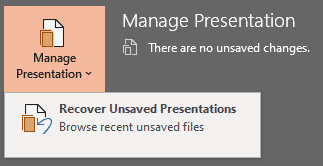
Manage Presentation option
Figure 15: Manage Presentation option

Learn more in our Recovering Presentations Manually page.

F. Properties

Options within this area allow you to create and modify many of the presentation’s properties. The links below provide detailed information:

  1. Properties of a Presentation
  2. Advanced Presentation Properties

See Also:

01 08 04 - File Types, File Menu, and Backstage View: Info Tab of Backstage View in PowerPoint (Glossary Page)

Info Tab of Backstage View in PowerPoint 365 for Mac
Info Tab of Backstage View in PowerPoint 2019 for Windows
Info Tab of Backstage View in PowerPoint 2016 for Windows
Info Tab of Backstage View in PowerPoint 2013 for Windows
Info Tab of Backstage View in PowerPoint 2010 for Windows
Info Tab of Backstage View in PowerPoint for the Web

You May Also Like: Four Actionable Ways to Ramp up Your Confidence | Equatorial Guinea Flags and Maps PowerPoint Templates


Popular Posts

Change the Unit of Measurement in Windows 10
Learn how to change the unit of measurement from US to Metric, and vice versa in Windows 10.

PowerPoint Tutorials, Articles and Reviews
Tutorials, reviews, articles and templates for Microsoft PowerPoint and other presentation software.

PowerPoint Templates
Find over 6000 PowerPoint templates in thousands of categories and all colors—from a trusted PowerPoint template resource for 20 years.

Create Animated GIFs from PowerPoint Slides
Explore ways to create animated GIFs from PowerPoint slides.


Polygon Center Circles for PowerPoint

These special circles have polygon centers: the centers are made of triangles, squares, pentagons, and hexagons! And based on the sides of the polygon, the rest of the circle has that many segments.

Download and use these Polygon Center Circles in your slides for just $4.99


Microsoft and the Office logo are trademarks or registered trademarks of Microsoft Corporation in the United States and/or other countries.

Home | PowerPoint | Photoshop | PowerPoint Templates | PowerPoint Tutorials | Blog | Notes | Ezine | Media Kit | Feedback | Site Map | About Us | Contact Us

Link to Us | Privacy | Testimonials

PowerPoint Backgrounds | Christian PowerPoint Backgrounds | Business PowerPoint Presentation Templates

Plagiarism will be detected by Copyscape

©2000-2023, . All rights reserved.