Indezine Logo


Change a Diagonal Line to a Horizontal or Vertical Line in PowerPoint 365 for Windows

Learn how to change a diagonal line to a horizontal or vertical line in PowerPoint 365 for Windows. You'll have to change either the height or width value to zero.


Author:

Product/Version: PowerPoint 365 for Windows

OS: Microsoft Windows 10 and higher


Learn PowerPoint

Learn how to export all slides to single-slide PowerPoint presentations.


In PowerPoint, you rotate shapes using the white rotation handle that appears when you select a shape, as shown highlighted in red within Figure 1, below. However, have you ever noticed that the open line shape in PowerPoint doesn't show a white rotation handle? Look at Figure 1, where you can see a diagonal, straight line on the right and a rectangle shape on the left. Both shapes are selected. Yet, notice that the rectangle shape includes a white rotation handle whereas there is no such handle on the Line shape.

An open line shape doesn't have a rotation handle
Figure 1: Open line shape without a rotation handle

Now, if you want to rotate any diagonal line such as the one shown in Figure 1, above, to make it either perfectly horizontal or vertical, how would you do so? Yes, you can right-click the line to bring up a contextual menu, as shown in Figure 2, below. Within this menu, select the Format Shape option, highlighted in red within Figure 2.

Right-click and choose the Format Shape option
Figure 2: Right-click menu for a Line shape

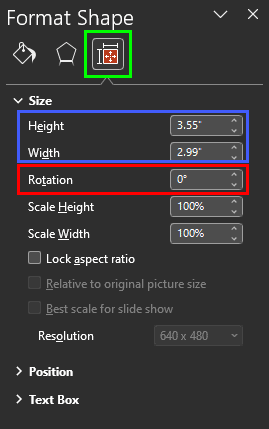
Doing so brings up the Format Shape Task Pane. Here, select the Size & Properties tab, as shown highlighted in green within Figure 3, below. Within this tab, you can find the Rotation option, as shown highlighted in red within Figure 3, and type in a value, but will that help?
Rotation option within the Format Shape Task Pane
Figure 3: Typing a rotation value

As you can notice, the selected diagonal line has an initial Rotation value of . So, you really have no clue currently to determine how much you must rotate to create a line that's standing vertically or sleeping horizontally! Even though it looks impossible, there is a workaround that can help you to make your Line shape a perfectly horizontal or vertical line using the Width and Height options, as shown highlighted in blue within Figure 3, above.

Follow these steps to rotate a line to make it horizontal or vertical in PowerPoint 365 for Windows:

Rotate a Line to make it Horizontal

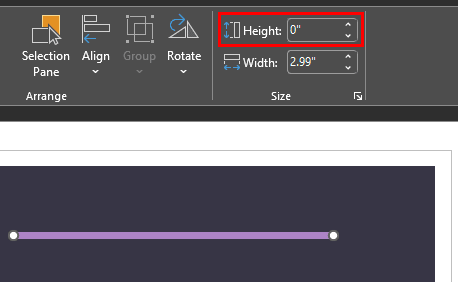
  1. Select your diagonal line and access the Shape Format tab of the Ribbon. Within this tab, locate the Width and Height options, as shown highlighted in red within Figure 4, below.
  2. Height and Width options within the Shape Format tab
    Figure 4: Height and Width options
  3. Contextual Tabs

  4. The Shape Format tab is a contextual tab. Contextual tabs are special tabs in the Ribbon that are not visible all the time. They only make an appearance when you are working with a particular slide object which can be edited using special options.
  5. Alternatively, right-click the line to bring up a contextual menu, as shown in Figure 2, previously on this page. Within this menu, select the Format Shape option to bring up the Format Shape Task Pane, as shown in Figure 3, previously on this page. Click the Size & Properties tab, as shown highlighted in green within Figure 3, to access the same Height and Width options, as shown highlighted in blue within Figure 3, previously on this page.
  6. With the line still selected, change the Height value to zero, as shown highlighted in red within Figure 5, below. You will notice that this will turn the selected diagonal line on the slide into a horizontal line, as shown again in Figure 5.
  7. Zero Height value turns the diagonal line into a horizontal line
    Figure 5: Change the height value to zero
  8. Reducing Line Length?

  9. Do note that this option of setting the height value to zero will reduce the length of your line. To counter this reduction of length, you should first calculate or make a note of the length so that you can increase it subsequently. Learn more in our Finding Length of a Diagonal Line in PowerPoint tutorial.

Rotate a Line to make it Vertical

  1. Select your diagonal line and access the Shape Format tab of the Ribbon and locate the Width and Height options, as explained in the preceding section on this page.
  2. With the line selected, change the Width value to zero, as shown highlighted in red within Figure 6, below. You will notice that this will turn the selected diagonal line on the slide into a vertical line, as shown in Figure 6.
  3. Zero Width value turns the diagonal line into a vertical line
    Figure 6: Change the width value to zero

Yes, now you have rotated your diagonal line. But have you noticed something? Is your line shape retaining its original length even after getting rotated? Unfortunately, it is not! Check out Figure 7, below, which shows a PowerPoint slide containing 3 Line shapes.

  • The line marked A is our original line.
  • The line marked as B is the copy of the same diagonal line that resulted from changing the Height to zero.
  • And finally, the line marked as C is the copy of the same diagonal line A, that resulted from changing the Width to zero.
  • Diagonal line and its copies rotated horizontally and vertically
    Figure 7: Diagonal line rotated horizontally and vertically

Look closely at Figure 7, above, and you will notice that both the rotated lines have lost some length. None of them is of the same length as the original line A. To overcome this drawback, you should know the length of your diagonal line in the first place. But again, there is no specific option in PowerPoint to achieve this objective. The good news is that we have a workaround for this too.

Determine the length of your diagonal line by following our Finding Length of a Diagonal Line in PowerPoint tutorial. Once you have noted down the length value, you can get back the original length of the rotated lines by following these guidelines:

  • Once your line is horizontal, select it, and change its Width value to match the length value you have noted down.
  • Once your line is vertical, select it, and change its Height value to match the length value you have noted down.

People Also Ask:

How do I make a line horizontal in PowerPoint?

If you're looking to get that perfectly straight line in PowerPoint, all you need to do is hold down the Shift key while drawing it. This little-known trick is sure to come in handy the next time you're giving a presentation.

How do you draw a diagonal line in PowerPoint?

Now that you've added a line, you can change its rotation value to make it diagonal. To do this, go to the Shape Format tab of the Ribbon and click the dialog launcher in the Size group. In the Format Shape task pane that appears, change the rotation value to -45 degrees (negative or positive).

How do you show the vertical and horizontal rulers in PowerPoint?

PowerPoint has two rulers that many users don't know about. Once you know where to find them, they can be extremely useful! The first ruler is horizontal and located at the top of the active slide. The second ruler is vertical and located along the left edge of the slide. To show the rulers, click the View tab of the Ribbon, and in the Show group, check Ruler. To hide the rulers, click View and in the Show group, clear the Ruler box.

See Also:

06 02 04 - Advanced Shape Techniques: Change a Diagonal Line to a Horizontal or Vertical Line in PowerPoint (Glossary Page)

Change a Diagonal Line to a Horizontal or Vertical Line in PowerPoint 365 for Mac
Change a Diagonal Line to a Horizontal or Vertical Line in PowerPoint 2013 for Windows
Change a Diagonal Line to a Horizontal or Vertical Line in PowerPoint 2011 for Mac
Change a Diagonal Line to a Horizontal or Vertical Line in PowerPoint for the Web

You May Also Like: Essential PowerPoint Skills Everyone Needs, Especially Working from Home | Ecology PowerPoint Templates


Popular Posts

Pivot Tables in PowerPoint: by Kasper Langmann
One of the most commonly used features in Microsoft Excel is the Pivot Table. A Pivot Table simply allows you to make better sense of data by giving you different options of how to view that data.

Get More SmartArt Graphics
Learn how you can get more SmartArt graphic variants.

Character Spacing in PowerPoint 2013
Explore Character Spacing options in PowerPoint 2013.

Add Secondary Value Axis to Charts in PowerPoint 2013 for Windows
Learn how to add a Secondary Value axis to charts in PowerPoint 2013 for Windows.


Pictures in Presentations

Is a picture is worth a thousand words? You probably have heard this adage so often that we decided not to repeat this phrase throughout this book! Now here’s some more info: the human brain uses a larger part of its area to store visual information rather than textual content. And that’s possibly because a picture describes so much more than text.

Go and get a copy of our Pictures in Presentations ebook.


Microsoft and the Office logo are trademarks or registered trademarks of Microsoft Corporation in the United States and/or other countries.

Home | PowerPoint | Photoshop | PowerPoint Templates | PowerPoint Tutorials | Blog | Notes | Ezine | Media Kit | Feedback | Site Map | About Us | Contact Us

Link to Us | Privacy | Testimonials

PowerPoint Backgrounds | Christian PowerPoint Backgrounds | Business PowerPoint Presentation Templates

Plagiarism will be detected by Copyscape

©2000-2023, . All rights reserved.