Indezine Logo


Change Shapes within a SmartArt Graphic in PowerPoint 2010 for Windows

Learn how to change shapes within a SmartArt graphic in PowerPoint 2010 for Windows. In many ways, editing text within SmartArt graphics is more intuitive using the Text Pane.


Author:

Product/Version: PowerPoint 2010 for Windows

OS: Microsoft Windows XP and higher


Learn PowerPoint

Find out whether WRM Safe for XML-based PowerPoint files?


Most of the time, SmartArt graphics work great with their default looks. Yes, you can change your SmartArt graphics to other layouts and you can also change the Theme colors or apply a SmartArt Style to make your SmartArt appear distinct and unique. What many users don't realize though is that you can change the actual shapes within a SmartArt graphic. For instance, you can change some rectangles in your SmartArt graphic to become ovals with a mere click or two!

Follow these steps to change shapes within a SmartArt graphic in PowerPoint 2010 for Windows:
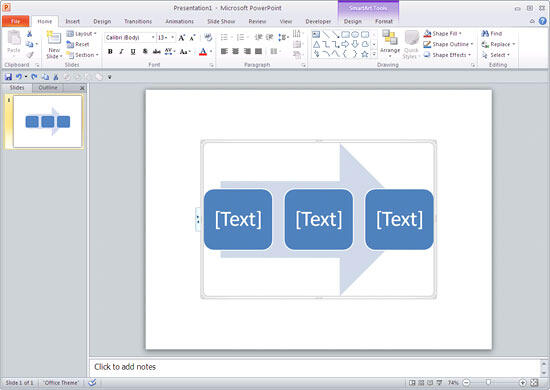
  1. Select your existing SmartArt graphic, as shown in Figure 1, below.
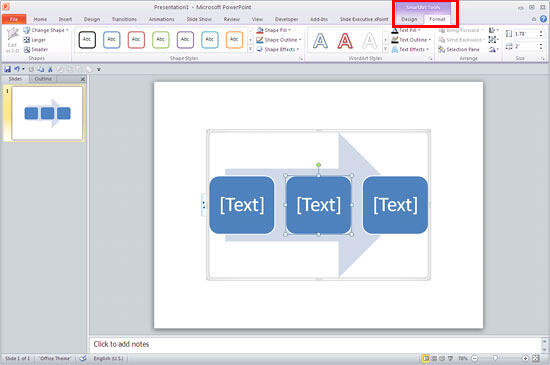
  2. Note that once you select a SmartArt graphic, two contextual tabs activate on the Ribbon. These are the SmartArt Tools Design and the SmartArt Tools Format tabs, as shown highlighted in red within Figure 2, below.
  3. Continuous Block Process SmartArt graphic in PowerPoint
    Figure 1: Continuous Block Process SmartArt graphic in PowerPoint
  4. Contextual Tabs

  5. The SmartArt Tools Design and SmartArt Tools Format tabs are contextual tabs. These tabs are special tabs in the Ribbon that are not visible all the time. They only make an appearance when you are working with a particular slide object which can be edited using special options.
  6. Select any shape within the SmartArt graphic that you want to change. In the example shown in Figure 2, we have selected the rounded rectangle in the middle. Now, select the SmartArt Tools Format tab on the Ribbon.
  7. SmartArt Tools Format tab selected
    Figure 2: SmartArt Tools Format tab selected
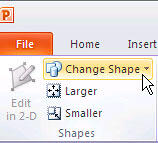
  8. Within the SmartArt Tools Format tab, locate the Shapes group. Then, click the Change Shape button, as shown in Figure 3, below.
  9. Change Shape button
    Figure 3: Change Shape button selected
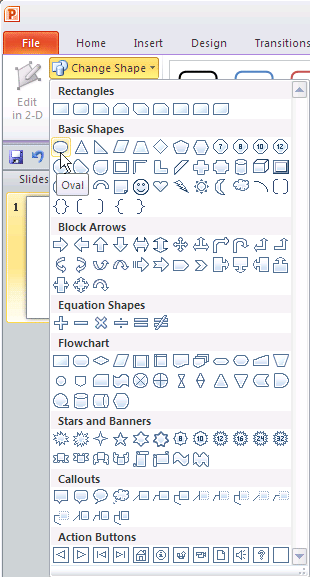
  10. Doing so brings up the Shapes gallery, as shown in Figure 4, below. Select any shape you like. For this tutorial we have selected the Oval shape, as shown in Figure 4, again.
  11. Oval shape selected within Shapes gallery
    Figure 4: Oval shape selected within Shapes gallery
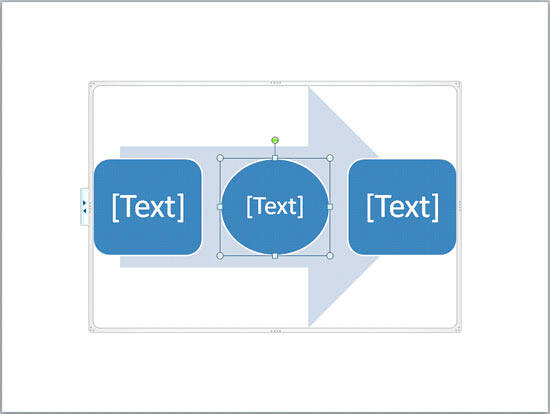
  12. Figure 5, below, shows the selected rounded rectangle is now changed to an Oval. Note that only the shape is changed and other attributes such as fill color, outline color, etc, remain the same (compare Figures 2 and 5).
  13. Selected shape within a SmartArt graphic is changed from a rectangle to an oval
    Figure 5: Selected shape within a SmartArt graphic is changed from a rectangle to an oval
  14. Save your presentation often.

See Also:

Advanced SmartArt: Change Shapes within a SmartArt Graphic (Glossary Page)

Change Shapes within a SmartArt Graphic in PowerPoint 2013 for Windows
Change Shapes within a SmartArt Graphic in PowerPoint 2011 for Mac

You May Also Like: Tips for Building Reports in PowerPoint | Olive PowerPoint Templates


Popular Posts

Character Spacing in PowerPoint 2013
Explore Character Spacing options in PowerPoint 2013.

Add Secondary Value Axis to Charts in PowerPoint 2013 for Windows
Learn how to add a Secondary Value axis to charts in PowerPoint 2013 for Windows.

Ten Easy Topics for Pecha Kucha
But what are simple topics, that excite you, and are interesting to your audiences? Of course, if you already have a topic, you need not read further, but if you are still looking for ideas, here are ten easy topics that you can use for your Pecha Kucha presentations.

Drawing Arcs in PowerPoint
Explore how you can draw an Arc shape in PowerPoint.


Handmade Slides: Pushpins for PowerPoint

These “pushpin” graphics are already placed in PowerPoint slides. Just copy them and paste within your slides to create a look that makes a picture, shape, or anything else appear as if it has been pushed onto a surface, board, or wall with a pin! These ready-made pushpins are already within PowerPoint slides, and have been provided in five colors. Just copy them and paste them on your slides.

Download these Pushpins for just $19.99


Microsoft and the Office logo are trademarks or registered trademarks of Microsoft Corporation in the United States and/or other countries.

Home | PowerPoint | Photoshop | PowerPoint Templates | PowerPoint Tutorials | Blog | Notes | Ezine | Media Kit | Feedback | Site Map | About Us | Contact Us

Link to Us | Privacy | Testimonials

PowerPoint Backgrounds | Christian PowerPoint Backgrounds | Business PowerPoint Presentation Templates

Plagiarism will be detected by Copyscape

©2000-2023, . All rights reserved.