Indezine Logo


Creating Curved Shapes in PowerPoint 2013 for Windows

Learn how to create curved shapes in PowerPoint 2013 for Windows. You can create a curved shape by dragging just one or two points.


Author:

Product/Version: PowerPoint 2013 for Windows

OS: Microsoft Windows 7 and higher


Learn PowerPoint

Temporarily Installing Fonts with Font Loader


PowerPoint provides an extensive array of built-in shapes which help you create great looking graphics for your slides. You can manipulate these graphics by dragging their yellow squares or combining them. But at times, you may not achieve the exact appearance you want. For instance, you might want a little curve in your shape edges rather than conventional straight lines. PowerPoint does allow you to tweak and make your shape look more organic than geometric curved lines:
  1. Launch PowerPoint 2013 for Windows. Most of the time, PowerPoint will open with a new slide in a presentation. You can change the slide layout to Blank by selecting the Home tab | Layout | Blank option.
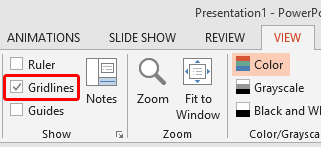
  2. Now select the View tab of the Ribbon and select the Gridlines check-box, as shown highlighted in red within Figure 1.
  3. Gridlines check-box
    Figure 1: Gridlines check-box
  4. Tip: Gridlines can help you to have more control over the curves that you will create.
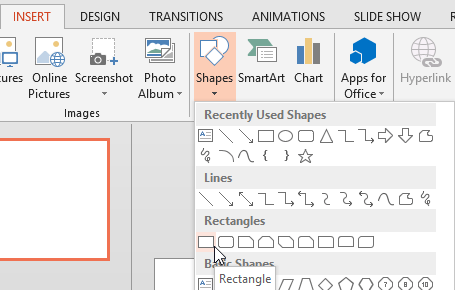
  5. Access the Insert tab (or the Home tab) of the Ribbon and click the Shapes button to bring up the Shapes drop-down gallery. Within this gallery, select the required shape. We choose a Rectangle shape, as you can see in Figure 2.
  6. Rectangle selected
    Figure 2: Rectangle selected
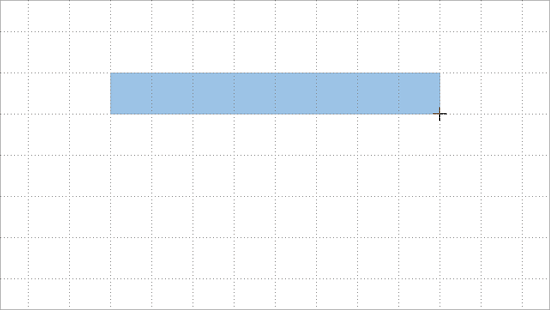
  7. Now click and drag on the slide to create an instance of the selected Rectangle shape within a section of the gridlines, as shown in Figure 3.
  8. Rectangle inserted on the slide
    Figure 3: Rectangle inserted on the slide
  9. Tip: Want to know more about Shapes, and how you add them to your slides? Learn how to insert shapes in PowerPoint 2013.
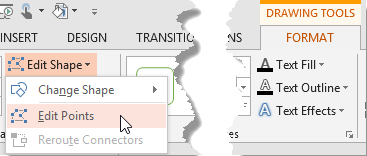
  10. Make sure that the Rectangle is selected. The Ribbon area now shows the Drawing Tools Format contextual tab. Activate this Ribbon tab by clicking on it. Click the Edit Shape button, and from the resultant drop-down list, select the Edit Points option, as shown in Figure 4.
  11. Edit Points option
    Figure 4: Edit Points option
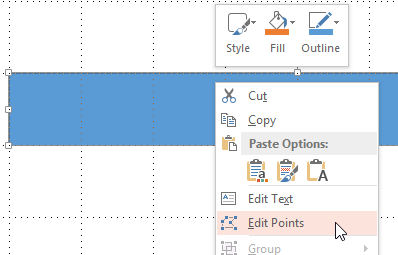
  12. Alternatively, you can right-click the shape and from the context menu select Edit Points option, as shown in Figure 5.
  13. Edit Points option within right-click context menu
    Figure 5: Edit Points option within right-click context menu
  14. This makes four small black squared points (vertexes) appear on the outline of the Rectangle, as shown in Figure 6. The number of vertexes that appear may be different depending on the shape you have selected. These vertexes mark any point on your shape's outline that denotes an extremity of a curve or a line segment, or even the start and end point of an open shape.
  15. Vertexes appears on the Rectangle
    Figure 6: Vertexes appears on the Rectangle
  16. Locate the line segment which you want to change into a curve, and click on any one of its corner vertexes to show one or two blue handles (lines emanating from the vertex). In Figure 7 you can see that the left bottom vertex has been selected. These handles alter the degree of the curve or line on either side of the vertex in relation to the next vertex along the line.
  17. Handles of selected vertex
    Figure 7: Handles of selected vertex
  18. Click the white square on the handle placed on the line to select it, and move this handle upwards or outwards towards the shape. In Figure 8 you can see that it is being dragged upwards toward the shape.
  19. Handle is moved up
    Figure 8: Handle is moved up
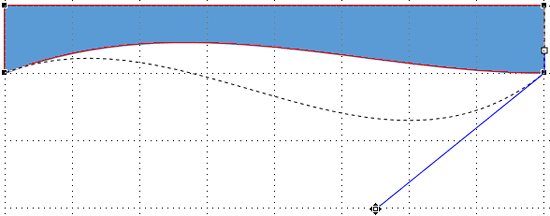
  20. Now select the vertex on the other corner of the line to access the same kind of blue handles. Click the handle (white square) on the line to select it and drag it as required. In Figure 9 you can see that the handle is being dragged out downwards of the shape.
  21. Handle is moved down
    Figure 9: Handle is moved down
  22. This converts the straight line of your Rectangle (or any other shape) to a curved line. (see Figure 9). Your shape is no longer a rectangle.
  23. Straight line converted to curved line
    Figure 9: Straight line converted to curved line
  24. Tip: Want to know more about vertexes and lines? Look at our Edit Points in PowerPoint 2013 tutorial.
  25. With your shape suitably curved, you can now change its appearance further by resizing or rotating. You can also change the shape's fill and line attributes, and also apply an effect.

See Also:

Drawing Common Shapes: Creating Curved Shapes in PowerPoint (Index Page)

Creating Curved Shapes in PowerPoint 2011 for Mac
Creating Curved Shapes in PowerPoint 2010 for Windows

You May Also Like: In Praise of Analogies | Giraffe PowerPoint Templates


Popular Posts

Playing Video Across Slides in PowerPoint 2016 for Windows
Play a video clip across slides in PowerPoint 2016 for Windows.

Set Document Resolution in PowerPoint 2016 for Windows
Learn how to set document resolution in PowerPoint 2016 for Windows.

Creating Anchor Points for Connectors in PowerPoint 2010 for Windows
Learn how to create Anchor Points for connectors in PowerPoint 2010.

Working With Slide Numbers in PowerPoint 2016 for Windows
Learn how to add Slide Numbers on slides and Masters and more tricks on making them work to your will in PowerPoint 2016 for Windows.


Pictures in Presentations

Is a picture is worth a thousand words? You probably have heard this adage so often that we decided not to repeat this phrase throughout this book! Now here’s some more info: the human brain uses a larger part of its area to store visual information rather than textual content. And that’s possibly because a picture describes so much more than text.

Go and get a copy of our Pictures in Presentations ebook.


Microsoft and the Office logo are trademarks or registered trademarks of Microsoft Corporation in the United States and/or other countries.

Home | PowerPoint | Photoshop | PowerPoint Templates | PowerPoint Tutorials | Blog | Notes | Ezine | Media Kit | Feedback | Site Map | About Us | Contact Us

Link to Us | Privacy | Testimonials

PowerPoint Backgrounds | Christian PowerPoint Backgrounds | Business PowerPoint Presentation Templates

Plagiarism will be detected by Copyscape

©2000-2023, . All rights reserved.