Indezine Logo


Creating and Editing AutoCorrect Entries in PowerPoint 365 for Windows

Learn how to create and edit AutoCorrect entries in PowerPoint 365 for Windows. Remember that these edits will also work in other Office programs.


Author:

Product/Version: PowerPoint 365 for Windows

OS: Microsoft Windows 10 and higher


Learn PowerPoint

Explore and understand Microsoft Locale IDs.


The AutoCorrect feature in PowerPoint and other Microsoft Office programs is dependent on a small list of words and phrases. This list contains two columns called Replace and With. For example, the Replace entry for teh will correspond to the With entry containing the word the.

AutoCorrect Across Microsoft Office

Do note that this AutoCorrect list works across all Microsoft Office programs such as PowerPoint, Word, Excel, Outlook, etc. If you add, edit, or delete entries within this AutoCorrect list, the changes will be reflected in all Microsoft Office programs.

You can easily tailor your AutoCorrect list by adding your own commonly misspelled words. Similarly, you can make changes and delete entries from within this AutoCorrect list.

Follow these steps to edit your AutoCorrect entries in PowerPoint 365 for Windows:
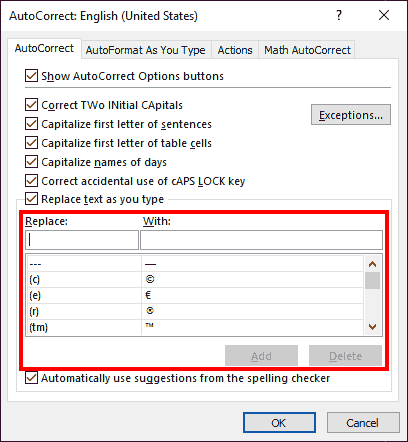
  1. Launch PowerPoint, and access the AutoCorrect dialog box, as explained in the Tip box below. The AutoCorrect list is located at the lower portion of the AutoCorrect dialog box, as shown highlighted in red within Figure 1, below.
  2. AutoCorrect list in PowerPoint 365
    Figure 1: AutoCorrect list within the AutoCorrect dialog box
  3. Tip: Access AutoCorrect Options

  4. You can access the AutoCorrect dialog box shown in Figure 1 as per instructions explained in our AutoCorrect Options in PowerPoint 365 for Windows tutorial. Alternatively, press both the Alt and T keys together, and next press A. You can find more such keyboard sequences in our Keyboard Sequences for PowerPoint 365 for Windows page.
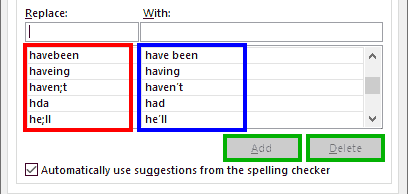
  5. Do note that this list has two columns: Replace and With. The Replace column on the left contains common misspellings, as shown highlighted in red within Figure 2, below. Similarly, the With column on the right contains the word, symbol, phrase, or sentences that PowerPoint substitutes in its place, as shown highlighted in blue within Figure 2. Scroll through this AutoCorrect list to see the corrections that PowerPoint provides. Each corresponding Replace and With entry can be called a word pair.
  6. Common mistakes and their corrections within the AutoCorrect list
    Figure 2: Word pairs in the AutoCorrect list
  7. Do observe that both the Add and Delete buttons in the dialog box, as shown highlighted in green within Figure 2, above, are grayed out.
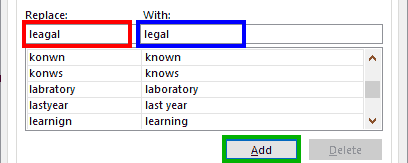
  8. To add your word pair to the AutoCorrect list, type the misspelled word or an abbreviated key within the text box located at the top of the Replace column, as shown highlighted in red within Figure 3, below, and then type the replacement text within the With field, as shown highlighted in blue within Figure 3.
  9. As soon as these words are typed, the Add button, highlighted in green within Figure 3 is activated. Click the Add button to include this new word pair in your AutoCorrect list.
  10. Entries within the Replace and With text boxes for a new word pair
    Figure 3: Create a new AutoCorrect word pair
  11. Save and Share Your AutoCorrect Customizations

    All AutoCorrect customizations including the word pairs you create are located on the system you are using and will be lost if your system suffers from an irrecoverable crash. You may want to save these customizations so that you can share them with other computers or even colleagues, friends, or family. We will explore saving AutoCorrect customizations in a future tutorial.
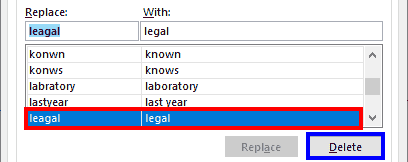
  12. Do you notice the new word pair you just added to the AutoCorrect list, as shown highlighted in red within Figure 4, below? To delete any existing word pair, select it and click the Delete button, as shown highlighted in blue within Figure 4.
  13. Word pair selected for deletion in PowerPoint 365
    Figure 4: Select the word pair to delete
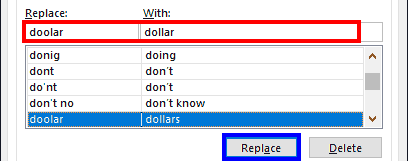
  14. To change an existing word pair, select it and type any text to overwrite existing text within the Replace and/or With text boxes, as shown highlighted in red within Figure 5, below. Next, click the Replace button, as shown highlighted in blue within Figure 5.
  15. Selected word pair being edited in PowerPoint 365
    Figure 5: Replace existing word pairs
  16. You will be prompted with a message window, asking for a confirmation that you want to redefine the already existing word pair entry, as shown in Figure 6, below. Click Yes to proceed.
  17. Message window asking confirmation for redefining an existing word pair entry
    Figure 6: Confirmation for redefining an existing word pair
  18. Once done, click the OK button within the AutoCorrect dialog box to save any changes you made.
  19. Save your presentation often.

See Also:

05 08 09 - Spelling, AutoCorrect, and Reference Tools: Creating and Editing AutoCorrect Entries in PowerPoint (Glossary Page)

Creating and Editing AutoCorrect Entries in PowerPoint 2016 for Windows
Creating and Editing AutoCorrect Entries in PowerPoint 2013 for Windows
Creating and Editing AutoCorrect Entries in PowerPoint 2011 for Mac
Creating and Editing AutoCorrect Entries in PowerPoint 2010 for Windows

You May Also Like: Simple Countdown in PowerPoint | Marine Biology PowerPoint Templates


Popular Posts

Texture Fills for Slide Backgrounds in PowerPoint 2013 for Windows
Use texture fills for slide backgrounds in PowerPoint 2013 for Windows.

Adding More Guides in PowerPoint 2016 for Windows
Learn how to add more guides in PowerPoint 2016 for Windows.

Notes Page View in PowerPoint 2016 for Windows
Learn about Notes Page view in PowerPoint 2016 for Windows.

Christmas PowerPoint Presentation
This presentation is a great introduction to why we celebrate Christmas for both Christian and non-Christian audiences.


Feature List 01 (Layout with Tabs)

The Feature List Layout comprises three sample PowerPoint presentations: one each to create a visual list for 4 features, 5 features, and 6 features. These work great when you have too much information to fit within one slide. This solution lets you use multiple slides, but the visual result is still that of one single slide!

Buy and Download Feature List 01 (Layout with Tabs) for $4.99+ (671 kb)


Microsoft and the Office logo are trademarks or registered trademarks of Microsoft Corporation in the United States and/or other countries.

Home | PowerPoint | Photoshop | PowerPoint Templates | PowerPoint Tutorials | Blog | Notes | Ezine | Media Kit | Feedback | Site Map | About Us | Contact Us

Link to Us | Privacy | Testimonials

PowerPoint Backgrounds | Christian PowerPoint Backgrounds | Business PowerPoint Presentation Templates

Plagiarism will be detected by Copyscape

©2000-2023, . All rights reserved.