Indezine Logo


Creating a Half Circle in PowerPoint 2013 for Windows

Learn to create a half-circle in PowerPoint 2013 for Windows. A half-circle is not the same as a semi-circle.


Author:

Product/Version: PowerPoint 2013 for Windows

OS: Microsoft Windows 7 and higher


Learn PowerPoint

What to do if outlines from TextEdit on Mac OS X don't import in PowerPoint?


An Indezine reader asked a long time ago if one could create three circles next to each other, and make sure that they looked like this:

  • The leftmost circle should be filled-in completely
  • The second circle should be half full
  • The third and the rightmost circle should have no fill, to represent something that is empty

A visual is worth a thousand words, so do look at Figure1 to understand this better.

The filled, half filled, and empty circles
Figure 1: The filled, half filled, and empty circles

This sort of visual can be used in many scenarios, but is best used when you are explaining an analogy. Also for the classic half-filled or half-empty perspective, you can create a visual with just the middle circle shown in Figure 1. And really speaking, we have used circles—but you could use just any shape you want!

Let's now explore how to create a visual of this sort. The first and third circles are easy, all you need to do is ensure that the first circle has both an outline and a solid fill, and that the third circle has only an outline without a fill. For the latter, you will use the No Fill attribute. The second circle (half circle) is an easy challenge that we'll teach you to create in this one page tutorial using PowerPoint 2013 for Windows.

Follow these steps to get started:

  1. Launch PowerPoint 2013 for Windows. Most of the time, PowerPoint will open with a new slide in a presentation. You can change the slide layout to Blank by selecting the Home tab | Layout | Blank.
  2. Create a perfect circle, as shown in Figure 2.
  3. Perfect Circle
    Figure 2: Perfect Circle
  4. Duplicate the circle to make two more copies of it as shown in Figure 3.
  5. Three circles with same attributes
    Figure 3: Three circles with same attributes
  6. Select all three circles, and optionally increase the thickness of their outlines. You can also change the line color. Your circles will look similar to what you can see in Figure 4.
  7. Circles with thick outlines
    Figure 4: Circles with thick outlines
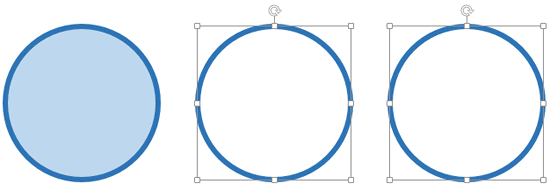
  8. Select the second and third circles, and format their fill attributes to No Fill, as shown in Figure 5.
  9. 2nd and 3rd circles with fill removed
    Figure 5: 2nd and 3rd circles with fill removed
  10. Now create a semi-circle elsewhere on the slide, as explained in our Creating a Semi-Circle in PowerPoint 2013 tutorial.
  11. Now, copy the shape attributes of the first circle and apply them to the new semicircle using the Format Painter. Then set the outline for this semi-circle to No Outline. Copy this semi-circle and paste it on top of the second circle so that it looks like what you can see in Figure 6.
  12. Paste semi-circle on the second circle
    Figure 6: Paste semi-circle on the second circle
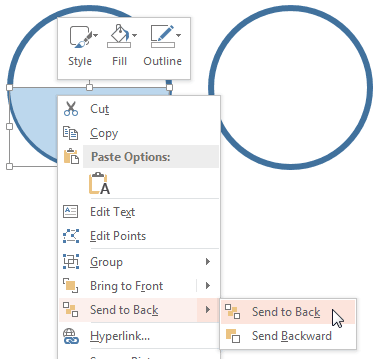
  13. Now carefully select the pasted semi-circle, right-click and from the resultant contextual menu, choose Send To Back | Send To Back option as shown in Figure 7.
  14. Send the semi-circle backward
    Figure 7: Send the semi-circle backward
  15. Tip: If you want to know more about re-ordering the shapes, go to our tutorial Reorder Shapes in PowerPoint 2013.
  16. This will send the selected semi-circle behind the full circle and now your second circle will look like a half circle, as shown in Figure 8.
  17. Half circle created using a semi-circle and circle
    Figure 8: Half circle created using a semi-circle and circle
  18. Once done, save your presentation.

See Also:

Creating a Half Circle in PowerPoint 2011 for Mac
Creating a Half Circle in PowerPoint 2010 for Windows
Creating a Half Circle in PowerPoint 2007 for Windows
Creating a Half Circle in PowerPoint 2003 for Windows

You May Also Like: PresentationPoint VideoPoint: Conversation with Kurt Dupont | Plaid Patterns PowerPoint Templates


Popular Posts

Ten Easy Topics for Pecha Kucha
But what are simple topics, that excite you, and are interesting to your audiences? Of course, if you already have a topic, you need not read further, but if you are still looking for ideas, here are ten easy topics that you can use for your Pecha Kucha presentations.

Drawing Arcs in PowerPoint
Explore how you can draw an Arc shape in PowerPoint.

Set Minimum and Maximum Values on Value Axis in PowerPoint 2013 for Windows
Learn how to set the Minimum and Maximum values on Value Axis of Charts in PowerPoint 2013 for Windows.

Crop Pictures (Mask to Shape) in PowerPoint 2011 for Mac
Learn how to crop pictures using Mask to Shape option in PowerPoint 2011 for Mac.


PowerPoint Keyboard Shortcuts and Sequences:
PowerPoint 2016, 2013, 2011, 2010, 2007 and 2003 for Windows
PowerPoint 2016 and 2011 for Mac
PowerPoint Online for Windows and Mac

Have your ever used keyboard shortcuts and sequences in PowerPoint? Or are you a complete keyboard aficionado? Do you want to learn about some new shortcuts? Or do you want to know if your favorite keyboard shortcuts are documented?

Go and get a copy of our PowerPoint Keyboard Shortcuts and Sequences ebook.


Microsoft and the Office logo are trademarks or registered trademarks of Microsoft Corporation in the United States and/or other countries.

Home | PowerPoint | Photoshop | PowerPoint Templates | PowerPoint Tutorials | Blog | Notes | Ezine | Media Kit | Feedback | Site Map | About Us | Contact Us

Link to Us | Privacy | Testimonials

PowerPoint Backgrounds | Christian PowerPoint Backgrounds | Business PowerPoint Presentation Templates

Plagiarism will be detected by Copyscape

©2000-2023, . All rights reserved.