Indezine Logo


Crop Picture to Shape in PowerPoint 2016 for Windows

Learn to crop pictures using the Crop to Shape option in PowerPoint 2016 for Windows. This option allows you to restrain a picture to a shape.


Author:

Product/Version: PowerPoint 2016 for Windows

OS: Microsoft Windows 7 and higher


Learn PowerPoint

Adding Harvey Balls Using think-cell in PowerPoint


While you can conventionally crop pictures in PowerPoint to a rectangular constraint, you can also opt to use another shape to crop instead. This tutorial explains the Crop to Shape option that lets you choose non-rectangular cropping shapes for your pictures; the results tend to look like a picture contained within a shape.

Figure 1 below, shows a conventional rectangular picture towards the left. The other two variations have been created using the Crop to Shape option that you will explore in this tutorial.

Picture cropped using the Crop to Shape option
Figure 1: Picture cropped using the Crop to Shape option

Follow these steps to learn how to crop a picture using the Crop to Shape option in PowerPoint 2016 for Windows:

  1. Figure 1, below shows a picture inserted on your slide.
  2. Crop to Shape option within the Crop drop-down gallery
    Figure 2: Crop to Shape option within the Crop drop-down gallery
  3. Note: The Picture Tools Format tab is a Contextual tab. These contextual tabs are special tabs in the Ribbon that are not visible all the time. They make an appearance only when you are working with a particular slide object that can be edited using the options within these tabs.
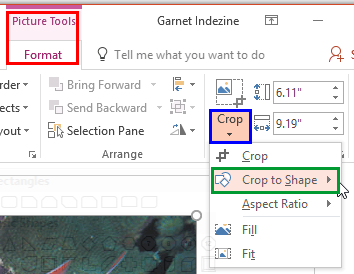
  4. Select the picture to bring up the Picture Tools Format tab (highlighted in red within Figure 3) of the Ribbon. Activate this Contextual tab by clicking on it; and then click the down- arrow below the Crop button (highlighted in blue within Figure 3). This opens the Crop drop-down gallery.
  5. Crop to Shape option within the Crop drop-down gallery
    Figure 3: Crop to Shape option within the Crop drop-down gallery
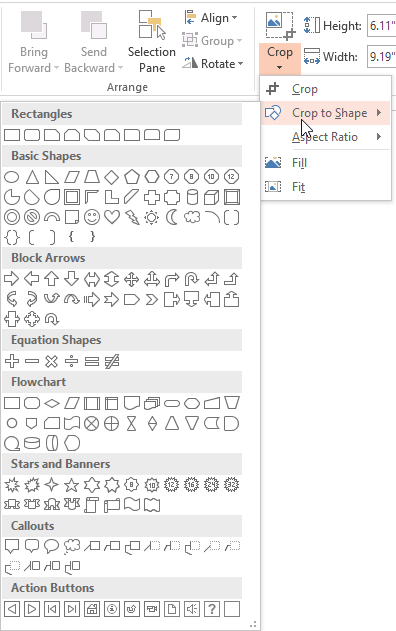
  6. Within the Crop drop-down gallery, click the Crop to Shape option (highlighted in green within Figure 3, above) to open the Crop to Shape sub-gallery, as shown in Figure 4.
  7. Crop to Shape sub-gallery
    Figure 4: Crop to Shape sub-gallery
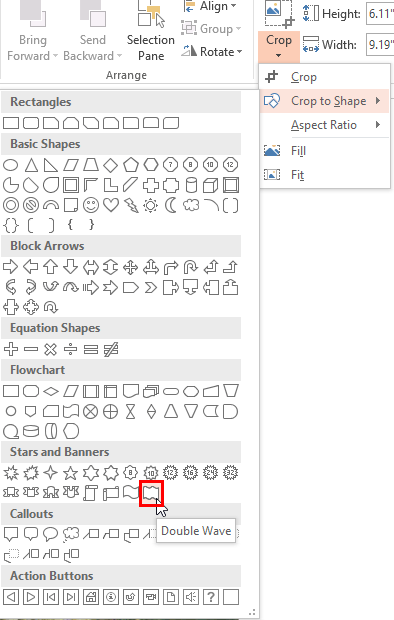
  8. Within the Crop to Shape sub-gallery, select any shape from various categories. Click on any shape variant of your choice. In Figure 5, you can see that the Double Wave shape type is being selected (highlighted in red within Figure 5).
  9. Shape chosen to crop the selected picture
    Figure 5: Shape choosen to crop the selected picture
  10. This will crop the selected picture into the shape you have chosen. Once you are done, just click away from the selected shape to deselect it. In Figure 6 you can see that the selected picture has been cropped within a Double Wave shape. Compare Figures 2 and 6 to see the difference.
  11. Picture cropped into a shape
    Figure 6: Picture cropped into a shape
  12. Note: The Crop to Shape option automatically trims the picture content to fill the geometry of the shape, while maintaining the picture proportions. You can also apply the Crop to Shape option to a picture used as a shape fill; in that case, you will end up changing the original shape into a new shape.
  13. Save your presentation.

See Also:

Pictures - Cropping: Crop Picture to Shape (Glossary Page)

Crop Picture to Shape in PowerPoint 2013 for Windows
Crop Picture to Shape in PowerPoint 2011 for Mac
Crop Picture to Shape in PowerPoint 2010 for Windows

You May Also Like: 4 Ideas to Help You Find The Right Story For Your Next Presentation | Seychelles Flags and Maps PowerPoint Templates


Popular Posts

Playing Video Across Slides in PowerPoint 2016 for Windows
Play a video clip across slides in PowerPoint 2016 for Windows.

Set Document Resolution in PowerPoint 2016 for Windows
Learn how to set document resolution in PowerPoint 2016 for Windows.

Creating Anchor Points for Connectors in PowerPoint 2010 for Windows
Learn how to create Anchor Points for connectors in PowerPoint 2010.

Working With Slide Numbers in PowerPoint 2016 for Windows
Learn how to add Slide Numbers on slides and Masters and more tricks on making them work to your will in PowerPoint 2016 for Windows.


Feature List 01 (Layout with Tabs)

The Feature List Layout comprises three sample PowerPoint presentations: one each to create a visual list for 4 features, 5 features, and 6 features. These work great when you have too much information to fit within one slide. This solution lets you use multiple slides, but the visual result is still that of one single slide!

Buy and Download Feature List 01 (Layout with Tabs) for $4.99+ (671 kb)


Microsoft and the Office logo are trademarks or registered trademarks of Microsoft Corporation in the United States and/or other countries.

Home | PowerPoint | Photoshop | PowerPoint Templates | PowerPoint Tutorials | Blog | Notes | Ezine | Media Kit | Feedback | Site Map | About Us | Contact Us

Link to Us | Privacy | Testimonials

PowerPoint Backgrounds | Christian PowerPoint Backgrounds | Business PowerPoint Presentation Templates

Plagiarism will be detected by Copyscape

©2000-2023, . All rights reserved.