You can export your presentation slides created within PowerPoint into a video clip in either WMV or MP4 formats. This is probably the easiest way to create quick videos from your slides, and is best suited for converting photo slides to video clips. You can also use this technique to create video clips from PowerPoint that can be uploaded to YouTube or other video-sharing sites.
PowerPoint's video export features respect sounds, animations, and transition effects. For the latter, you can also override the slide transition delay as required.
Follow these steps to export a PowerPoint presentation as a video clip in PowerPoint 2016 for Windows:
- Open the presentation that you want to export as a video. Click on the File menu, as shown highlighted in blue within Figure 1, below, to open Backstage View.
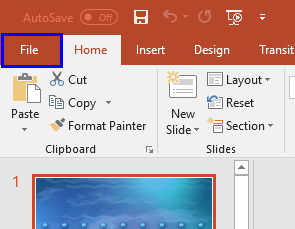
Figure 1: File option - Now, choose the Export option, as shown highlighted in blue within Figure 2, below, to view the Export panel. Here, select the Create a Video option, as shown highlighted in red within Figure 2.
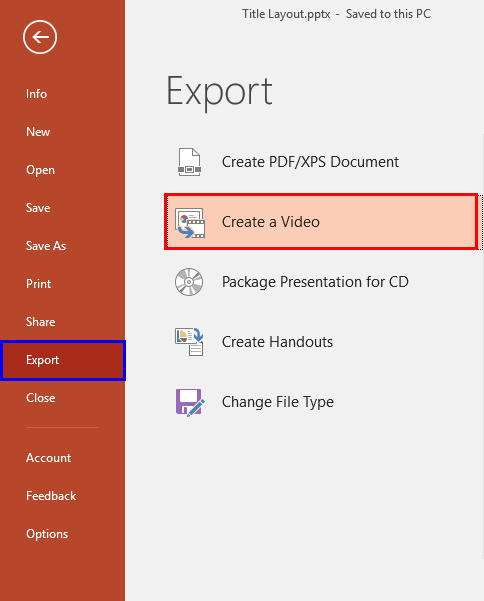
Figure 2: Export Panel - Doing so brings up Create a Video options within the Export panel, as shown in Figure 3, below.
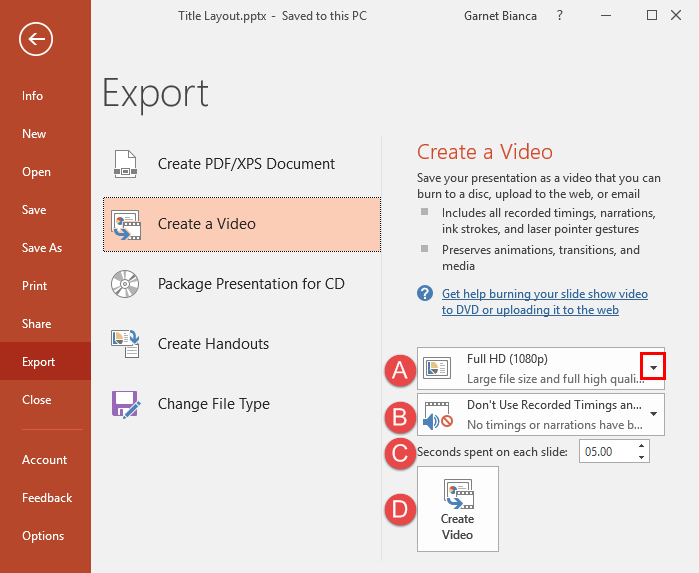
Figure 3: Create a Video option - Let's explore these options, as marked in Figure 3.
A. Resolution
- This selection box provides you with four options. Click the down-arrow, as shown highlighted in red within Figure 3, above, and Figure 4 below, to open a drop-down menu, as shown in Figure 4.
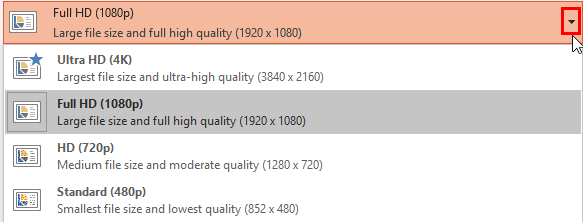
Figure 4: What should be the quality and resolution of exported video - In this drop-down menu, select any of the four options based upon the quality and resolution of exported video. Descriptions given along with each of the options can help you make a decision.
B. Recorded Timings and Narrations
- Here, you can decide whether you want to export your presentation along with all slide transitions, narrations, and laser pointer gestures as it is, or you want to make some changes. Click the down-arrow to open the drop-down menu, as shown in Figure 5, below.

Figure 5: Do you want to keep the transition delay and narrations? - Let's explore the options as shown in Figure 5.
Don't Use Record Timings and Narrations
- When you select this option, all the slides within the exported video will be set with a delay time that you specify within the Seconds spent on each slide box, marked as C within Figure 3, previously on this page. Also the narrations will be lost.
Use Record Timings and Narrations
- This option makes sure that slide transition times within the exported video will be same as the transition time within the presentation (unless you record the timings and narrations, as explained next). If any of the slides do not have slide transition times, you can specify a time within the Seconds spent on each slide box, marked as C within Figure 3, previously on this page.
Record Timings and Narrations
- This option allows you to record the slide transition time and narrations manually. This provides you with more control over the slide transition timing within the exported video.
Preview Timings and Narrations
- Select this option to see how the exported video will play.
C. Seconds spent on each slide
- If you want to override the slide transition applied to the slides, and want all slides to follow the same transition time in the exported video, enter the required transition time (in seconds) within this box.
D. Create Video
- Once you have made all required settings for the video to be exported, click this button. This action will summon the Save As dialog box, as shown in Figure 6, below.
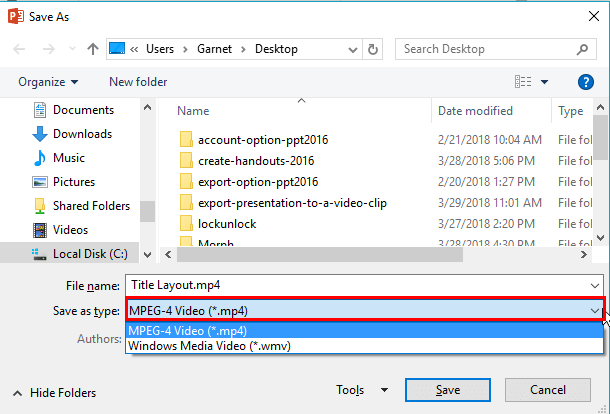
Figure 6: Save As dialog box - Within the Save As dialog box navigate to the location where you want to save the exported video. And, within the Save as type selection box, as shown highlighted in red within Figure 6, select based upon whether you want to save it as an MP4 or a WMV file. Then, click the Save button to start the export procedure.
- Once the Save button is clicked, you can see the conversion process in progress on the Status Bar, as shown highlighted in red within Figure 7, below.

Figure 7: Conversion process in progress - Once this conversion is completed, your exported video will be ready. Play the exported video to check if everything is fine.


