Introduction
Creating cutouts with perfect edges has always been more time-consuming a process than other image editing procedures—even in new Photoshop versions which have made these tasks considerably easier. And then spending loads of time on creating impressive cutouts is not something that everyone wants to do. It's always nice to find a tool that will make this process simpler. If you agree with that observation, you'll love Fluid Mask, a Photoshop plug-in from Vertus, which gives perfect results in minutes instead of hours.
Fluid Mask works from within Photoshop. It analyses the image and creates groups of areas to be masked.
Back
About Fluid Mask
Fluid Mask is from Vertus, a New York, USA based company that is the graphics and imaging software division of Heligon, a technology business specializing in image data interpretation. You can learn more about Vertus and download trial versions of the products at their site.
While you are there, make sure that you check out the impressive movie tutorials for Fluid Mask on the site.
My contact at Vertus for this review was Nicola Parsonage. Thank you, Nicola.
Back
Installation
Download the installer file for Windows or Mac from the Vertus website. The setup routine automatically installs into the plug-ins folder of Photoshop. For this tutorial, I am using the Windows version of Fluid Mask, but the Mac version does work in a similar way.
When launched for the first time, you will have a choice of running Fluid Mask as a demo (limited functionality), or activating it fully using your serial key. If you choose to open it as a demo, you may later enter a purchased serial key to activate it fully.
Back
How To Use
Here's how you can create masks using this Photoshop plug-in.
- Open an image in Adobe Photoshop.
- Choose the Filter | Vertus | Fluid Mask option, as shown in Figure 1, below.

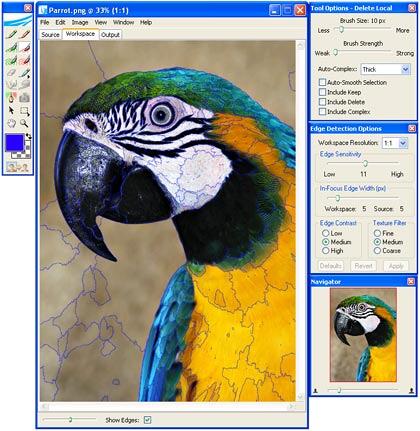
Figure 1: Fluid Mask - First of all, Fluid Mask analyses the image. This can take a while depending upon the size and complexity of the image. Thereafter, you will see the Fluid mask interface, as shown in Figure 2, below.

Figure 2: The Fluid Mask interface - The interface is intuitive. The main preview window has three tabs: Source, Workspace and Output.
Source
- Source view shows the original image.
Workspace
- Workspace is to create and modify mask by clicking the show edges check box right at the bottom of the preview area. Since your image is already analyzed, you'll see the automatic edge detection in place represented by blue outlines (as shown in Figure 2, above)
Output
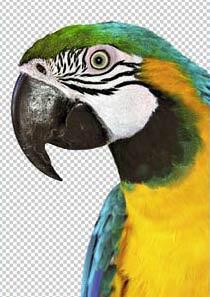
- Output view shows the final cutout.
- You will also find a tool palette, which has different brushes used to create or modify masks. A separate Tool Options floating palette allows you to tweak parameters for any selected tool.
- The masking is entirely based on the detection of the edges. The parameters for the edge detection are set in a separate Edge Detection Options palette. Once you change any parameters, you need to apply the changes. This will prompt Fluid Mask to analyze your image again, and this might take a while.
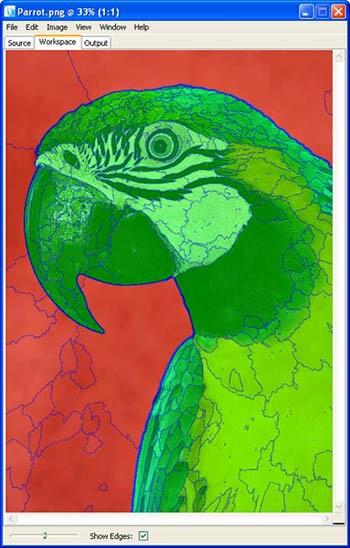
- By using the red and green brushes from the tool palette, you can select the area you want to delete or keep. The red areas are for deleting and the green areas are for retaining The red areas are for deleting and the green areas are for retaining, as shown in Figure 3, below. Draw with the required brushes on the areas as required. If you inadvertently paint in a red area with a green brush, or vice versa, you can retouch that area with the correct brush color again until you get the correct areas chosen, and isolated.
Tip: You can also select all red areas, and leave the green areas unpainted.

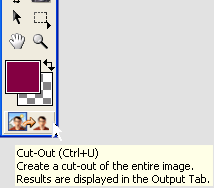
Figure 3: Selected masking areas - When the selections are made, click on the Cut-Out button which is at the bottom of the Tools palette, as shown in Figure 4, below. The results can be seen in the output view.

Figure 4: Create the cut-out - If you are not happy with the results you can anytime switch to workspace view and make changes. Make sure that you click on the Cut-Out button after each change to preview the results.
- When you are done, go to File menu and choose Save and Apply. This masks the image and applies the cut-out within Photoshop. Later you can add any background to the image.
Tip: If you also want your original image within Photoshop, duplicate the layer and apply the mask to this duplicated layer.
See the Before and After samples:


Back
Specifications
| Photoshop Versions: |
Photoshop 7.0 or higher versions |
| Platforms: |
Windows, Mac |
| Site: |
Vertus |
| Price: |
$199 |
| Trial Version: |
Available |
Back

