Indezine Logo


Formatting Connectors within Flowcharts in PowerPoint for Mac

Learn about formatting connectors within flowcharts in Microsoft Office applications such as Word, Excel, and PowerPoint for Mac. You can add captions and change the thickness of the connector.


Author:

Product/Version: PowerPoint for Mac

OS: Mac OS X


Learn PowerPoint

Explore 3D in PowerPoint and Microsoft Office.


Once you add multiple connectors that emanate from a Decision shape, you need to help your users decide where they branch their thought or work processes within the flowchart. This is typically done by adding a Yes or No caption to the connectors that output from a Decision shape.

Tip: Don't know what a Decision shape is? Explore our Getting Started with Flowcharts and Flowchart Symbols: What They Represent? pages.

So how do you add these captions? Look at Figure 1, where we have added two connectors that output from the "Are you happy?" Decision shape. At this point of time, these two connectors don't have Yes or No captions.
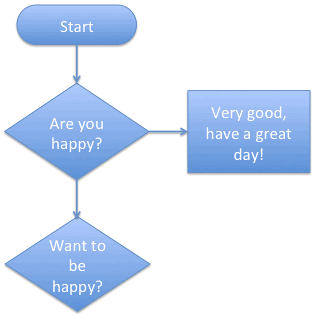
Two connectors are emerging from "Are you happy?" Decision shape
Figure 1: Two connectors are emerging from "Are you happy?" Decision shape

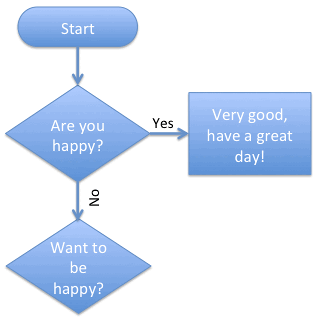
Depending upon whether the user's answer is Yes or No, they will decide which shape they need to move towards next within the flowchart. The Yes and No captions can be easily added by inserting individual text boxes for both Yes and No, as shown in Figure 2, below.
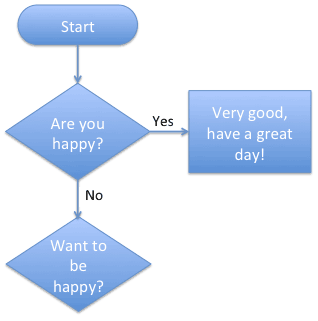
Yes and No captions added
Figure 2: Yes and No captions added

To add such captions beside the connectors, and to format connectors, please follow these steps:
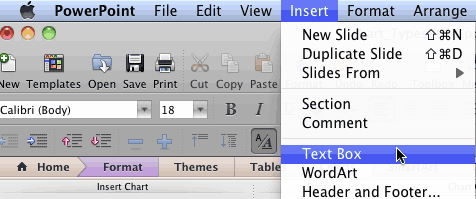
  1. Access the Insert | Text Box menu option as shown in Figure 3.
  2. Select the Insert | Text Box menu option
    Figure 3: Select the Insert | Text Box menu option
  3. At this point, your cursor turns into a cross-hair. Now, drag and draw to create a text box besides the connector for which you want to type Yes. Next select this text box, and type Yes.
  4. Similarly, place a second text box besides the other connector emanating from your Decision shape, and type No within this text box. Your flowchart will now look similar to what you last saw in Figure 2.
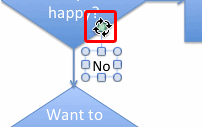
  5. Optionally, you can now rotate the No text box. To do that, select the text box so that you can see the Rotation handle, highlighted in red within Figure 4. Click this rotation handle and drag it towards the right or left as required so that your text box is rotated.
  6. Click and drag the Rotation handle to rotate the text box
    Figure 4: Click and drag the Rotation handle to rotate the text box
  7. Tip: Press the Shift key while dragging the rotation handle so that you can drag in increments of 15 degrees. You'll feel a distinct snap as you rotate at each 15 degree level. Six such snaps equal 90 degrees!
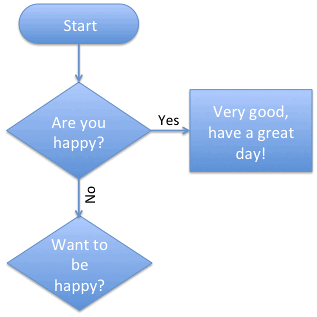
  8. Now your text box that contains No has been rotated, as shown in Figure 5, below (compare with Figure 2).
  9. Flowchart with Yes and No captions
    Figure 5: Flowchart with Yes and No captions
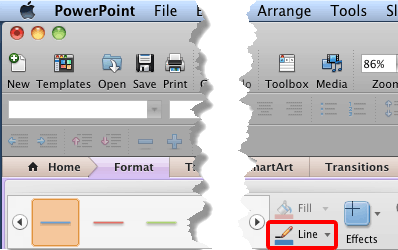
  10. Other than adding Yes and No captions to your connectors, you can also make them thicker or thinner. To do so, select the connector(s). Then access the Format tab of the Ribbon, and click the down-arrow within the Line button, as shown highlighted in red within Figure 6.
  11. Line button
    Figure 6: Line button
  12. Tip: Cannot see the Format tab on your Ribbon? Make sure you select your Connector so that this tab turns visible!
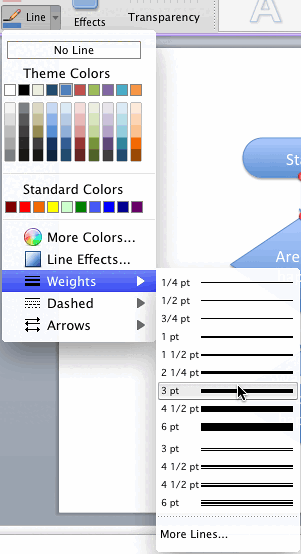
  13. This brings up the Line drop-down gallery as shown in Figure 7. Choose the Weights option to bring up a sub-gallery (again, see Figure 7).
  14. Weights option selected within Line gallery
    Figure 7: Weights option selected within Line gallery
  15. Choose a thicker or thinner weight. We choose a slightly thicker weight at around 3 points. You can see the thicker connectors in Figure 8, below (compare to Figure 5, above).
  16. Flowchart with thicker connectors
    Figure 8: Flowchart with thicker connectors
  17. Save your documents often!

See Also:

Advanced Flowchart Techniques: Formatting Connectors Within Flowcharts (Glossary Page)

Formatting Connectors Within Flowcharts in PowerPoint for Windows

You May Also Like: How to Make Your Presentation Fly | Eritrea Flags and Maps PowerPoint Templates


Popular Posts

Playing Video Across Slides in PowerPoint 2016 for Windows
Play a video clip across slides in PowerPoint 2016 for Windows.

Set Document Resolution in PowerPoint 2016 for Windows
Learn how to set document resolution in PowerPoint 2016 for Windows.

Creating Anchor Points for Connectors in PowerPoint 2010 for Windows
Learn how to create Anchor Points for connectors in PowerPoint 2010.

Working With Slide Numbers in PowerPoint 2016 for Windows
Learn how to add Slide Numbers on slides and Masters and more tricks on making them work to your will in PowerPoint 2016 for Windows.


Organic Shapes with Brush Edges

You get 8 shape types plus lines as part of this Organic Shapes collection. Each of these 8 shape types have 10 variants. So you end up with 80 hand-drawn shape options! Again each of these 80 shapes have 12 brush stroke styles! Plus you get the lines and arrows in 12 brush stroke styles too. Combine all variations to end up with more than 3000 possibilities.

Buy and Download for $99+ (83 MB)


Microsoft and the Office logo are trademarks or registered trademarks of Microsoft Corporation in the United States and/or other countries.

Home | PowerPoint | Photoshop | PowerPoint Templates | PowerPoint Tutorials | Blog | Notes | Ezine | Media Kit | Feedback | Site Map | About Us | Contact Us

Link to Us | Privacy | Testimonials

PowerPoint Backgrounds | Christian PowerPoint Backgrounds | Business PowerPoint Presentation Templates

Plagiarism will be detected by Copyscape

©2000-2023, . All rights reserved.