Do you want to insert a check mark, which is also called a tick mark, in your slides? Very often, this symbol indicates a task is done, and you may want to add it as part of your regular text in text placeholders and boxes, shapes, tables, and even charts.
Fortunately, it is very easy to complete this task in most versions of PowerPoint, including PowerPoint for the Web. There may be slight differences, depending upon whether you are using PowerPoint for the Web in a Windows or a Mac environment, and also upon which browser you are using. Even with these differences, the process is very similar. Using one of these options, you will be able to add a check mark or tick mark in PowerPoint for the Web.
We will look at three ways to add a check mark in PowerPoint for the Web:
- Use an Alt key combination
- Use the Symbol dialog box
- Use Copy and Paste
1. Use an Alt key combination
Follow these steps to insert a check mark or tick mark on your slide in PowerPoint for the Web:
- Click your insertion point within the text box, text placeholder, shape, or any other slide object where you want to add a check mark, as shown in Figure 1, below.

Figure 1: Place your insertion point in Notepad - Now, hold the Alt key while you type 0252 on the number pad of your keyboard to insert an ü (u umlaut) character (see Figure 2, below).

Figure 2: Add an ü (u umlaut) character in Notepad - Select this ü umlaut character in PowerPoint, and change the font to Wingdings, as shown in Figure 3, below. You will notice that the u umlaut character changed to a check mark (tick mark) symbol.

Figure 3: Change the font to Wingdings
Wingdings, Wingdings 2, and Dingbats
- Are you wondering why an alphabetical character that you typed or pasted changed into a symbol? That's because we changed the font for this text to Wingdings, a font that comprises dingbat characters for every keystroke you type! Dingbat fonts don’t contain normal alphabet and number characters. Instead, they contain symbols. So, when you type a, b, c, 1, 2, 3, or another character, you will see different symbols instead.
- Wingdings has been part of Microsoft Windows since Windows 3.1. After the success of Wingdings, Microsoft created Wingdings 2 and Wingdings 3 too. Do note though that to add this checkmark or tally symbol, you must use Wingdings, and not Wingdings 2 or Wingdings 3.
2. Use the Symbol dialog box
To access the check mark character from the Symbol dialog box, follow these steps:
- Click in any text container object to place your insertion point, as shown in Figure 2, previously on this page.
- Now access the Insert tab of the Ribbon, and click the Symbol button. Doing so will bring up a drop-down menu, as shown in Figure 4, below. Click the More Symbols option, highlighted in red.
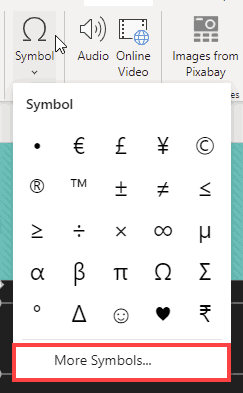
Figure 4: Click the Symbol button - Doing so brings up the Symbol dialog box, that you can see in Figure 5, below.
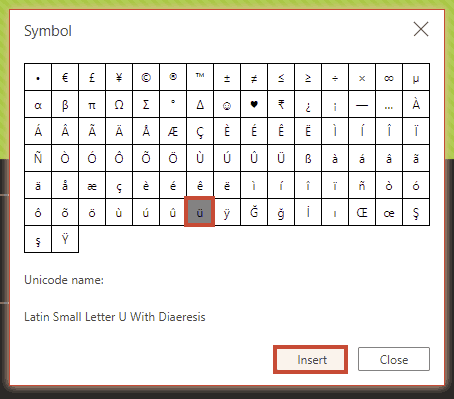
Figure 5: The Symbol dialog box - Now find the ü umlaut character, captioned as Latin Small Letter U with Diaeresis. This character can be seen highlighted in red within Figure 5, above. You then press the Insert key, also highlighted in red to place your u umlaut character in PowerPoint.
- Now, select the ü umlaut character, and access the Home tab of the Ribbon. Now change the font to Wingdings in the Font dropdown list, as shown highlighted in red within Figure 6, below.
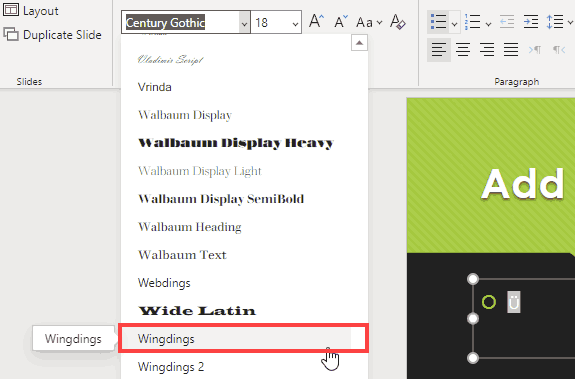
Figure 6: Change the font to Wingdings
Quickly Add Symbols
- Double-click any character to quickly add it to your insertion point in PowerPoint. You can double-click characters in quick succession, one after the other, to add multiple characters to your insertion point on the slide.
- Doing so changes the ü umlaut character to a check mark (tick mark) symbol (see Figure 3, shown previously on this page).
3. Use Copy and Paste
The third option is to copy and paste, and this option probably is the easiest way since you are already working within a web browser. It's easy to copy something from another tab in the browser and paste into your slide, also within a browser.
Now, follow these steps to copy symbols into PowerPoint for the Web:
- Click within any text container object to place your insertion point, as shown in Figure 2, previously on this page.
- Now, navigate to any web page that contains the ü umlaut character, or you can search on Google or another search engine for the term, ü umlaut. Once you see the ü umlaut character on a web page, carefully select it, making sure you only select the em dash and nothing else. Alternatively, here is the ü umlaut character for you to select and copy.
ü
- Now, paste this copied ü umlaut in your slide at the insertion point within PowerPoint for the Web. Now change the font to Wingdings in the Font dropdown list, as shown highlighted in red within Figure 6, previously on this page.
- Doing so changes the ü umlaut character to a check mark (tick mark) symbol, as shown in Figure 7, below.

Figure 7: The ü umlaut changes to a check mark
Sometimes, you may find that the font size of your pasted check mark character in PowerPoint may be different from the nearby text. In that case, make sure you match the font size of the text pasted.
As you learned, there is not one but three ways that you can use to insert a check mark or a tick mark within your slides in PowerPoint for the Web. Do use the way that works best for you, and wish you all success in your presentations.


