It's always been possible to add pictures from an online source within PowerPoint. For more than a decade, this source has been the pictures available online at Office.com. Now with a recent update, this option is no longer available in PowerPoint 2013 for Windows. Instead, you can use the Online Pictures option. This feature is very helpful as you are not limited to just the pictures available on your system. You get other picture sources, some of which also include Creative Commons pictures. All this happens within PowerPoint and there's no need to open your web browser.
Similar to what we learned in the Insert Picture in PowerPoint 2013 for Windows tutorial, there are two ways to insert an online picture on your slide in PowerPoint:
- You use a layout that includes a Content placeholder
- You insert a picture within a slide irrespective of its layout
Whichever option you choose depends upon your requirement. We cover both of them in the following steps:
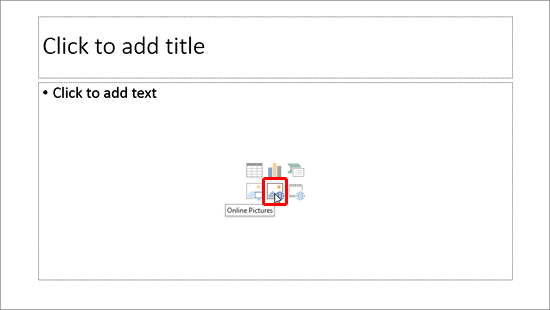
- Launch PowerPoint 2013 for Windows. You will see the Presentation Gallery. Here, select the Blank Presentation option to open a blank presentation with a new slide. Change the layout of this slide to Title and Content by selecting the Home tab | Layout | Title and Content option. This results in the slide layout you see in Figure 1.
Tip: A Content placeholder is a flexible placeholder on your slide that lets you add text, pictures, or any other content types. A Picture placeholder, on the other hand, lets you add just a picture. We use the Content placeholder in this tutorial.

Figure 1: Online Pictures button within Content placeholder - Notice that this layout has a Content placeholder that lets you add bulleted text or any of the 6 other content types in the slide. These 6 content types are indicated by the 6 buttons you see within the Content placeholder (see Figure 1). Click on the Online Pictures button in the Content placeholder, as highlighted in red within Figure 1, above.
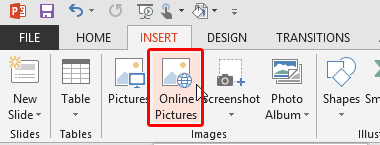
- Alternatively, if you want to add a picture on an existing slide that has no Content placeholder, you can select the Insert tab of the Ribbon, and click the Online Pictures button (highlighted in red within Figure 2).

Figure 2: Online Pictures button within the Insert tab - Either option brings up the Insert Pictures dialog box, as shown in Figure 3.

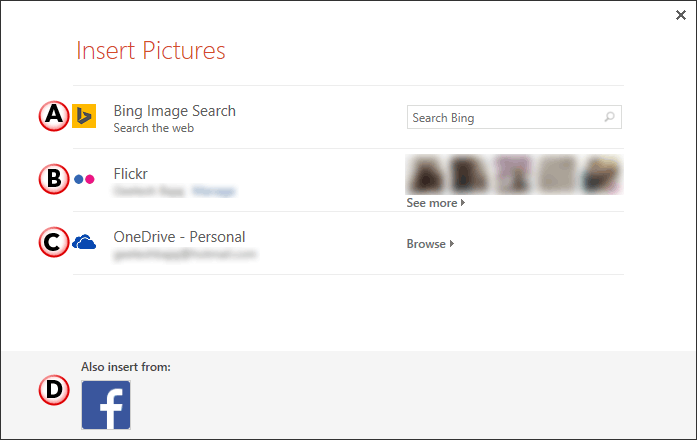
Figure 3: Insert Pictures dialog box - Within the Insert Pictures dialog box you'll find a list of online picture service providers, as shown in Figure 3, above. Additionally, if you are signed in within PowerPoint via your Microsoft Account, you will see your OneDrive account and any other services connected.
Note: Does the Insert Pictures dialog box look different when you access it, compared to what's shown in Figure 3, above? That may be because you may be connected to different services via your Microsoft Account. It may also be because this option is an online service, that's prone to change continuously.
- Options within the Insert Pictures dialog box are explained below, as marked in Figure 3, above.
A. Bing Image Search
- This option shows all the picture search result directly from Bing. Learn more on our Insert Picture from Bing in PowerPoint 2013 for Windows tutorial.
Tip: Want to explore how you can search images using Bing's amazing image search functions? Refer to our
Bing Image Search tutorial.
B. Flickr
- You can get pictures within your Flickr photostream. Learn more in our Insert Picture from Flickr in PowerPoint 2013 for Windows tutorial.
C. OneDrive
- Within this option, you can access pictures uploaded to your OneDrive account and insert them within your PowerPoint slides. To learn more refer to our Insert Picture from OneDrive in PowerPoint 2013 for Winodws tutorial.
D. Also insert from
- Other than the options explained above, you may see additional picture sources within this section. In this case, you can see that a Facebook option is available. To use this option, you first have to connect your Facebook account to your Microsoft account. Explore more in our Add Services in PowerPoint 2013 for Windows tutorial.
Choose any of the picture sources, and select the picture you want to add to your slide.
Make sure to save your presentation.
Cannot Access the Insert Pictures Dialog Box?
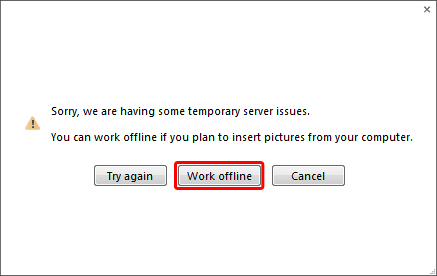
Cannot access the Insert Pictures dialog box, shown in Figure 3 earlier on this page? That may be because you are not connected online or Microsoft's servers are facing some temporary connectivity issues. You may see a different dialog box, as shown in Figure 4, below. In this case, just click on the Work offline button (highlighted in red within Figure 4, below), and you will see the local Insert Pictures option, as detailed in our Insert Picture in PowerPoint 2013 for Windows tutorial.

Figure 4: Work offline button 


