There are many, options as far as inserting pictures from online sources within PowerPoint are concerned. Other than using the Bing Image Search options, you can also access Flickr. Flickr is probably the greatest online resource for pictures uploaded by photographers and enthusiasts all over the world. However, unlike with the Bing option, PowerPoint does not allow you to simply go and insert anyone's Creative Commons licensed pictures from Flickr. You are allowed to download and insert pictures only from your own Flickr photostream. Needless to add, you will need to have an active Flickr account with photos available to use this feature.
Follow these steps to learn how to use the Flickr option to insert an online picture within PowerPoint 2016 for Windows:
- Access the Insert tab of the Ribbon, and click the Online Pictures button (highlighted in red within Figure 1).
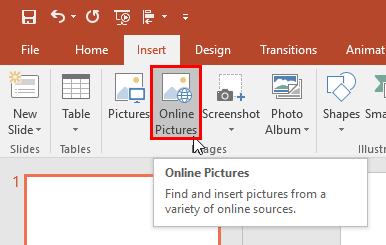
Figure 1: Online Pictures button - This will bring up the Insert Pictures dialog box. Within this dialog box, you can see the Flickr option as shown in Figure 2.
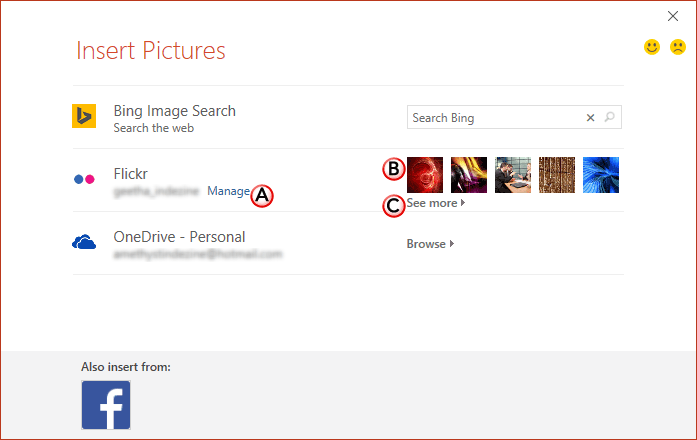
Figure 2: Flickr option within Insert Pictures dialog box Note: Is there no
Flickr option within the
Insert Pictures dialog box? You will have to add Flickr as a service connected to your Microsoft account. This needs to be done only once. Explore our
Add Services in PowerPoint 2016 tutorial to learn more.
- Unlike other services, the Flickr option does not provide you with a Search Bar to type in the keywords within the Insert Pictures dialog box. Instead, you are provided with different options detailed below, as marked in Figure 2 above:
A. Manage
- Click the Manage hyperlink to manage your Flickr account. Learn more in our Manage and Remove Connected Services in PowerPoint 2016 tutorial.
B. Picture preview
- This shows you thumbnail previews of the first five pictures within your Flickr photostream. You can click on any of these thumbnails here to insert the associated picture on your active slide within PowerPoint.
C. See more
- Click this option to open the next windows on the dialog box to see all the pictures within your photostream.
- For now, click the See more hyperlink, and you'll get to see all the pictures within your Flickr photostream in the next window, as shown in Figure 3. You can see only five pictures in Figure 3 because we have only five pictures in our photostream.
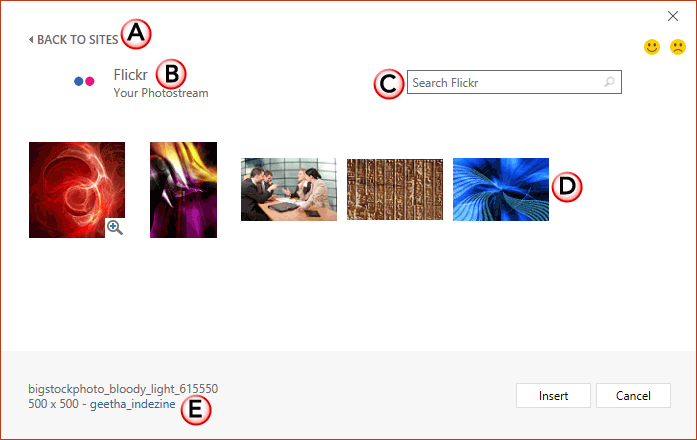
Figure 3: Window showing more pictures - Options within this window are explained below, as marked in Figure 3 above.
A. Back to Sites
- Click this option to get back to the Insert Pictures dialog box (refer to Figure 2, shown earlier in this page).
B. Photostream
- Click here and you can see pictures from your Flickr photostream.
C. Search Flickr
- This search bar allows you to find pictures from within your Flickr photostream using keywords.
D. Search Result
- Here you can see all pictures based on the search terms you provide. Unless you do this search, you will see all pictures within your Flickr photostream. If there are many pictures, you can use the scroll bar to explore more picture thumbnails.
E. Picture Info
- When you hover the mouse cursor on any picture thumbnail, in this area you can see the resolution and
name of the selected picture.
- Select one or more pictures that you want to insert on you slide, as shown in Figure 4 (highlighted in red). To select multiple pictures, Ctrl-click each of them. When you select picture(s) within this window, you can also see the number of pictures selected, as shown highlighted in blue within Figure 4.
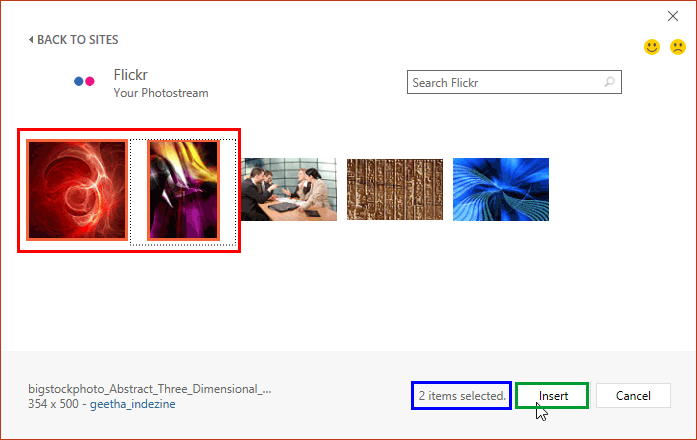
Figure 4: Pictures selected for inserting - Click the Insert button (highlighted in green within Figure 4, above) to insert the picture in your active slide as shown in Figure 5.

Figure 5: Selected pictures inserted on the slide - Make sure to save your presentation.


