If you want to add some visual content to your presentation slide, adding pictures is a great way to get started. There are
two ways to insert a picture on your slide in PowerPoint:
- You use a layout that includes a Content placeholder
- You insert a picture within a slide irrespective of its layout
Choose the option that works best for you; we cover both options in the following steps:
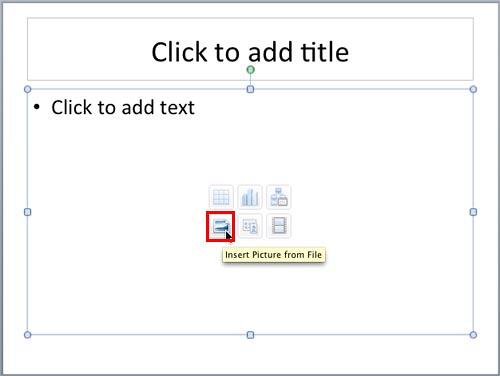
- Launch PowerPoint. You will see the Presentation Gallery that allows you to set all attributes of your new presentation, such as a preset Theme or template. Make selections or just click Cancel in this gallery to open a blank presentation with a new slide. Change the layout of this slide to Title and Content by selecting Layout | Title and Content within the Home tab of the Ribbon. This results in the slide layout you see in Figure 1.
- Notice that this layout has a Content placeholder that lets you add bulleted text or any of the 6 other content types in the slide. These 6 content types are indicated by the 6 buttons you see in the Content placeholder as shown in Figure 1. Click on the Insert Picture from File button within the Content placeholder (highlighted in red in Figure 1).
Tip: A Content placeholder is a flexible placeholder on your slide that lets you add text, pictures, or any other content types. A Picture placeholder, on the other hand, lets you add just a picture. We use the Content placeholder in this tutorial.

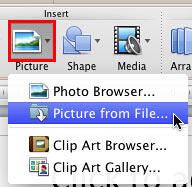
Figure 1: Insert Picture from File button within the Content placeholder - If you want to add a picture on a slide that includes no Content placeholder, select the Home tab of the Ribbon, and then, within the Insert group, click the Picture button (highlighted in red in Figure 2). From the drop-down gallery that appears, select the Picture from File option as shown in Figure 2.

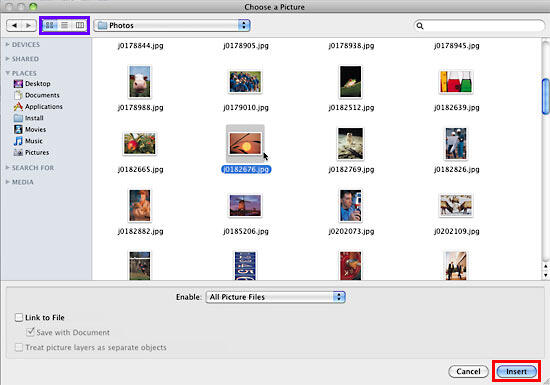
Figure 2: Picture from File option selected within the Picture drop-down gallery - Either way, you will summon the Choose a Picture dialog box. Navigate to the folder where your pictures are located. You will see the icons or thumbnails of the pictures as shown in Figure 3. Select the picture you need, and click on the Insert button highlighted in red in Figure 3.

Figure 3: Choose a Picture dialog box Note: Can't see the picture thumbnails, as shown in
Figure 3? Do you see a list or columns instead? It's simple to change between the views in
PowerPoint 2011 for Mac. Locate the
View button (highlighted in
blue in
Figure 3), and opt to view the items as icons by selecting the box with four squares (highlighted in
red in
Figure 4, below) in the
View button. This will make the folder contents to show up as picture thumbnails. See
Figure 4 for an enlarged view of the
View button.

Figure 4: View as icons option selected within the View button
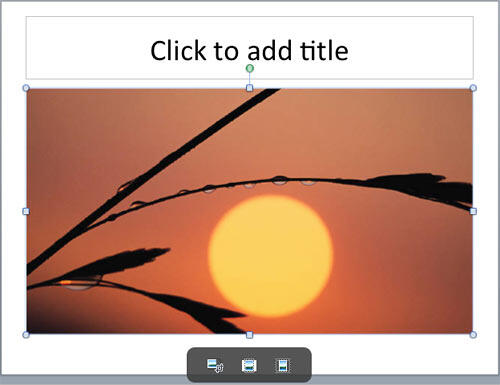
- As soon as you click the Insert button, you will see the selected picture placed on the slide (or within the Content placeholder), as shown in Figure 5.

Figure 5: Picture inserted on the slide - When a picture is inserted into a Content placeholder, you will see three icons below the inserted picture as shown in Figure 5 above. These icons are used to crop the inserted picture as explained below (in the left to right
order):
- Allows you to manually reposition, resize, or crop the picture in placeholder.
- Crops picture to fill the placeholder
- Resizes the picture to fit in placeholder
- Please note that these icons won't appear when you insert a picture on a slide without a Content placeholder.
- You can choose any of these options, or just click away from the picture to deselect it. Now, the picture can be edited by resizing, moving, rotating, etc. You can also add effects and more pizzazz to your pictures, as we will show you in subsequent tutorials. For now, don't forget to save your presentation.
Note that the procedure to insert a picture explained above will not retain any relation between the picture in your folder and the picture on your slide. The picture on your slide is an independent copy that is contained within the presentation. We will show you how you can link to the picture in our next tutorial in this series.


