Indezine Logo


Internal Margin Options in PowerPoint 2013 for Windows

Learn about setting internal margins for text boxes in PowerPoint 2013 for Windows. You can increase the space in all four directions individually.


Author:

Product/Version: PowerPoint 2013 for Windows

OS: Microsoft Windows 7 and higher


Learn PowerPoint

Learn about Presentation Industry Events


Internal margins are relevant to all the three types of text containers in PowerPoint. These three containers are text boxes, text placeholders, and shapes that contain text. Internal margins control the amount of blank space between the perimeter (edge) and the actual text within the text container. Although these margins are similar to the margins of pages in a word-processing document like Microsoft Word, there is a significant difference. Each text container has its own individual margins set, and you can have entirely different margins for different text containers, even if they reside on the same slide. In this tutorial, we will explore how you can set and change these Internal margins for text within a text container in PowerPoint 2013.

It is recommended that the margin settings should be done on the slide itself only for text boxes (and shapes) rather than individual text placeholders. You can set margins for text placeholders too but best practices dictate that you make these changes for text placeholders within the Slide Master—thus, providing a consistent look to successive slides in your presentation.

Tip: Don't know the difference between a text box and a text placeholder? Look at our Text Boxes vs. Text Placeholders tutorial.

Follow these steps to set a text container's internal margins in PowerPoint 2013 for Windows:
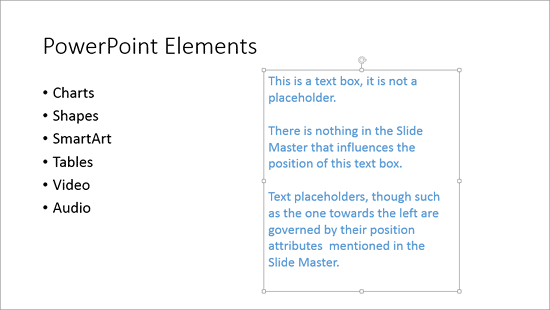
  1. Open any slide which has a text container. Click on the edge of the text container so that the entire text container is selected. Figure 1 shows a text box selected, which is indicated by the solid line with selection handles on its perimeter.
  2. Text box selected
    Figure 1: Text box selected
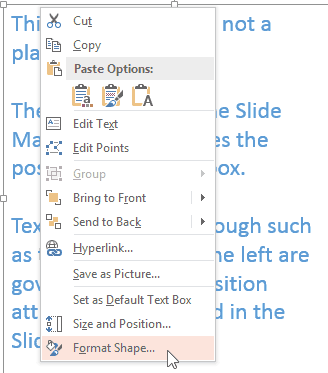
  3. Right-click to get the context menu you see in Figure 2. Select the Format Shape option (refer to Figure 2 again).
  4. Format Shape option
    Figure 2: Format Shape option
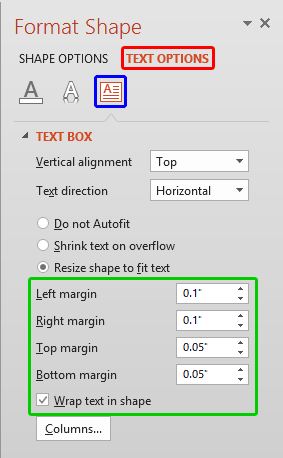
  5. This will open the Format Shape Task Pane, as shown in Figure 3. Make sure you choose Text Options tab (highlighted in red within Figure 3). Then select the Text Box button (highlighted in blue within Figure 3). All the options related to text box internal margin are highlighted in green within Figure 3.
  6. Format Shape Task Pane
    Figure 3: Format Shape Task Pane
  7. This section provides options to tweak the space around the text within the text box. You'll find four separate boxes to enter values for the internal margins. These are Left margin, Right margin, Top margin, and Bottom margin. Enter the values or use the up and down arrow to change the margin value in each of these four boxes.
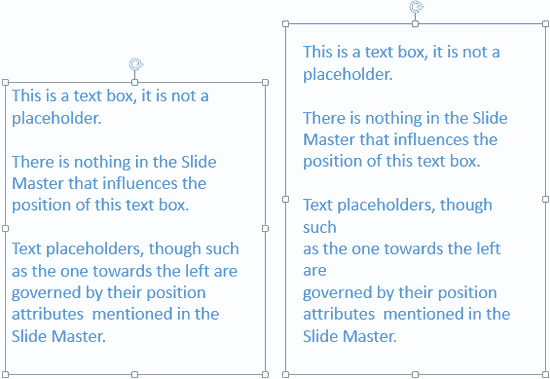
  8. Right below these boxes, you'll find the Wrap text in shape check-box. When selected, this instructs text to flow within the shape. In Figure 4, the shape shown towards left includes the text that is not wrapped, and the same shape shown towards right includes wrapped text.
  9. Text within the shape when not wrapped and same shape with text wrapped
    Figure 4: Text within the shape when not wrapped and same shape with text wrapped
  10. Figure 5 shows the difference between the text box with default internal margins and the same text box with changed internal margins. You can see the original text box on the left, and the text box on the right has larger margins.
  11. Compare the same text container with differing internal margins
    Figure 5: Compare the same text container with differing internal margins
Tip: Once you change text margins for a text box or a shape, you can set them as the default for any text box or shape you insert hereafter within the same presentation. To learn how to set this default, explore our Set as Default Text Box in PowerPoint 2013 and Change the Default Shape Attributes in PowerPoint 2013 tutorials.

See Also:

Internal Margin Options in PowerPoint 2011 for Mac
Internal Margin Options in PowerPoint 2010 for Windows

You May Also Like: Obama Gets Back on Message | Pregnancy PowerPoint Templates


Popular Posts

Creating Anchor Points for Connectors in PowerPoint 2010 for Windows
Learn how to create Anchor Points for connectors in PowerPoint 2010.

Working With Slide Numbers in PowerPoint 2016 for Windows
Learn how to add Slide Numbers on slides and Masters and more tricks on making them work to your will in PowerPoint 2016 for Windows.

Texture Fills for Slide Backgrounds in PowerPoint 2013 for Windows
Use texture fills for slide backgrounds in PowerPoint 2013 for Windows.

Adding More Guides in PowerPoint 2016 for Windows
Learn how to add more guides in PowerPoint 2016 for Windows.


Handmade Slides: Pushpins for PowerPoint

These “pushpin” graphics are already placed in PowerPoint slides. Just copy them and paste within your slides to create a look that makes a picture, shape, or anything else appear as if it has been pushed onto a surface, board, or wall with a pin! These ready-made pushpins are already within PowerPoint slides, and have been provided in five colors. Just copy them and paste them on your slides.

Download these Pushpins for just $19.99


Microsoft and the Office logo are trademarks or registered trademarks of Microsoft Corporation in the United States and/or other countries.

Home | PowerPoint | Photoshop | PowerPoint Templates | PowerPoint Tutorials | Blog | Notes | Ezine | Media Kit | Feedback | Site Map | About Us | Contact Us

Link to Us | Privacy | Testimonials

PowerPoint Backgrounds | Christian PowerPoint Backgrounds | Business PowerPoint Presentation Templates

Plagiarism will be detected by Copyscape

©2000-2023, . All rights reserved.