Indezine Logo


Create Jigsaw Shapes with Merge Shapes Commands in PowerPoint 2013 for Windows

Learn how to create jigsaw shapes using Merge Shapes commands in PowerPoint 2013 for Windows. You can create jigsaws from any shape you like, and the process is easy and fast.


Author:

Product/Version: PowerPoint 2013 for Windows

OS: Microsoft Windows 7 and higher


Learn PowerPoint

Learn how to ungroup charts in PowerPoint.


PowerPoint's Merge Shapes commands open new opportunities and possibilities for you. Typically, whenever we need to create a jigsaw puzzle in PowerPoint, we source the actual jigsaw shapes from Office.com or from one of the many stock image sites. However, the Merge Shapes commands make it so easy to create your own jigsaws with nothing more than a few shapes! Read more to learn.


  1. Launch PowerPoint 2013 for Windows. Most of the time PowerPoint will open with a new slide in a presentation. PowerPoint 2013 users can change the slide layout to Blank by selecting Home tab | Layout | Blank.
  2. Now place a square shape that is sized 2.5"x2.5". If your computer shows centimeters rather than inches as the unit of measurement, you can use the same size in that unit (6.35 cms). Place 4 squares lengthwise and 3 height wise, as shown in Figure 1, below. You may need to distribute your squares so that they line up perfectly.
  3. Square shapes placed on slide
    Figure 1: Square shapes placed on slide
  4. Tip: We are using a standard resolution (4:3) slide, so we are using just 3 rows with 4 squares each, as shown in Figure 1. If you are using a widescreen (16:9) resolution for your slides, you may have to choose a different size for your squares. In widescreen resolutions, it's difficult to get fewer squares of the same size unless you create 9 rows with 16 squares each and that does make a very crowded jigsaw! In that case, you can use slightly wider rectangles rather than squares, as shown in Figure 2, below.
  5. Square shapes placed on 16:9 resolution of slide
    Figure 2: Square shapes placed on 16:9 resolution of slide
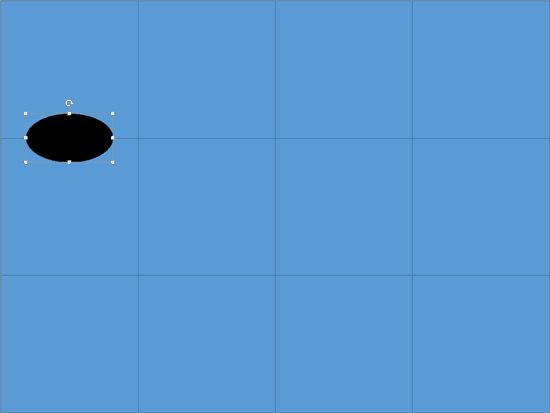
  6. Next, draw an oval shape that's much smaller than the squares, as shown in Figure 3. We colored this oval in a different color so that it stands apart from the squares. Make sure you place the oval to overlap symmetrically above two squares.
  7. Oval shape placed right in between two squares
    Figure 3: Oval shape placed right in between two squares
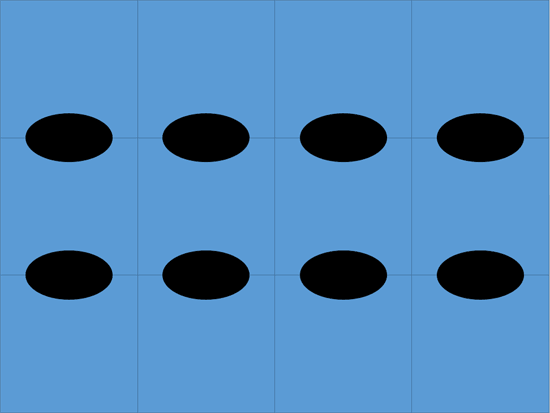
  8. Now duplicate these ovals so that you overlap them over all squares, as shown in Figure 4.
  9. Oval shape duplicated
    Figure 4: Oval shape duplicated
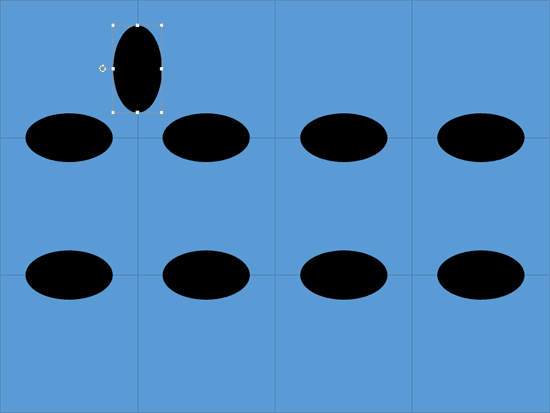
  10. Duplicate one of the ovals again, and rotate it 90 degrees. Then place it height-wise, symmetrically over two squares, as shown in Figure 5.
  11. Duplicated Oval shape placed height wise
    Figure 5: Duplicated Oval shape placed height wise
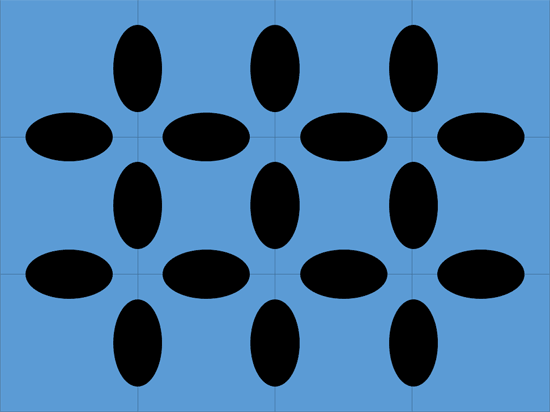
  12. Now duplicate these ovals too, so that you have them placed overlapping all squares, as shown in Figure 6.
  13. More Duplicated Oval shapes
    Figure 6: More Duplicated Oval shapes
  14. Duplicate your entire slide, as shown in Figure 7. Go back to the earlier slide.
  15. Slide duplicated
    Figure 7: Slide duplicated
  16. Now first select the square on the top left, and then the oval at its bottom, as shown in Figure 8. It's important that you select the square first and thereafter the oval.
  17. Square and Oval shapes selected
    Figure 8: Square and Oval shapes selected
  18. Now choose the Merge Shapes | Subtract option. You will end up with the results shown in Figure 9.
  19. Oval shape subtracted from Square shape
    Figure 9: Oval shape subtracted from Square shape
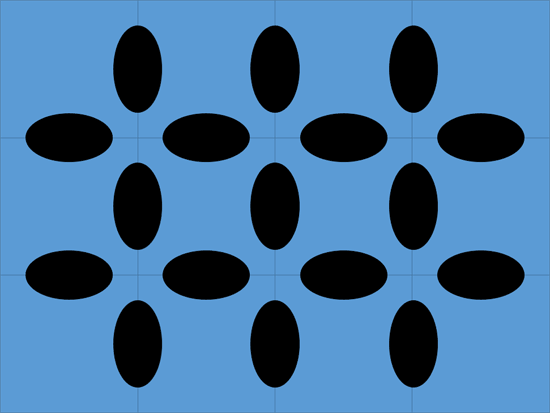
  20. Do the same for all the remaining 8 ovals beneath the squares. The squares in the bottom row have no ovals beneath them, and that's OK. You will end up with the results shown in Figure 10. If you are doing the subtraction in succession, you can quickly press the Ctrl +Y keyboard shortcut to do so.
  21. Result of Oval shapes subtracted from Square shapes
    Figure 10: Result of Oval shapes subtracted from Square shapes
  22. PowerPoint Keyboard Shortcuts

    PowerPoint Keyboard Shortcuts

    Do you want more keyboard shortcuts?

    Explore our PowerPoint Keyboard Shortcuts and Sequences Ebook that is updated for all PowerPoint versions.
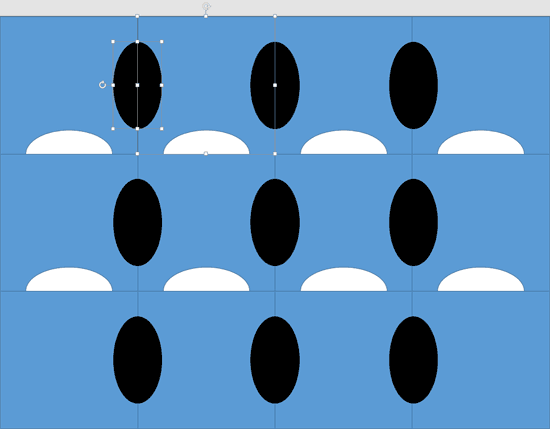
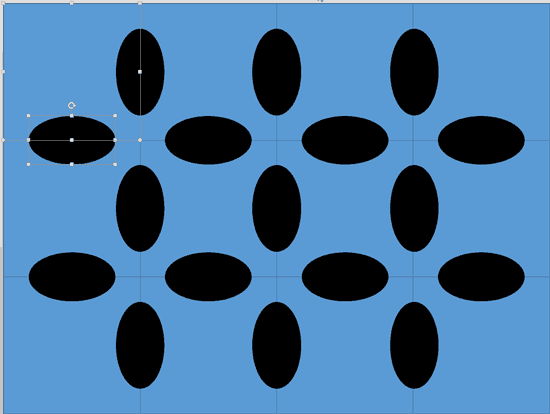
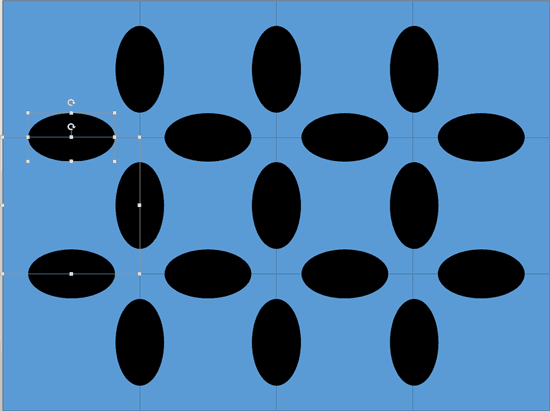
  23. Now select the second square from the left in the top row, and then select the oval immediately leftwards, as shown in Figure 11.
  24. 2nd Square from left and the Oval leftwards selected
    Figure 11: 2nd Square from left and the Oval leftwards selected
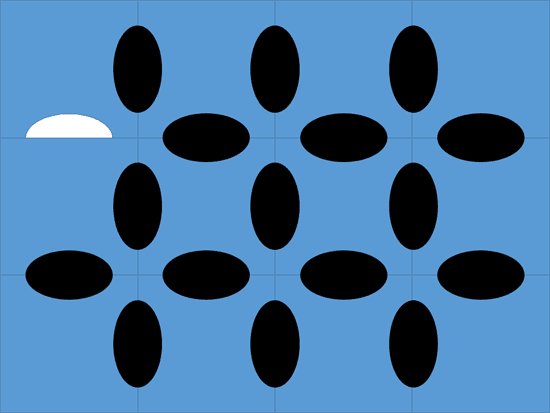
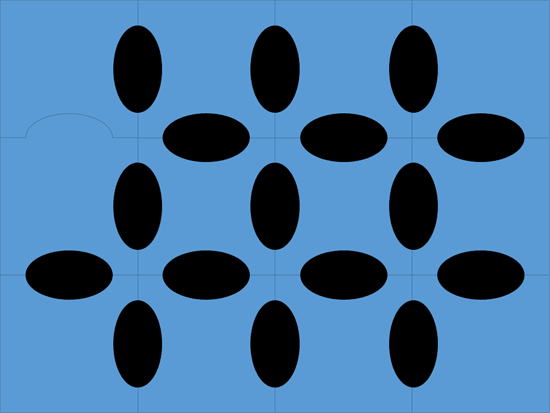
  25. Now choose the Merge Shapes | Subtract option. You will end up with the results shown in Figure 12.
  26. Oval shape subtracted from Square shape
    Figure 12: Oval shape subtracted from Square shape
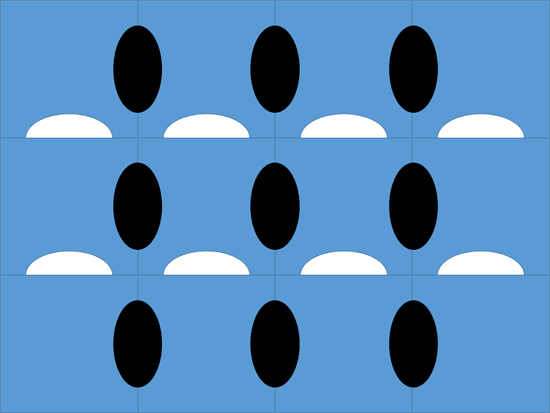
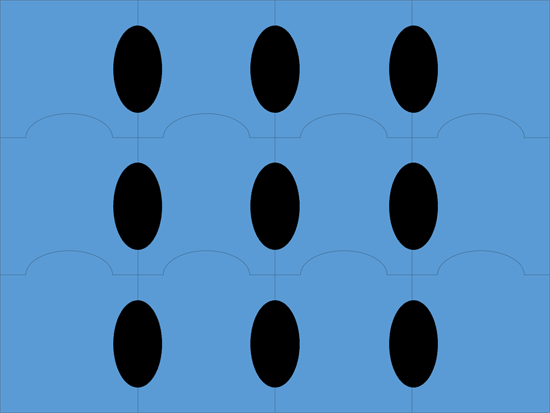
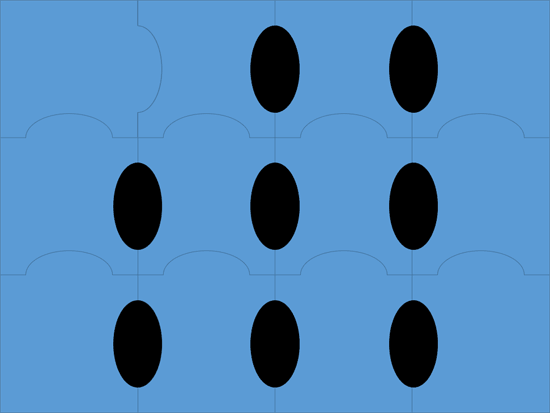
  27. Do the same for all the remaining 9 ovals leftwards of the squares. If you are doing the subtraction in succession, you can quickly press the Ctrl + Y keyboard shortcut to do so. The squares in the leftmost column have no ovals besides them, and that's OK. You will end up with the results shown in Figure 13.
  28. Result of subtracting all the 9 Oval shapes from Square shapes
    Figure 13: Result of subtracting all the 9 Oval shapes from Square shapes
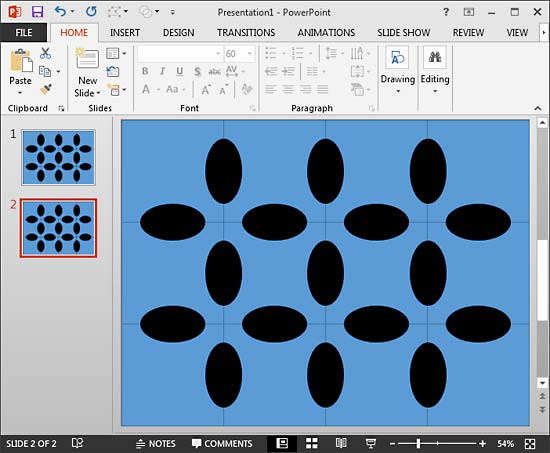
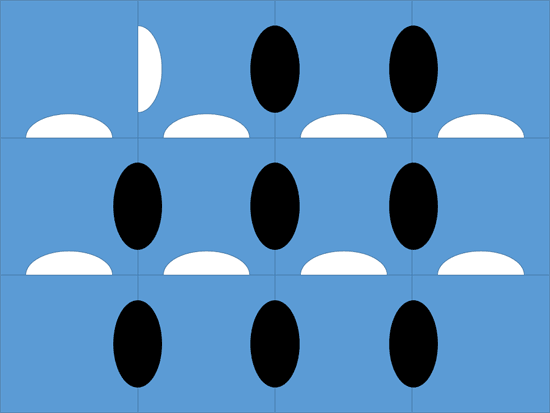
  29. Now, do you remember the duplicated slide in step 7? Select all ovals from that slide (do not select any squares). Copy them and then paste them into your slide that you worked upon in step 13 to end up with the results shown in Figure 14.
  30. Placed all the Oval shapes over Square shapes
    Figure 14: Placed all the Oval shapes over Square shapes
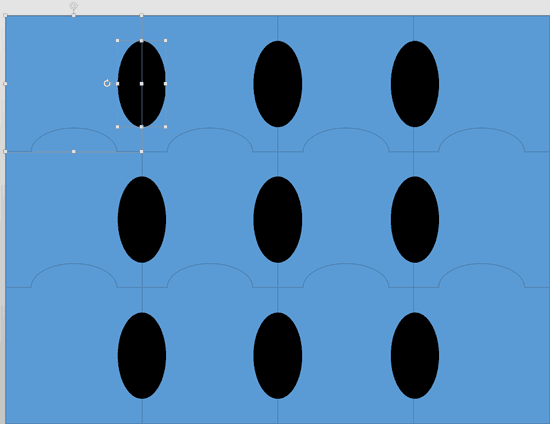
  31. Now select the first square in the second row, and the oval placed directly above (see Figure 15).
  32. 1st Square of 2nd row and Oval above it selected
    Figure 15: 1st Square of 2nd row and Oval above it selected
  33. Now choose the Merge Shapes | Union option. You will end up with the results shown in Figure 16.
  34. Oval and Square shapes united
    Figure 16: Oval and Square shapes united
  35. Do the same for all the remaining 8 ovals above the squares. If you are doing the union in succession, you can quickly press the Ctrl+Y keyboard shortcut to do so. The squares in the top row have no ovals above them, and that's OK. You will end up with the results shown in Figure 17.
  36. Result of all 8 Oval united to and Square shapes
    Figure 17: Result of all 8 Oval united to and Square shapes
  37. Now select the first square from the left in the top row, and then select the oval immediately rightwards, as shown in Figure 18.
  38. Square shape and Oval shape selected
    Figure 18: Square shape and Oval shape selected
  39. Now choose the Merge Shapes | Union option. You will end up with the results shown in Figure 19.
  40. Result of uniting previously selected Square and Oval shapes
    Figure 19: Result of uniting previously selected Square and Oval shapes
  41. Do the same for all the remaining 9 ovals rightwards of the squares. If you are doing the union in succession, you can quickly press the Ctrl + Y keyboard shortcut to do so. The squares in the rightmost column have no ovals besides them, and that's OK. You will end up with the results shown in Figure 20.
  42. Jigsaw shapes created
    Figure 20: Jigsaw shapes created
  43. You can now select any individual jigsaw shape and move it to see that it's an individual shape in its own right! You can create similar jigsaws with other shapes too. You can also animate these jigsaw pieces and fill them with slide background fills to create an amazing effect. Explore our Puzzle Pictures in PowerPoint tutorial to learn more.

[an error occurred while processing this directive]

You May Also Like: Show Off Your Expertise in an Impressive Presentation | Animals - O PowerPoint Templates


Popular Posts

Set Minimum and Maximum Values on Value Axis in PowerPoint 2013 for Windows
Learn how to set the Minimum and Maximum values on Value Axis of Charts in PowerPoint 2013 for Windows.

Crop Pictures (Mask to Shape) in PowerPoint 2011 for Mac
Learn how to crop pictures using Mask to Shape option in PowerPoint 2011 for Mac.

Playing Video Across Slides in PowerPoint 2016 for Windows
Play a video clip across slides in PowerPoint 2016 for Windows.

Set Document Resolution in PowerPoint 2016 for Windows
Learn how to set document resolution in PowerPoint 2016 for Windows.


Polygon Center Circles for PowerPoint

These special circles have polygon centers: the centers are made of triangles, squares, pentagons, and hexagons! And based on the sides of the polygon, the rest of the circle has that many segments.

Download and use these Polygon Center Circles in your slides for just $4.99


Microsoft and the Office logo are trademarks or registered trademarks of Microsoft Corporation in the United States and/or other countries.

Home | PowerPoint | Photoshop | PowerPoint Templates | PowerPoint Tutorials | Blog | Notes | Ezine | Media Kit | Feedback | Site Map | About Us | Contact Us

Link to Us | Privacy | Testimonials

PowerPoint Backgrounds | Christian PowerPoint Backgrounds | Business PowerPoint Presentation Templates

Plagiarism will be detected by Copyscape

©2000-2023, . All rights reserved.