Indezine Logo


Move Text Boxes on a Slide in PowerPoint 2016 for Windows

Learn how to move text boxes on a slide in PowerPoint 2016 for Windows. There is surprising control over how you drag and move text boxes.


Author:

Product/Version: PowerPoint 2016 for Windows

OS: Microsoft Windows 7 and higher


Learn PowerPoint

Learn about using the Object Packager to embed video


This tutorial is about moving text boxes rather than text placeholders. Typically text placeholders for regular text content or even slide titles are located in the same position on successive slides. So, if you really do need to move a text placeholder, do it within the Slide Master so that this change of position happens on all slides, providing a consistent look to your presentation. This will also prevent you from repeatedly moving the placeholders on each and every slide on your presentation.

Tip: Don't know the difference between a text box and a text placeholder? Look at our Text Boxes vs. Text Placeholders tutorial.

In this tutorial, you will learn how you can move text boxes within the Slide Area in PowerPoint 2016. Do note that we suggest you move only text boxes, and not text placeholders since the positioning of the latter is normally controlled by the Slide Master.

Now that you are more aware of why you should not move text placeholders, let us tell you that all techniques on this page apply to both text placeholders and text boxes! Actually, they also apply to any shapes in your slides that contain text. But yes, it is not a good practice to move text placeholders on your slide.

Learn more about how you can change the position of your text boxes in PowerPoint 2016 for Windows. Follow these steps:
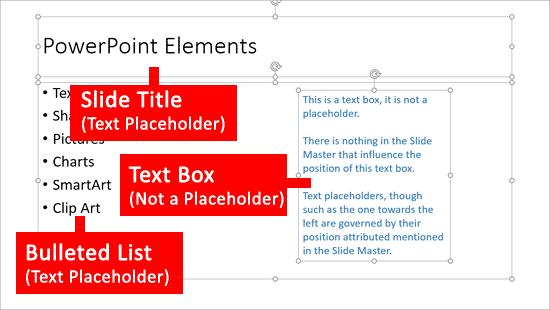
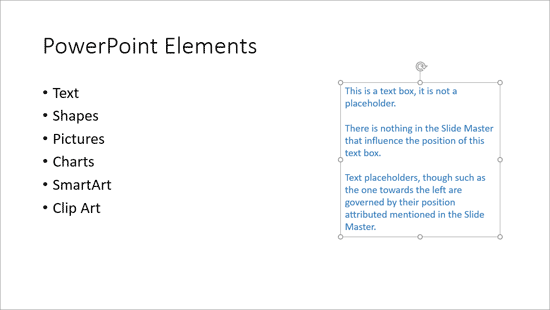
  1. Open any slide which has a text box, as shown in Figure 1. Note that of the three text containers on this slide, only one is a text box, and that's the one on the right side of the slide (which includes blue colored text).
  2. Slide with all text containers selected
    Figure 1: Slide with all text containers selected
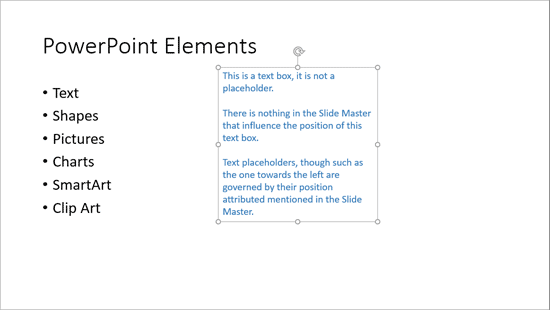
  3. Click on the edge of the text box so that it shows a solid line with selection handles on its perimeter (see Figure 2).
  4. Text box selected
    Figure 2: Text box selected
  5. Tip: If you click within the text box, you'll see a dotted line surrounding the perimeter of the text box indicating that you are editing the text inside the box. A solid line indicates the selection of the entire text box, rather than some text within.
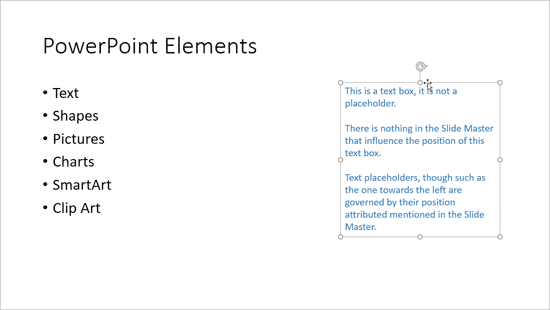
  6. Now move the cursor over the edge of the selected text box so that it changes to a double-crossed arrow, as shown in Figure 3.
  7. Changed cursor
    Figure 3: Changed cursor
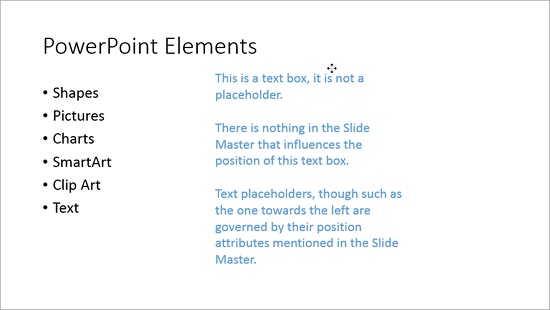
  8. Click the border and drag the text box to a new position without leaving the mouse button. Figure 4 shows the text placeholder being dragged to new place.
  9. Text box is being moved
    Figure 4: Text box being dragged
  10. Figure 5 shows the selected text box in a new position. Compare to Figure 2, shown earlier on this page.
  11. Text box moved to new position
    Figure 5: Text box moved to new position
  12. Tip: You can also move a selected text box by nudging it using the arrow keys on your keyboard.
  13. Make sure to save your presentation often.

This tutorial looked at moving text boxes by dragging. If you want to move text boxes more accurately, explore our Reposition Text Boxes Accurately on a Slide in PowerPoint 2016 tutorial.


See Also:

Move Text Boxes on a Slide in PowerPoint 2016 for Windows
Move Text Boxes on a Slide in PowerPoint 2016 for Mac
Move Text Boxes on a Slide in PowerPoint 2013 for Windows
Move Text Boxes on a Slide in PowerPoint 2011 for Mac

You May Also Like: Presentation Summit 2019: Conversation with Nolan Haims | Chinese Zodiac PowerPoint Templates


Popular Posts

Formatting Arrows (Arrowheads) in PowerPoint 2013 for Windows
Learn how to format arrowheads for lines in PowerPoint 2013 for Windows.

Changing Location of Slide Numbers in PowerPoint 2010
Learn how to change location of slide numbers in PowerPoint 2010.

Text Alignment within Table Cells in PowerPoint 2013 for Windows
Learn about the options for text alignment within Table cells in PowerPoint 2013 for Windows.

Keyboard Shortcuts for PowerPoint 2011 for Mac
Explore keyboard shortcuts in PowerPoint 2011 for Mac.


Handmade Slides: Pushpins for PowerPoint

These “pushpin” graphics are already placed in PowerPoint slides. Just copy them and paste within your slides to create a look that makes a picture, shape, or anything else appear as if it has been pushed onto a surface, board, or wall with a pin! These ready-made pushpins are already within PowerPoint slides, and have been provided in five colors. Just copy them and paste them on your slides.

Download these Pushpins for just $19.99


Microsoft and the Office logo are trademarks or registered trademarks of Microsoft Corporation in the United States and/or other countries.

Home | PowerPoint | Photoshop | PowerPoint Templates | PowerPoint Tutorials | Blog | Notes | Ezine | Media Kit | Feedback | Site Map | About Us | Contact Us

Link to Us | Privacy | Testimonials

PowerPoint Backgrounds | Christian PowerPoint Backgrounds | Business PowerPoint Presentation Templates

Plagiarism will be detected by Copyscape

©2000-2023, . All rights reserved.