Once a picture is inserted in your slide, you can do so much more. Explore cropping, or adjust how the picture looks by applying adjust picture options. Additionally, you may also apply any of the preset Picture Styles available. In this tutorial, we will explore the Border options that allow you to add a simple outline or even a beautiful frame to your pictures.
Follow these steps to learn more in PowerPoint 2010 for Windows:
- Open your presentation and select the picture that you want to apply the border to. You can also select more than one picture on a single slide. Alternatively, if you just want to follow this tutorial step-by-step, launch PowerPoint. Most of the time, PowerPoint will open with a new slide in a presentation. PowerPoint 2010 for Windows users can change the slide layout to Blank by selecting the Home tab | Layout | Blank option. Then, insert a picture and select it.
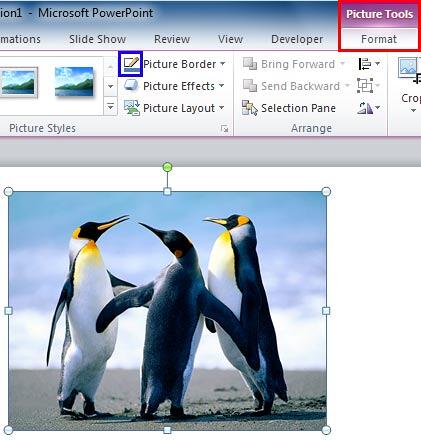
- This brings up the Picture Tools Format tab on the Ribbon (highlighted in red within Figure 1). Make sure that this contextual tab is activated.

Figure 1: Picture Border button within the Picture Tools Format Picture tab Note: The
Picture Tools Format tab is a
Contextual tab. These tabs are special tabs in the
Ribbon that are not visible all the time. They only make an appearance when you are working with a particular slide object which can be edited using special options.
- At this point, you can add the border to your selected picture using any of the following approaches:
- Apply a Picture Style that includes a border, and edit it later, as required.
- Click the Picture Border button, as shown highlighted in blue within Figure 1, above. This adds a thin border using the first Accent color of the active Theme.
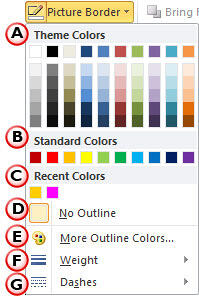
- Click the Picture Border text button, as shown highlighted in green within Figure 1, above. This opens the Picture Border drop-down gallery that you can see in Figure 2. Select any of the options within this drop-down gallery that we have explained next.

Figure 2: Picture Border drop-down gallery - Let us explore all options within the Picture Border drop-down gallery, as marked in Figure 2:
A. Theme Colors
- Here, you can select any of the colors which are from the active Theme of the presentation for the picture border. You can also select any of the 5 tints or shades for any Theme color. Learn more about Themes here.
B. Standard Colors
- Here you can choose from any of the ten standard colors. These ten standard colors are just choices of colors that PowerPoint believes to be widely used. You don't have to limit yourself to either the Theme colors or Standard colors, as we'll show you in the next options. It's a good design idea to use Theme colors as far as possible.
C. Recent Colors
- Here you can find the colors most recently used. If you have just launched PowerPoint and created a new presentation, the Recent Colors option may be entirely absent since you haven't selected any color recently!
D. No Outline
- Choose this option to remove the picture border altogether from your selected picture.
E. More Outline Colors
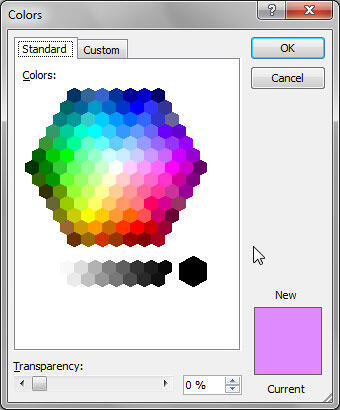
- This option is to summon the Colors dialog box as shown in Figure 3. This dialog box has two tabs: Standard and Custom. First select the Standard tab (again, refer to Figure 3).

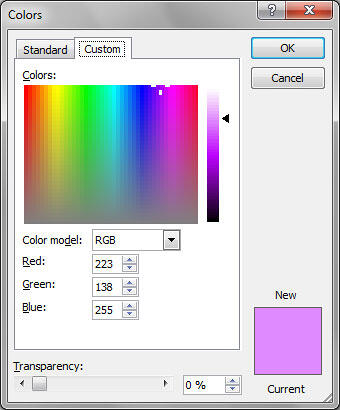
Figure 3: Standard tab within the Colors dialog box - This tab offers 127 colors in a honeycomb style palette, including 14 gray shades, black and white. You can even change the transparency value of the selected color in the Transparency slider below. If you want more color choices, then select the Custom tab of the same dialog box, as shown in Figure 4.

Figure 4: Custom tab within the Colors dialog box - In this tab, you can choose any color from the spectrum and later adjust the selected color's luminosity with the slider on the right. You can even enter specific values of RGB and HSL to create a specific color. All these combinations provide 16 million color choices!
- Again, you can even change the transparency value of the selected color in the Transparency slider below. Choose any color and click the OK button to apply the changes.
F. Weight
- Change the thickness of the border from hairline to a chunky, thick line. Learn more about line thickness in our Formatting Line Weight and Thickness for Shapes in PowerPoint 2010 for Windows tutorial. Although the linked tutorial is about shape borders, the procedure explained in the tutorial applies to picture borders as well.
G. Dashes
- These are different dash types for the picture border. Learn more about these options in our Formatting Line Dashes for Shapes in PowerPoint 2010 for Windows tutorial.
- Once you have added/edited the picture border, remember to save your presentation. In Figure 5 you can see a border added to the selected picture. Compare Figures 1 and 5.

Figure 5: Picture border added and enhanced


