 Trisha Meyer is a stay-at-home mom and former employee of Sound Engineering.
In this tutorial, she explores how you can use the various ActiveX controls available to PowerPoint versions on Microsoft Windows, within your slides. She looks at various such controls, such as editable Text Box objects, scrollable Text Box objects, Check Box objects, and Option Button objects.
Introduction
Accessing the ActiveX Control Toolbox
Creating Editable Text Box Objects
Creating Scrollable Text Box Objects
Creating Check Box Objects
Creating Option Button Objects
Introduction
So you think you know PowerPoint? Good. Now you're ready to learn some really interesting techniques. For example, have you ever wanted to have a text box that can be edited while a show is running? Have you ever had more text than room and wished you could create a scroll bar? Have you ever wanted to use PowerPoint as a quiz or survey? Then read on...
ActiveX controls allow you to set up truly interactive PowerPoint presentations. The viewer can type responses or check the box with the correct answer or select the button that corresponds to his or her choice. Although ActiveX controls take a little more time to set up initially, the end result is impressive and useful.
Back
Accessing the ActiveX Control Toolbox
- Select the slide on which you wish to add interactive elements.
- Click on View | Toolbars | Control Toolbox. A new toolbox window will open. If you prefer, you can drag this toolbox to the top and add it as another menu row.

- The Control Toolbox consists of the following icon buttons: Properties, View Code, Check Box, Text Box, Command Button, Option Button, List Box, Combo Box, Toggle Button, Spin Button, Scroll Bar, Label, Image, and More Controls.
- Many of these options require knowledge of Visual Basic for Applications (VBA), which we will NOT be covering in this lesson.
- The following options, however, can be used without any knowledge of VBA: Check Box, Text Box, and Option Button. (Despite the name, Scroll Bar is NOT the option we will be using to create scrolling text boxes.)
- The Properties button allows you to edit your ActiveX objects. We will use this option extensively. The View Code button will take you to the VBA code screen. We will not be using this option.
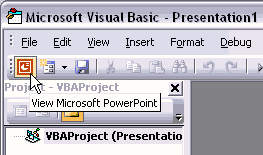
- If you accidentally end up on this screen, simply click on the PowerPoint icon in the upper left to return to your regular PowerPoint slide. (see screenshot below)

- You can also close the Microsoft Visual Basic window to get back to PowerPoint.
Back
Creating Editable Text Box Objects
You can create text boxes that can be typed in while the show is running by using the Text Box option. This allows you to create presentations in which viewers can type responses right onto the slides.
Note: You will be creating text box objects, which are different from regular text boxes.
- Click on the Text Box icon (ab|).

- Click on the slide and draw a box. This will be TextBox 1.
- Make sure the text box is selected and click on the Properties button (the finger pointing to a piece of paper).

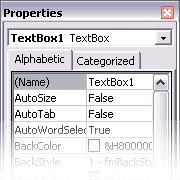
- A list of object properties will open.

- Click on the Categorized tab. This will list options by Appearance, Behavior, Data, Font, Misc(ellaneous), and Scrolling.
- To change the background color of the text box, click on the BackColor line in the Appearance section. An arrow will appear to the right.
- Click on the arrow. A list will open showing various pre-set colors for Windows system features. For more color options, click on the Palette tab.
- This color palette has fewer choices than the one you use in regular PowerPoint. If you want your text box object's background to match your slide background, choose a color from this palette and then find the same color in the Slide Background color chart. On the Palette, click on the box of the color you want to use. The color of the text box object will change.
- If you want your text box object to have a border, click on BorderStyle and select 1. Then click on the BorderColor line and repeat steps 6 and 7 to select your border color.
- To choose your font color, click on ForeColor and select your desired font color.
- In the Behavior section, find MultiLine. If you want your text to "wrap" to the next line (and you most likely do), click on this line and select True. Otherwise, your text will continue across in a single line, and most will not be visible.
- Click on TextAlign and select your desired alignment: 1=left, 2=centered, 3=right.
- To adjust your font, click on Font. Instead of an arrow, three dots will appear to the right. Click on these dots to open the font window. Select your desired font, style, and size. Again, you will have fewer options than in the Format Font window of regular PowerPoint.
- In the Misc section, you can adjust the height and width of the text box object. This option is useful if you need more than one box to be the same size. Create one that is the size you like (by dragging on the corners), and then make note of its height and width numbers. Type in those numbers to create subsequent text box objects that are the same size.
- Click on View | Slide Show to run this slide. You will be able to type in the text box object you just created. When you exit the show, you will see the text you typed on the editing slide.
- In order to edit a text box object in editing mode, click on Edit: TextBox Object: Edit. You will need to do this EACH time you wish to edit a text box object in editing mode (as opposed to view mode).
Back
Creating Scrollable Text Box Objects
Use the same process as for a regular text box object, but add the following step:
- In the Properties list, find the Scrolling section and click on ScrollBars. Select option 2. When your text no longer fits in the text box object, it will automatically create a scroll bar on the right side. (If your text does fit in the text box object, no scroll bar will appear.) Make sure you have selected MultiLine: True in step 10, above. If False is selected, a horizontal scroll bar will appear across the bottom, and all your text will be on one line.
When you run the show, the viewer will be able to scroll down to see more text. This feature is useful if you have a lot of text to describe a picture on a slide. Rather than creating multiple slides with the same picture, you can use a scrollable text box to contain your long text.
Back
Creating Check Box Objects
Perhaps you want to create a PowerPoint multiple-choice quiz where there will be more than one possible answer. Or maybe you want to create a survey that allows the user to “check all that apply”. Then text box objects are what you will need.
- If it is not already open, open your Control Toolbox.
- Click on the Check Box icon (the box with a check mark in it).

- Click on your slide and draw a box (a long horizontal box is best). This will be CheckBox 1.
- Adjust the properties of your check box object as desired. (See also Creating Editable Text Box Objects.)
- Alignment: 0=text on left, box on right; 1=box on left, text on right
- Special Effect: 0=boldface check box; 2=regular check box (not boldface)
- TextAlign: 1=left; 2=centered; 3=right
- To change the text from “CheckBox #,” click on Edit: CheckBox Object: Edit and retype the text that you want.
- Picture allows you to insert a picture from a file so that the user can choose from among pictures rather than text options (great for kindergarten or foreign language teachers!).
- PicturePosition allows you to include both text and a picture. Type your text (Edit: CheckBox Object: Edit) BEFORE inserting a picture. There are numerous options for positioning your text and picture. If some or all of your text disappears, try increasing the size of your Check Box Object. If your text still does not appear, your picture is too big.
- Remember that in order to change the text while in editing mode, you must click on Edit: CheckBox Object: Edit. You cannot simply type in the box as you can with a regular text box.
Back
Creating Option Button Objects
Option buttons are sometimes referred to as radio buttons. They are used when only one selection is allowed. Once an option has been selected, the user can only change the selection. It cannot be removed, nor can more than one be selected.
- If it is not already open, open your Control Toolbox.
- Click on the Option Button icon (the circle with a dot in it).

- Click on your slide and draw a box (a long horizontal box is best). This will be OptionButton 1.
- Adjust the properties of your option button object as desired. (See also Creating Check Box Objects above.)
- Alignment: 0=text on left, button on right; 1=button on left, text on right
- TextAlign: 1=left; 2=centered; 3=right
- To change the text from “CheckBox #,” click on Edit: CheckBox Object: Edit and retype the text that you want.
- Picture allows you to insert a picture from a file so that the user can choose from among pictures rather than text options (great for kindergarten or foreign language teachers!).
- PicturePosition allows you to include both text and a picture. See number 10 under Creating Check Box Objects.
- Remember that in order to change the text while in editing mode, you must click on Edit: OptionButton Object: Edit. You cannot simply type in the box as you can with a regular text box.
Back
 Trisha Meyer is a stay-at-home mom and former employee of Sound Engineering.


