![]()
This is the print version of this page. All content is copyright Indezine.com 2000-2023.
![]()
Learn about using PowerPoint and HyperCam together.
Author: Geetesh Bajaj
Product/Version: PowerPoint
A Movie from a Presentation
So, What's HyperCam?
Download and Installation
A Sample Presentation
Resolution, Pixels, and Mighty Systems
Running HyperCam
The Actual Capture
Examining the Capture
Post Processing
Pricing, Ideas, and Conclusion
We've actually lost count of occasions when we've been asked to suggest a convenient route to convert PowerPoint presentations to movies. On the Apple Macintosh, it's really simple because PowerPoint 2001 for the Macintosh contains the ability to output to a QuickTime movie natively. Surprisingly, even the newer PowerPoint 2002 for Windows lacks this feature.
When there's no native way to output to a movie, one does tend to think about the next logical course of action. That's predictably a screen capture program. Again, screen capture programs come in two varieties for still and moving video capture. Video capture options include Lotus ScreenCam, Microsoft Camcorder, TechSmith Camtasia, Matchware Screencorder and finally our actual choice for this project, which is Hyperionics HyperCam. Compared to the other products, HyperCam has many virtues on both the price and features fronts. However, any comparitive discussion is beyond the scope of this article. So, let's proceed straightaway exploring HyperCam.
![]()
HyperCam's product statement reads as under:
HyperCam captures the action from your Windows screen and saves it to AVI (Audio-Video Interleaved) movie file. Sound from your system microphone is also recorded.
You'll find more information on HyperCam at:
To follow our sample project, you can download a trial or full version of HyperCam from the Hyperionics web site.
Installation is a straightforward procedure. If you have already purchased a license, you can register using the procedure detailed in the mail you receive from Hyperionics.
Video captures through the unregistered version of HyperCam will however leave a HyperCam watermark on captured AVI files.
Our sample presentation for this review was a very basic PowerPoint presentation with usual wipe transitions and a few custom animations. The slides use a single background graphic throughout and the show is set to advance automatically from one slide to another. One specific change we made was to use a larger font size throughout the presentation, as seen in Figure 1, below. This was done because the exported movie clip may be seen in a lower resolution.

Figure 1: A sample PowerPoint presentation
This presentation was created using PowerPoint 2000, but can be played equally well on PowerPoint 97 and 2002.
Video is a great equalizer because it can bring both mighty and lowly systems to bow down. However, it goes without saying that you'll need a responsive machine to do anything worthwhile during this tutorial.
Our test system is usually set to a resolution of 1024 x 768 pixels at 32 bit color, which is way too high for any decent video capture. So, the first thing to do was to change the resolution to a more manageable 800 x 600 pixels at 16 bit High Color mode. The presentation looks equally good at this resolution, and HyperCam heaves a sigh of relief too!
There's more good news. PowerPoint has a great quarter-screen slide show feature. If you capture your presentation in this mode, it means your computer has to struggle only 25% as much of what it would have had to do in normal circumstances.
To run a slideshow in PowerPoint in quarter-screen mode, just hold your Ctrl key while you click the Slide Show button below the PowerPoint slide window, as shown in Figure 2, below.
![]()
Figure 2: Slide Show button
The presentation should typically now run in quarter screen mode on the top left of your desktop.
Now, let's fire up HyperCam!
Before we actually begin to capture our presentation into a movie, we need to tweak a few options within HyperCam. All tweaks are based on the assumption that you have set your desktop resolution to 800 x 600 pixels for this tutorial.
HyperCam typically loads up as an application with six tabs. The first of these tabs is Screen Area, as shown in Figure 3, below. Match your options to be identical to those in Figure 3.

Figure 3: Screen Area
The next tab is called Hot Keys. Here, you can choose a custom hotkey to begin and stop a video capture recording. The default is F2 and should work fine unless it conflicts with any other installed application. You can choose your own hotkey in that case. There are similar customisable hotkeys available for pausing and taking still shots.
A tab named AVI File, as shown in Figure 4, below is our next stop.
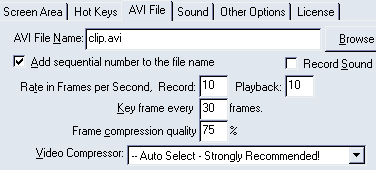
Figure 4: AVI File
First, choose the folder where you want to save the captured AVI file. Thereafter, change the key frame rate from 20 to 30. Let everything else be set at default values. Now, let's proceed to the next tab.
The next tab is Sound. We've opted not to record any sound, since the sample presentation we're using does not use any audio stream.
Finally, in the Other Options tab, deselect the Record Cursor check box. We're now done with our pre-capture configuration.
Our capture spanning 50 seconds stood at over 5 MB. The quality was excellent, and zooming up to full-screen mode (use Alt + Enter in Windows Media Player) showed very little pixelation.
At over 1 MB for every 10 seconds, the output can be used extensively for CD-ROM, DVD-ROM and broadband internet delivery. Unfortunately, you cannot expect realtime display on a dial-up connection, and streaming media is a good option in that case. Again, streaming media can be optimised to suit internet connection speeds. You'll find more details later in this article.
More often than not, you may want to post process your video capture for efficient delivery on CD-ROM, the internet or any other media. Take a look at these options:
HyperCam costs only US$30. At this price, it definitely provides excellent value for money. However, HyperCam offers no editing features. You cannot even set in and out points and remove unwanted parts of a capture. Hyperionics suggests you buy a product called VideoFramer from FlickerFree for this purpose. This product costs US$89.95. Naturally, VideoFramer does a lot more than just video slicing. Nevertheless, video slicing is a feature that should have been built into HyperCam in the first place.
On every other front, HyperCam is an excellent product. There are a few products which excel in their area of activity, and HyperCam is definitely one of them. And at this price range, no one should complain!
BackYou May Also Like: How to Raise Yourself From Garden Talker to Go-to Speaker | Leonardo da Vinci PowerPoint Templates


Microsoft and the Office logo are trademarks or registered trademarks of Microsoft Corporation in the United States and/or other countries.
