Introduction
The Procedure
More Options
Compression
Introduction
Sun has just come back from a trip to San Francisco with heaps of digital camera pictures, and predictably he wants to show them to his friends Shine and Storm who work with him at Comitu, Inc. He knows the easiest way to do that would be through PowerPoint's excellent Photo Album feature, and he's convinced us to take part in an interactive tutorial on using this cool feature. So, are you ready?
Back
The Procedure
- Open PowerPoint 2002 or higher.
- Choose the Insert | Picture | New Photo Album menu option.
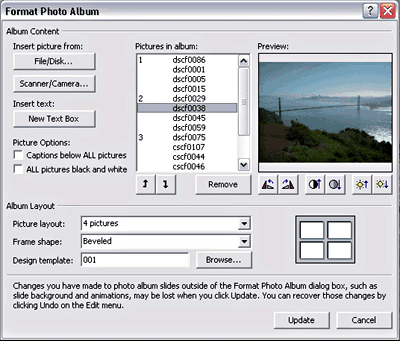
- The resultant Photo Album dialog box, shown in Figure 1, below provides many options. We'll walk through most of them in this demonstration.

Figure 1: Photo Album dialog box - Click the File/Disk... button on the top left to open the Insert New Pictures dialog box. Navigate to the folder where you have stored your pictures. Select them all through Shift and Ctrl clicking and click the Insert button.
- Back in Photo Album, you can reorder the sequence of your pictures using the Up and Down arrow keys below the listing of the pictures. Each picture is previewed when selected, so you can remove pictures you don't need.
- While a picture is previewed, you have options to rotate the pictures in 90-degree increments. In addition, you can also alter the contrast and brightness values of a picture. All these options are placed directly below the picture preview window.
- Next, we can choose a picture layout. Generally speaking, you have layouts for one, two and four pictures per slide. We'll choose the 4 pictures layout.
- The frame shape option allows you to provide specific corner styles to each picture. Choices include rectangle, rounded rectangle, beveled, oval, corner tabs, and square tabs. Let's choose the beveled option.
- Finally, you are provided an option to choose your own design template. Click the Browse button. This opens the Choose Design Template box that allows you to navigate to the folder where we have stored the downloaded templates. Choose any of the three templates.
- Finally, press the Create button. You're done!
Back
More Options
There are more features in the Photo Album dialog box that we did not explore above. Let's discuss them now:
- The Captions below ALL pictures options allows you to provide a separate caption under each picture.
- The ALL pictures black and white option converts all your pictures to grayscale color mode.
- You can also opt to include a separate text box on each slide using the New Text Box option.
- All these options can be added even after your Photo Album is created. Choose Format | Photo Album when your Photo Album presentation is open in PowerPoint.
You just ended up with a basic Photo Album. You might want to refine the output by adding your own transitions and custom animations. You might want to add a continuous music score to your entire presentation. You'll find more info here.
Back
Compression
There's more to the Photo Album thing yet. If you started with high resolution images, you'll find your Photo Album presentation saves to a huge size. Something that is impractical if you want to email it to others. To get around this problem, follow these steps:
- Right-click any picture (actually an AutoShape with a picture fill) and choose Format | AutoShape.
- Choose the Picture tab in the resultant tabbed dialog box and click the Compress button.
- Change the resolution to Web/Screen and choose to apply to all pictures in the document (presentation). Click OK and then Apply to the next dialog box. Click OK again.
- Resave the presentation.
At the end of this interactive demonstration. Sun was visibly impressed, and so were Shine and Storm when they viewed the Photo Album. So, when are you creating your next Photo Album? Very soon, I presume?
Back


