Indezine Logo


Clip Media Properties in Clip Organizer in PowerPoint 2010 for Windows

Explore clip media properties option within Clip Organizer in PowerPoint 2010 for Windows. You can see previews, explore name, type, resolution, size, and do so much more.


Author:

Product/Version: PowerPoint 2010 for Windows

OS: Microsoft Windows XP and higher


Learn PowerPoint

Learn how to create scrolling credits in PowerPoint.


As we explored in earlier tutorials, every clip media object within the Clip Organizer has keywords associated, and these keywords can be edited as required. Similarly, clip media objects have certain other properties also such as the clip media name, type, resolution, etc.

What is the Clip Organizer?

If you are new to Clip Organizer, it's a basic digital asset management program that lets you catalog clip media to be used within PowerPoint and other Microsoft Office programs. Do note that while you can catalog and organize media using the Clip Organizer, you will still have to insert these clip media via the Clip Art task pane in Microsoft Office applications.

The version we are exploring was included as part of Microsoft Office 2000, but the techniques we explore will work for previous versions too. However, Clip Organizer no longer works within newer versions of Microsoft Office released thereafter, such as Office 2013 or subsequent versions.

In this tutorial, we'll explain how to view the Properties for the clip media within the Clip Organizer. Follow these steps to learn more in PowerPoint 2010 for Windows :
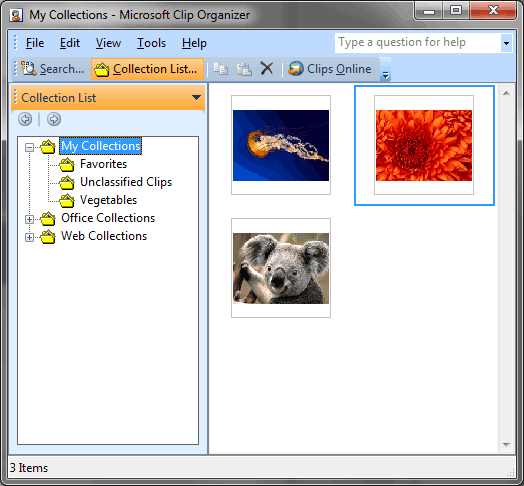
  1. Launch Microsoft Clip Organizer and access any Collection which has some clips. In Figure 1, below you can see that we have selected the My Collections collection.
  2. Collection selected within the Microsoft Clip Organizer
    Figure 1: Collection selected within the Microsoft Clip Organizer
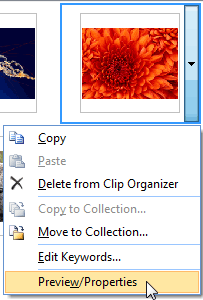
  3. Now, select any clip media and right-click to bring up a contextual menu, as shown in Figure 2. Within the contextual menu, select the Preview/Properties option.
  4. Preview/Properties option
    Figure 2: Preview/Properties option
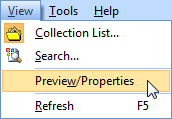
  5. Alternatively, select the View | Preview/Properties menu option, as shown in Figure 3.
  6. View | Preview/Properties menu option
    Figure 3: View | Preview/Properties menu option
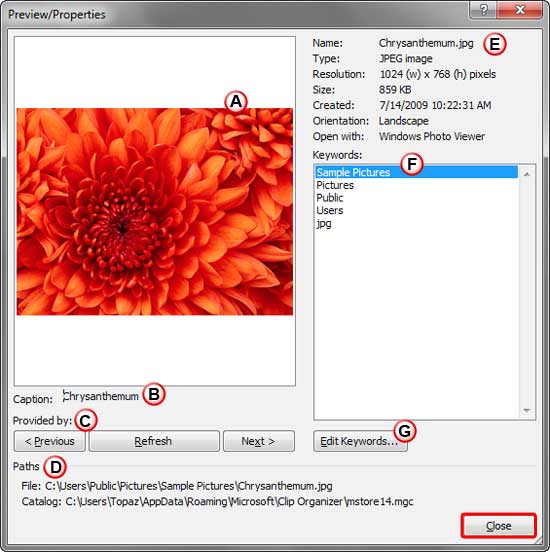
  7. This opens the Preview/Properties dialog box, as shown in Figure 4.
  8. View | Preview/Properties menu option
    Figure 4: Preview/Properties dialog box
  9. Options within the Preview/Properties dialog box are explained below, as marked in Figure 4 above:
  10. A. Preview

  11. This area shows the selected clip media.
  12. B. Caption

  13. Here you can view the caption for the clip media.
  14. C. Provided by

  15. Within this section you'll find the name of the vendor that provided this clip. If you added your own clips, this area will have no content. Below this area you will see three buttons:
  16. Previous button goes to previous clip media,
    Next button goes to next clip media, and
    Refresh button refreshes the properties and thumbnail of the current clip.
  17. D. Paths

  18. Here you can view File and Catalog paths for the current clip media.
  19. E. Properties

  20. This area shows the properties of the selected picture such as: Name, Type, Resolution, Size, etc. Learn more in our Understanding Clip Art Search Results in PowerPoint 2010 tutorial.
  21. F. Keywords

  22. This section displays all the associated keywords for the clip media.
  23. G. Edit Keywords

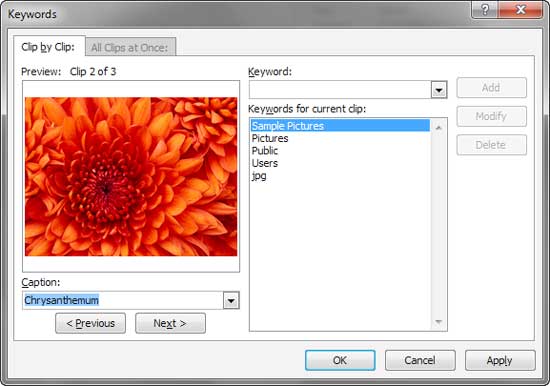
  24. Clicking this button brings up the Keywords dialog box, as shown in Figure 5. Here you can edit current keywords and also add new keywords. To learn how, refer to our learn Edit Keywords in Clip Organizer tutorial.
  25. Preview/Properties dialog box
    Figure 5: Keywords dialog box
  26. Once done, click the Close button, as shown highlighted in red within Figure 4 earlier on this page.

Clip Organizer: Clip Media Properties in Clip Organizer (Glossary Page)

You May Also Like: Presentation Management Strategic to Enterprise Communication: Conversation with James Ontra | Benelux PowerPoint Templates


Popular Posts

Set Minimum and Maximum Values on Value Axis in PowerPoint 2013 for Windows
Learn how to set the Minimum and Maximum values on Value Axis of Charts in PowerPoint 2013 for Windows.

Crop Pictures (Mask to Shape) in PowerPoint 2011 for Mac
Learn how to crop pictures using Mask to Shape option in PowerPoint 2011 for Mac.

Playing Video Across Slides in PowerPoint 2016 for Windows
Play a video clip across slides in PowerPoint 2016 for Windows.

Set Document Resolution in PowerPoint 2016 for Windows
Learn how to set document resolution in PowerPoint 2016 for Windows.


Ebook PowerPoint Keyboard Shortcuts

PowerPoint Keyboard Shortcuts and Sequences Ebook

PowerPoint 365, 2019, 2016, 2013, 2011, 2010, 2007 and 2003 for Windows

PowerPoint 365, 2019, 2016 and 2011 for Mac

PowerPoint for the Web on Windows and Mac

Have you ever used keyboard shortcuts and sequences in PowerPoint? Or are you a complete keyboard aficionado? Do you want to learn about some new shortcuts? Or do you want to know if your favorite keyboard shortcuts are documented?

Go and get a copy of our PowerPoint Keyboard Shortcuts and Sequences ebook.


Microsoft and the Office logo are trademarks or registered trademarks of Microsoft Corporation in the United States and/or other countries.

Home | PowerPoint | Photoshop | PowerPoint Templates | PowerPoint Tutorials | Blog | Notes | Ezine | Media Kit | Feedback | Site Map | About Us | Contact Us

Link to Us | Privacy | Testimonials

PowerPoint Backgrounds | Christian PowerPoint Backgrounds | Business PowerPoint Presentation Templates

Plagiarism will be detected by Copyscape

©2000-2023, . All rights reserved.