Indezine Logo


Reorder Pictures in PowerPoint 2013 for Windows

Learn how to reorder pictures and other slide objects in PowerPoint 2013 for Windows. It can be helpful to place pictures below and above other pictures and slide objects.


Author:

Product/Version: PowerPoint 2013 for Windows

OS: Microsoft Windows 7 and higher


Learn PowerPoint

Explore 3D in PowerPoint and Microsoft Office.


PowerPoint enables you to do most positioning tasks for your pictures such as resizing, aligning, and grouping. In addition, you can also reorder pictures (or even a bunch of pictures and other slide objects such as shapes) on your slide using various ordering options available within PowerPoint.

Now, look at Figure 1 which has three slide objects, where two of them are pictures and one of them is just a rectangle shape. We want to reorder them so that the rectangle is placed between the larger and the smaller pictures, with the smaller picture placed above the other two objects.

Pictures and Rectangle placed on the slide
Figure 1: Pictures and Rectangle placed on the slide

Follow these steps to learn more about reordering pictures in PowerPoint 2013 for Windows:

  1. Select both pictures and the rectangle. Then align them to the center, and then to the middle of the slide. To learn how to align and distribute pictures and other slide objects to the center of a slide, refer to our Align and Distribute Pictures tutorial. When we aligned the pictures and the rectangle on our slide, the resultant slide ended up looking like what you can see in Figure 2, below. Note that the smaller picture (the flower) has been rendered invisible. This picture was intended to be our primary focus object for this slide. We now need to correct the order of pictures and other slide objects.
  2. Small picture hidden behind the rectangle
    Figure 2: Small picture hidden behind the rectangle
  3. Note: The result of applying align to center and middle options may be different, depending upon the present order of your slide objects.
  4. To achieve this objective, you can reorder the slide objects using any of the following ways:
    1. Use the Arrange options. To learn more about Arrange options, refer to our Reorder Slide Objects tutorial. The linked tutorial pertains to shapes, but the concepts explained are applicable to all other slide objects, including pictures.
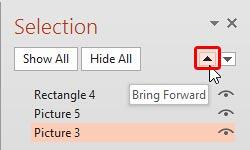
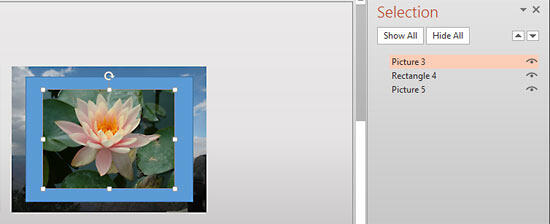
    2. Within the Picture Tools Format tab of the Ribbon, locate the Arrange group, and click the Selection Pane button. This will bring up the Selection Task Pane. In this task pane, select the smallest picture which is now at the third place and hidden below the big picture and the rectangle, as shown in Figure 3.
  5. Small picture selected within the Selection Task Pane
    Figure 3: Small picture selected within the Selection Task Pane
  6. Now, use the up arrow (highlighted in red within Figure 3) to move the small picture right above the big picture and the rectangle. Figure 4 shows the small picture is now atop everything else.
  7. Small picture re-ordered
    Figure 4: Small picture re-ordered
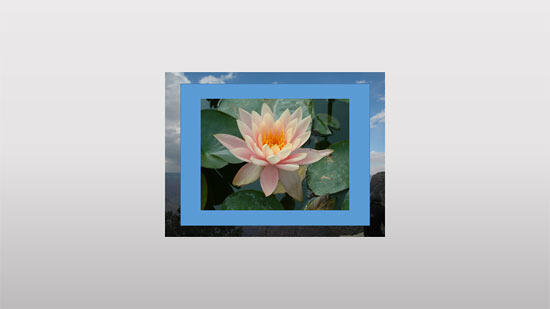
  8. After reordering, you can see the resultant arrangement of pictures on your slide, as shown in Figure 5.
  9. Pictures and Rectangle reordered properly
    Figure 5: Pictures and Rectangle reordered properly
  10. Note: To learn more about how to work with slide objects listed within Selection task pane, refer to our Select, Deselect, View, and Hide Shapes Using the Selection Task Pane tutorial.
  11. Save your presentation.

See Also:

Pictures Position and Order: Reorder Pictures (Glossary Page)

Reorder Pictures in PowerPoint 2011 for Mac
Reorder Pictures in PowerPoint 2010 for Windows

You May Also Like: How to Make Long-Lasting Change | United Kingdom Flags and Maps PowerPoint Templates


Popular Posts

Creating Anchor Points for Connectors in PowerPoint 2010 for Windows
Learn how to create Anchor Points for connectors in PowerPoint 2010.

Working With Slide Numbers in PowerPoint 2016 for Windows
Learn how to add Slide Numbers on slides and Masters and more tricks on making them work to your will in PowerPoint 2016 for Windows.

Texture Fills for Slide Backgrounds in PowerPoint 2013 for Windows
Use texture fills for slide backgrounds in PowerPoint 2013 for Windows.

Adding More Guides in PowerPoint 2016 for Windows
Learn how to add more guides in PowerPoint 2016 for Windows.


Pictures in Presentations

Is a picture is worth a thousand words? You probably have heard this adage so often that we decided not to repeat this phrase throughout this book! Now here’s some more info: the human brain uses a larger part of its area to store visual information rather than textual content. And that’s possibly because a picture describes so much more than text.

Go and get a copy of our Pictures in Presentations ebook.


Microsoft and the Office logo are trademarks or registered trademarks of Microsoft Corporation in the United States and/or other countries.

Home | PowerPoint | Photoshop | PowerPoint Templates | PowerPoint Tutorials | Blog | Notes | Ezine | Media Kit | Feedback | Site Map | About Us | Contact Us

Link to Us | Privacy | Testimonials

PowerPoint Backgrounds | Christian PowerPoint Backgrounds | Business PowerPoint Presentation Templates

Plagiarism will be detected by Copyscape

©2000-2023, . All rights reserved.