Indezine Logo


Reroute Connectors in PowerPoint 2013 for Windows

Learn how to reroute connectors automatically and manually within PowerPoint 2013 for Windows. These ideas can help if you don't like how existing connectors are presently routed.


Author:

Product/Version: PowerPoint 2013 for Windows

OS: Microsoft Windows 7 and higher


Learn PowerPoint

Learn how to pause slides, sounds, and movies – and resume!


Many times when you draw connectors between shapes, the connector may use the shortest path to link between two shapes. This might mean that your connector overlaps other shapes, text boxes, or any other object that is positioned between the connected objects. You might have another reason to use a longer connector between two shapes as well. Whatever your reason may be, the good news is that you can easily reroute your connectors, either automatically or manually.

When you use the automatic options, the connector always links between two shapes using the shortest route. For longer paths, you will have to use the manual options. You will learn about both these options in PowerPoint 2013 for Windows on this page.

Reroute Connectors Automatically

To fix the connector routing automatically, just carefully right-click on the connector to bring up the contextual menu that you see in Figure 1. Choose the Reroute Connectors option (highlighted in red within Figure 1).

Reroute Connectors option
Figure 1: Reroute Connectors option

This will reroute the connector to the closest points between the shapes (see Figure 2).
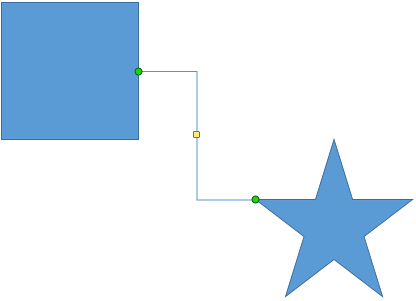
Automatically reroute your connector between two shapes
Figure 2: Automatically reroute your connector between two shapes

Reroute Connectors Manually

To reroute connectors manually, you first need to select just the connector (not the shapes that it links). You will find one or more yellow squares on the connector, as shown in Figure 3 below.
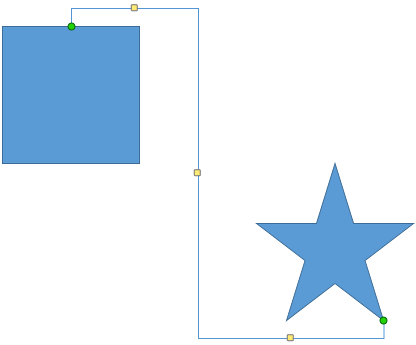
Some connectors may have more than one yellow squares
Figure 3: Some connectors may have more than one yellow squares

Tip: Don't see any yellow squares on selected connectors? Yellow squares show up only on elbow and curved connectors, and not on straight connectors. Look at our Connector Types tutorial to learn about different types of connectors.

What's so special about these yellow squares? They have special attributes to reroute the connector (learn about yellow squares for shapes). Pulling them around lets you change the length and shape of your connector. Look at the example towards the left in Figure 4, and compare it to the example on the right. The difference in the connector's orientation was achieved by pulling the yellow square on the connector towards the first shape.

Dragging squares reorients the connector
Figure 4: Dragging squares reorients the connector

Here are some guidelines on using the yellow squares to reroute connectors:

  • For elbow connectors, the yellow square allows you to change the location of any branch of the elbow.
  • For curve connectors, the yellow square allows you to change the curvature of the connector.
  • Straight connectors need no manipulation, so they don't have any yellow squares.
Tip: If you end up with a straight connector that you want to reorient, just change it to another connector type, and then reroute as required.

See Also:

Reroute Connectors in PowerPoint 2011 for Mac
Reroute Connectors in PowerPoint 2010 for Windows

You May Also Like: How Will Argentine Tango Skills Make You a Better Presenter? | Azerbaijan Flags and Maps PowerPoint Templates


Popular Posts

Add Headers and Footers to Slides in PowerPoint 2016 for Windows
Learn how to add Headers and Footers to slides in PowerPoint 2016 for Windows.

Text Box Autofit Options in PowerPoint 2016 for Windows
Learn about Text Box autofit options in PowerPoint 2016.

Paste in Place in PowerPoint
How can you place a copied or duplicated slide object right on top of the original object in PowerPoint?

Formatting Arrows (Arrowheads) in PowerPoint 2013 for Windows
Learn how to format arrowheads for lines in PowerPoint 2013 for Windows.


Jeopardy-Like PowerPoint Template (25 Questions)

Want to play a Jeopardy-like game using PowerPoint slides? Yes, this is absolutely doable but making PowerPoint slides with all the interactivity and layouts takes too much work. Fortunately, we have done the work for you. just download our Jeopardy-like 25 (5x5) question PowerPoint template, replace the placeholders provided for questions, answers, and categories, and you’re done! You'll still need a real human being to track scores and you could soon be playing this amazing game as part of a fun exercise, a training program, or even a quiz show.

Download and play your own Jeopardy-like game


Microsoft and the Office logo are trademarks or registered trademarks of Microsoft Corporation in the United States and/or other countries.

Home | PowerPoint | Photoshop | PowerPoint Templates | PowerPoint Tutorials | Blog | Notes | Ezine | Media Kit | Feedback | Site Map | About Us | Contact Us

Link to Us | Privacy | Testimonials

PowerPoint Backgrounds | Christian PowerPoint Backgrounds | Business PowerPoint Presentation Templates

Plagiarism will be detected by Copyscape

©2000-2023, . All rights reserved.