Indezine Logo


Resize, Rotate, and Flip Pictures in PowerPoint 2010 for Windows

Learn how to resize, rotate, and flip pictures in PowerPoint 2010 for Windows. These slight changes can make pictures more suitable for use in slides.


Author:

Product/Version: PowerPoint 2010 for Windows

OS: Microsoft Windows XP and higher


Learn PowerPoint

Learn how you can advance two PowerPoint presentations with a single click.


We have already explored the Adjust Picture options and how you apply Picture Styles, Picture Effects, and Picture Borders within PowerPoint. These options can help you to enhance the look of your inserted pictures. Other than these enhancement options, there are some very significant yet basic picture editing options that you should consider. These include learning how you can resize, rotate, and flip pictures.

We assume that you already have inserted a picture on your slide, and have selected it, as shown in Figure 1. Do note that when you select a picture, the Picture Tools Format contextual tab (highlighted in red within Figure 1) appears on the Ribbon. Make sure that you click this tab to activate it.
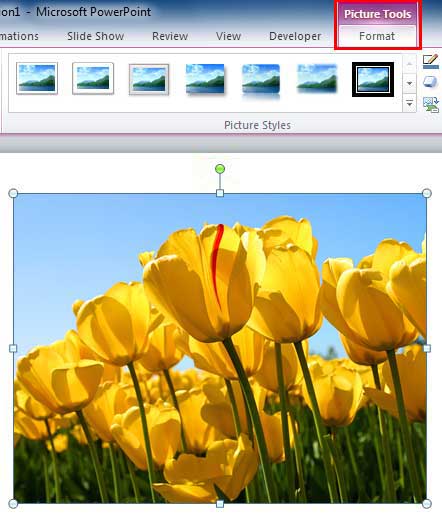
Picture inserted and selected
Figure 1: Picture inserted and selected

Note: The Picture Tools Format tab is a Contextual tab. These contextual tabs are special tabs in the Ribbon that are not visible all the time. They only make an appearance when you are working with a particular slide object which can be edited using special options.

Now, let us learn how to resize, rotate, and flip pictures in Poweroint 2010 for Windows.

Resize

You can resize your selected picture in any of the two ways mentioned below:

  1. You can click and drag any of the blueish-white selection handles that show on the selected picture, as shown in Figure 1, above. To resize a picture proportionally, hold the Shift key while you drag one of the four corner handles.
  2. Tip: If you have cropped the picture to a shape like a Teardrop, a Trapezoid, or a Star, then you can also drag the yellow diamond that appears along with the selection handles to manipulate the picture's edges.
  3. Locate the Size group within the Picture Tools Format tab. Then, enter the required Height and Width values in digits, as shown in Figure 2.
  4. Height and Width values entered within the Size group
    Figure 2: Height and Width values entered within the Size group
  5. Centimeters or Inches?

  6. Do you see the Width and Height values in centimeters rather than inches? That's not an issue since you will either see centimeters or inches everywhere in PowerPoint. However, if you want to change the unit of measurement, you will have to do that globally in your Microsoft Windows operating system. The following tutorials will help you:
  7. Change The Unit Of Measurement in Windows 8
    Change the Unit of Measurement in Windows 7
    Change the Unit of Measurement in Windows Vista
    Change the Unit of Measurement in Windows XP
  8. To learn more about advanced options to resize the selected pictures, just right-click the picture, and choose the Format Picture option in the resultant contextual menu. Thereafter, follow instructions within our Resizing Shapes tutorial to proceed further.

Rotate

You can rotate a selected picture in any of the two ways mentioned below:
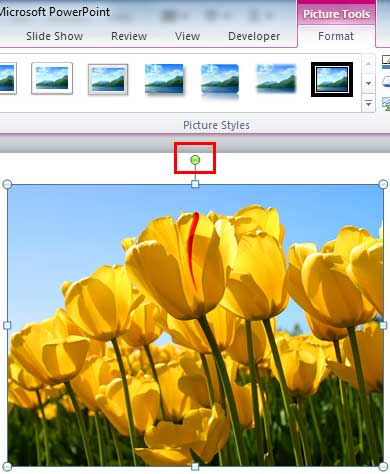
  1. You can click and drag the green rotation handle that you can see in Figure 3 (highlighted in red) towards the right or left as required.
  2. Green rotation handle
    Figure 3: Green rotation handle
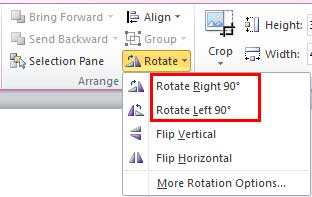
  3. You can locate the Arrange group within the Picture Tools Format tab. Then click the Rotate button to bring up the Rotate drop-down gallery, that you can see in Figure 4. Choose any of the two Rotate options (highlighted in red within Figure 4).
  4. Rotate options within the Rotate drop-down gallery
    Figure 4: Rotate options within the Rotate drop-down gallery

To learn more about advanced options to rotate selected pictures, just right-click the picture and, choose the Format Picture option in the resultant contextual menu. Thereafter, follow instructions within our Rotate Shapes tutorial to proceed further.

Flip

As with Resize and Rotate, there are two options available to Flip the picture:
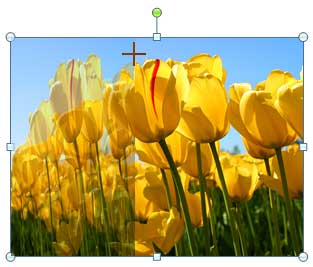
  1. You can click and drag one of the side (not corner) blueish-white selection handles of the picture, as shown in Figure 5. Note that side handles are square, unlike the corner handles which are round.
  2. Drag the side handle towards the other end of the picture
    Figure 5: Drag the side handle towards the other end of the picture
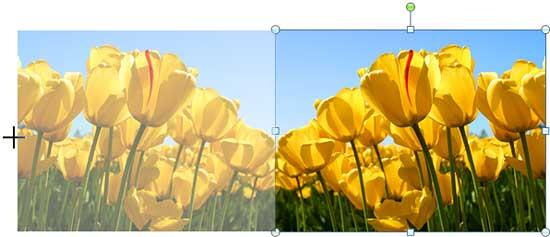
  3. Continue dragging even when you reach the end of the picture until you have flipped it as required (see Figure 6). Remember that if you drag the selection handle too little or too farther, you may end up quishing the picture!
  4. Drag beyond to the other side to flip a picture
    Figure 6: Drag beyond to the other side to flip a picture
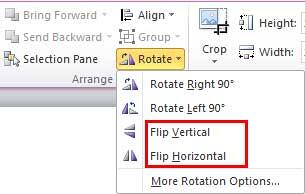
  5. You can locate the Arrange group within the Picture Tools Format tab. Then click the Rotate button to bring up the Rotate drop-down gallery as you can see in Figure 7. Choose any of the two Flip options (highlighted in red within Figure 7) within this drop-down gallery to flip your picture vertically or horizontally.
  6. Flip options within the Rotate drop-down gallery
    Figure 7: Flip options within the Rotate drop-down gallery
  7. To learn about how to do a more controlled flipping of the picture, refer to our Flip Shapes tutorial. You flip pictures in the same way as you flip shapes.

In Figure 8, you can see the selected picture as well as its variations in which the picture has been resized, rotated and flipped. Compare the original picture with its variations.
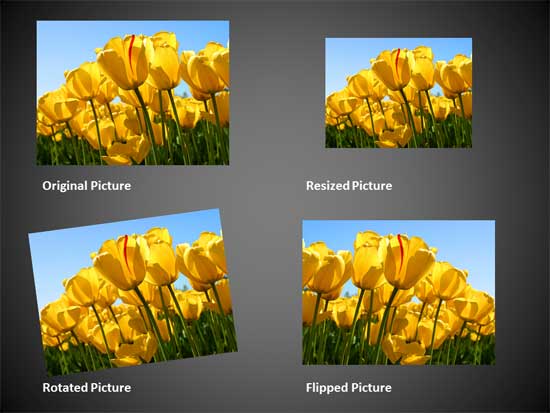
Variants of the same picture applied with resize, rotate, and flip options
Figure 8: Variants of the same picture applied with resize, rotate, and flip options


See Also:

Pictures Position and Order: Resize, Rotate, and Flip Pictures (Glossary Page)

Resize, Rotate, and Flip Pictures in PowerPoint Online
Resize, Rotate, and Flip Pictures in PowerPoint 2016 for Windows
Resize, Rotate, and Flip Pictures in PowerPoint 2013 for Windows
Resize, Rotate, and Flip Pictures in PowerPoint 2011 for Mac

You May Also Like: Obama Gets Back on Message | Tajikistan Flags and Maps PowerPoint Templates


Popular Posts

Keyboard Shortcuts for PowerPoint 2011 for Mac
Explore keyboard shortcuts in PowerPoint 2011 for Mac.

Insert Video from Facebook in PowerPoint 2016 for Windows
Learn how to insert video from your Facebook account in PowerPoint 2016 for Windows.

Add Pattern Fills to Shapes in PowerPoint 2010 for Windows
Add pattern fills to shapes in PowerPoint 2010 for Windows.

Gradient Fills for Text in PowerPoint 2013
Learn how to add gradient fills to selected text in PowerPoint 2013.


Pictures in Presentations

Is a picture is worth a thousand words? You probably have heard this adage so often that we decided not to repeat this phrase throughout this book! Now here’s some more info: the human brain uses a larger part of its area to store visual information rather than textual content. And that’s possibly because a picture describes so much more than text.

Go and get a copy of our Pictures in Presentations ebook.


Microsoft and the Office logo are trademarks or registered trademarks of Microsoft Corporation in the United States and/or other countries.

Home | PowerPoint | Photoshop | PowerPoint Templates | PowerPoint Tutorials | Blog | Notes | Ezine | Media Kit | Feedback | Site Map | About Us | Contact Us

Link to Us | Privacy | Testimonials

PowerPoint Backgrounds | Christian PowerPoint Backgrounds | Business PowerPoint Presentation Templates

Plagiarism will be detected by Copyscape

©2000-2023, . All rights reserved.