Indezine Logo


Shape Combine Command in PowerPoint 2016 for Windows

Learn how you can combine shapes in PowerPoint 2016 for Windows. The Shape Combine command combines non-overlapping areas while removing overlapping areas of shapes.


Author:

Product/Version: PowerPoint 2016 for Windows

OS: Microsoft Windows 7 and higher


Learn PowerPoint

Learn how you can use presets in Shape Styles in PowerPoint and Microsoft Office.


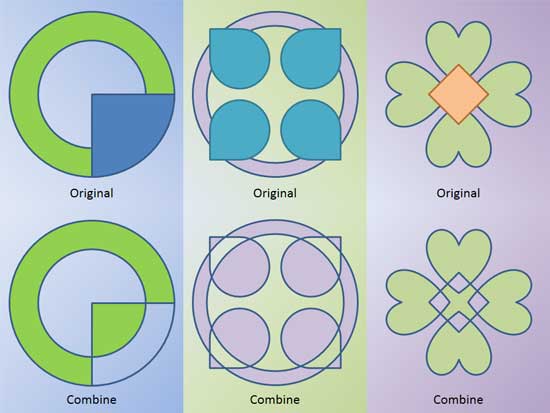
There are so many shapes available within PowerPoint 2016 for windows, and that's good because that means so many more possibilities to create your own unique shapes by using any of the Merge Shapes commands. One of the amazing options within Merge Shapes is Combine. This retains areas where the shapes do not overlap while removing the overlapping areas; think of Combine as an amazing cutout option! You can see examples of the Combine option in play within Figure 1, below—the three examples on the top area of the slide are separate shapes placed over each other. The shapes that you see at the bottom of the slide are the same shapes with the Combine option applied. Resulting in a cutout, remnant shape.
Sample showing use of the Combine command
Figure 1: Sample showing use of the Combine command

Once you finish reading this tutorial, do view the sample presentations embedded on the bottom of this page to see more samples of shapes that use the Combine command.

Follow these steps to learn more:
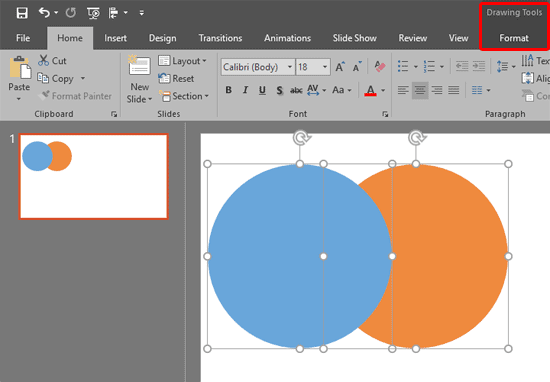
  1. Select any two or more shapes as shown in Figure 2. With these shapes selected, access the Drawing Tools Format tab on the Ribbon (highlighted in red within Figure 2).
  2. Drawing Tools Format tab
    Figure 2: Drawing Tools Format tab
  3. Note: The Drawing Tools Format tab is a Contextual tab. These tabs are special tabs in the Ribbon that are not visible all the time. They only make an appearance when you are working with a particular slide object which can be edited using special options.
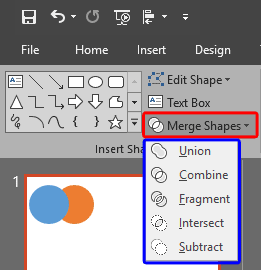
  4. Within the Drawing Tools Format tab, click the Merge Shapes button (highlighted in red within Figure 3). This brings up the Merge Shapes drop-down gallery (highlighted in blue within Figure 3).
  5. Merge Shapes drop-down gallery
    Figure 3: Merge Shapes drop-down gallery
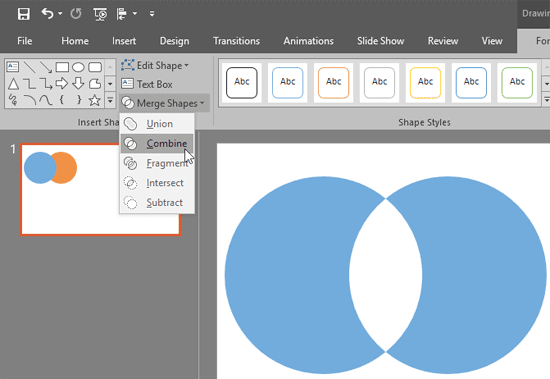
  6. Within the Merge Shapes drop-down gallery, hover the cursor over Combine option to see a Live Preview of how the shapes will look when combined, as shown in Figure 4. Click the Combine option so that the selected shapes are combined. You will notice that the Combine option removes any areas that overlap.
  7. Previously selected shapes are Combined
    Figure 4: Previously selected shapes are Combined
  8. Save your presentation often.

Do remember these guidelines for any tasks that involve the usage of this command. The Combine command:

  • Combines non-overlapping areas of shapes
  • Removes overlapping areas of shapes
  • If selected shapes do not overlap, acts like a group with no option to ungroup! Also you can then add a single fill to multiple shapes, as explained in our Create Segments with Unified Fill tutorial.
  • Retains formatting of first selected shape

You will see these guidelines in use within the embedded presentations below (scroll down this page).

Activity: Do experiment with various shapes that are formatted with fills of different colors. Select one of the shapes, and then individually select other shapes and click the Combine command. You will notice that the combined shape takes the formatting of the shape selected first.

The sample presentations below show how we used different shapes placed next to and above each other, and then combined.

Click below to view this presentation on SlideShare

Click below to view this presentation on YouTube


See Also:

Merge Shapes: Shape Combine Command in PowerPoint (Index Page)

Shape Combine Command in PowerPoint 2016 for Mac
Shape Combine Command in PowerPoint 2013 for Windows
Shape Combine Command in PowerPoint 2011 for Mac
Shape Combine Command in PowerPoint 2010 for Windows

You May Also Like: How to Give an Excellent Technical Business Presentation | Animals - F PowerPoint Templates


Popular Posts

Pivot Tables in PowerPoint: by Kasper Langmann
One of the most commonly used features in Microsoft Excel is the Pivot Table. A Pivot Table simply allows you to make better sense of data by giving you different options of how to view that data.

Get More SmartArt Graphics
Learn how you can get more SmartArt graphic variants.

Character Spacing in PowerPoint 2013
Explore Character Spacing options in PowerPoint 2013.

Add Secondary Value Axis to Charts in PowerPoint 2013 for Windows
Learn how to add a Secondary Value axis to charts in PowerPoint 2013 for Windows.


Feature List 01 (Layout with Tabs)

The Feature List Layout comprises three sample PowerPoint presentations: one each to create a visual list for 4 features, 5 features, and 6 features. These work great when you have too much information to fit within one slide. This solution lets you use multiple slides, but the visual result is still that of one single slide!

Buy and Download Feature List 01 (Layout with Tabs) for $4.99+ (671 kb)


Microsoft and the Office logo are trademarks or registered trademarks of Microsoft Corporation in the United States and/or other countries.

Home | PowerPoint | Photoshop | PowerPoint Templates | PowerPoint Tutorials | Blog | Notes | Ezine | Media Kit | Feedback | Site Map | About Us | Contact Us

Link to Us | Privacy | Testimonials

PowerPoint Backgrounds | Christian PowerPoint Backgrounds | Business PowerPoint Presentation Templates

Plagiarism will be detected by Copyscape

©2000-2023, . All rights reserved.