Indezine Logo


Shape Subtract Command in PowerPoint 2016 for Windows

Learn how you can subtract shapes in PowerPoint 2016 for Windows. The Shape Subtract command retains the first selected shape and subtracts overlapping areas of other shapes.


Author:

Product/Version: PowerPoint 2016 for Windows

OS: Microsoft Windows 7 and higher


Learn PowerPoint

Learn how to add circular text to target diagrams (or any Shape) in PowerPoint.


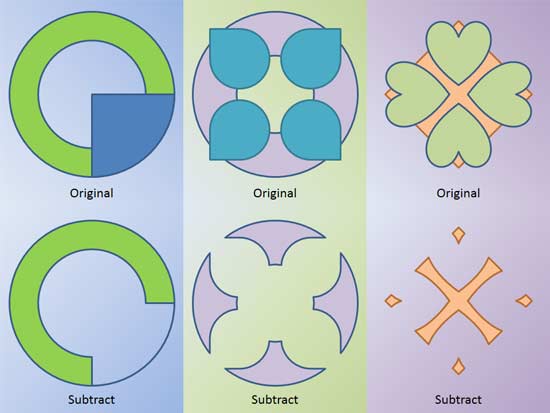
PowerPoint 2016 for Windows lets you change the appearance of merged shapes. Don't get fooled by how easy-to-use this is because the results you can end up with can be seriously impressive. In all, there are 5 options that let you merge shapes, and we have already explored 4 of them. In this tutorial, we'll show you how you can use the Subtract option to subtract one shape (or even multiple shapes), from the first selected shape. You can see examples of the Subtract option in play within Figure 1, below. The three examples on the top area of the slide are separate shapes placed over each other. The shapes that you see at the bottom of the slide are the same shapes with the Subtract option applied—resulting in a single, cutout shape.
Sample showing use of the Subtract command
Figure 1: Sample showing use of the Subtract command

Once you finish reading this tutorial, do view the sample presentations embedded at the bottom of this page to see more samples of shapes that use the Subtract command.

The Subtract command is one of Merge Shape commands in PowerPoint 2016 for Windows. Follow these steps to learn more:
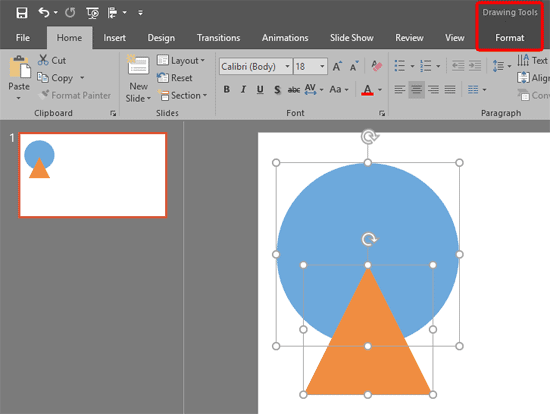
  1. Select any two or more shapes as shown in Figure 2. Remember that the shape (or shapes) you select next gets subtracted from the shape you select first—so it's very important to ascertain what you need to select first! With these shapes selected, access the Drawing Tools Format tab on the Ribbon (highlighted in red within Figure 2).
  2. Drawing Tools Format tab
    Figure 2: Drawing Tools Format tab
  3. Note: The Drawing Tools Format tab is a Contextual tab. These tabs are special tabs in the Ribbon that are not visible all the time. They only make an appearance when you are working with a particular slide object which can be edited using special options.
  4. Within the Drawing Tools Format tab, click the Merge Shapes button (highlighted in red within Figure 3). This brings up the Merge Shapes drop-down gallery (highlighted in blue within Figure 3).
  5. Merge Shapes drop-down gallery
    Figure 3: Merge Shapes drop-down gallery
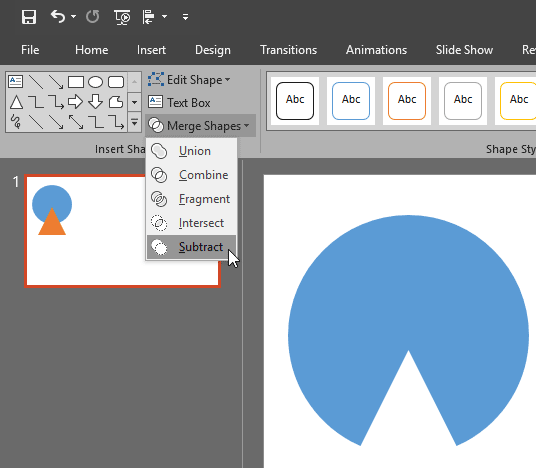
  6. Within the Merge Shapes drop-down gallery, hover the cursor over Subtract option to see a Live Preview of how the shapes will look when subtracted, as shown in Figure 4. Click the Subtract option so that the selected shapes are subtracted.
  7. Previously selected shapes are subtracted
    Figure 4: Previously selected shapes are subtracted
  8. Save your presentation often.

Do remember these guidelines for any tasks that involve the usage of this command. The Subtract command:

  • Retains the first selected shape
  • Subtracts overlapping areas of other shapes from first selected shape
  • If there is no overlap, the first selected shape is retained. Everything else is removed
  • Retains formatting of first selected shape

You will see these guidelines in use within the embedded presentations below (scroll down this page).

Activity: Do experiment with various shapes that are formatted with fills of different colors. Select one of the shapes, and then individually select other shapes and click the Subtract command. You will notice that the subtracted shape takes the formatting of the shape selected first.

The sample presentations below show how we used different shapes placed next to and above each other, and then subtracted.

Click below to view this presentation on SlideShare

Click below to view this presentation on YouTube


See Also:

Merge Shapes: Shape Subtract Command in PowerPoint (Index Page)

Shape Subtract Command in PowerPoint 2016 for Mac
Shape Subtract Command in PowerPoint 2013 for Windows
Shape Subtract Command in PowerPoint 2011 for Mac
Shape Subtract Command in PowerPoint 2010 for Windows

You May Also Like: How to Make Long-Lasting Change | Africa PowerPoint Templates


Popular Posts

Creating Semi-Circles in PowerPoint 2013
Learn how to create a semi-circle in PowerPoint 2013.

Apply Two or More Animations to One Object at the Same Time in PowerPoint
Apply multiple animations to one slide object in PowerPoint, and make all animations play together.

Flowchart Symbols: What They Represent?
Explore various flowchart symbols, and learn about what they represent.

Types of Animation in PowerPoint 2010 for Windows
Learn about different animation types in PowerPoint 2010 for Windows.


Organic Shapes with Brush Edges

You get 8 shape types plus lines as part of this Organic Shapes collection. Each of these 8 shape types have 10 variants. So you end up with 80 hand-drawn shape options! Again each of these 80 shapes have 12 brush stroke styles! Plus you get the lines and arrows in 12 brush stroke styles too. Combine all variations to end up with more than 3000 possibilities.

Buy and Download for $99+ (83 MB)


Microsoft and the Office logo are trademarks or registered trademarks of Microsoft Corporation in the United States and/or other countries.

Home | PowerPoint | Photoshop | PowerPoint Templates | PowerPoint Tutorials | Blog | Notes | Ezine | Media Kit | Feedback | Site Map | About Us | Contact Us

Link to Us | Privacy | Testimonials

PowerPoint Backgrounds | Christian PowerPoint Backgrounds | Business PowerPoint Presentation Templates

Plagiarism will be detected by Copyscape

©2000-2023, . All rights reserved.