Indezine Logo


Shape Union Command in PowerPoint 2016 for Windows

Learn how you can unite shapes in PowerPoint 2016 for Windows. The Shape Union command combines all overlapping and non-overlapping areas of shapes.


Author:

Product/Version: PowerPoint 2016 for Windows

OS: Microsoft Windows 7 and higher


Learn PowerPoint

Learn how to use non-installed fonts in PowerPoint.


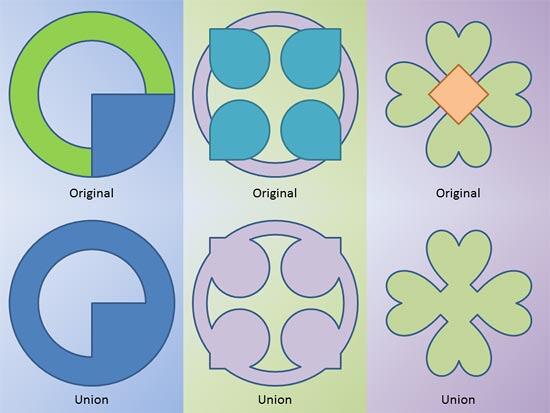
Union is part of the Merge Shapes commands in PowerPoint 2016 for Windows, this lets you unite two or more shapes with each other. The benefit of the Shape Union option is that you can quickly create complex shapes that may not have been easy to accomplish otherwise within PowerPoint. You can see examples of the Union option in play within Figure 1, below. The three examples on the top area of the slide are separate shapes placed over each other. The shapes that you see at the bottom of the slide are the same shapes with the Union option applied—resulting in a single, unified shape.
Samples showing use of the Union command
Figure 1: Samples showing use of the Union command

Once you finish reading this tutorial, do view the sample presentations embedded on the bottom of this page to see more samples of shapes that use the Union command.

The Union command is one of Merge Shape commands in PowerPoint 2016 for Windows. Follow these steps to learn more:
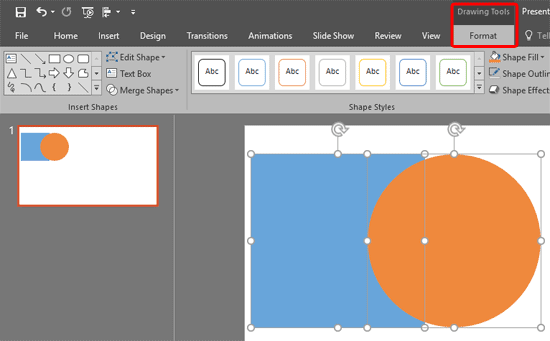
  1. Select any two or more shapes as shown in Figure 2. With these shapes selected, access the Drawing Tools Format tab on the Ribbon (highlighted in red within Figure 2).
  2. Drawing Tools Format tab
    Figure 2: Drawing Tools Format tab
  3. Note: The Drawing Tools Format tab is a Contextual tab. These tabs are special tabs on the Ribbon that are not visible all the time. They only make an appearance when you are working with a particular slide object which can be edited using special options.
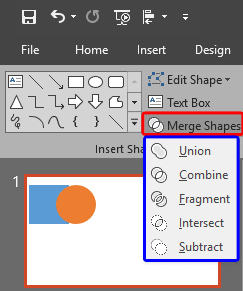
  4. Within the Drawing Tools Format tab, click the Merge Shapes button (highlighted in red within Figure 3). This brings up the Merge Shapes drop-down gallery (highlighted in blue within Figure 3).
  5. Merge Shapes drop-down gallery
    Figure 3: Merge Shapes drop-down gallery
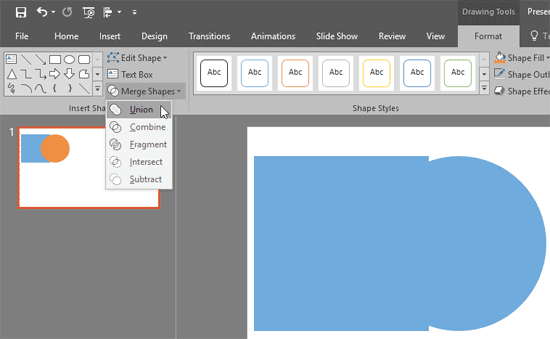
  6. Within the Merge Shapes drop-down gallery, hover the cursor over Union option to see a Live Preview of how the shapes will look when united, as shown in Figure 4. Click the Union option to unite the selected shapes.
  7. Previously selected shapes are United
    Figure 4: Previously selected shapes are United
  8. Save your presentation often.

Do remember these guidelines for any tasks that involve the usage of this command. The Union command:

  • Combines all overlapping and non-overlapping areas of shapes
  • Subtracts nothing
  • Retains formatting of first selected shape

You will see these guidelines in use within the embedded presentations below (scroll down this page).

Activity: Do experiment with various shapes that are formatted with fills of different colors. Select one of the shapes, and then individually select other shapes and click the Union command. You will notice that the united shape takes the formatting of the shape selected first.

The sample presentations below show how we used different shapes placed next to and above each other, and then united.

Click below to view this presentation on SlideShare

Click below to view this presentation on YouTube


See Also:

Merge Shapes: Shape Union Command in PowerPoint (Index Page)

Shape Union Command in PowerPoint 2016 for Mac
Shape Union Command in PowerPoint 2013 for Windows
Shape Union Command in PowerPoint 2011 for Mac
Shape Union Command in PowerPoint 2010 for Windows

You May Also Like: Develop Your Public Speaking: A Few Thoughts on Fear | Stars PowerPoint Templates


Popular Posts

Paste in Place in PowerPoint
How can you place a copied or duplicated slide object right on top of the original object in PowerPoint?

Formatting Arrows (Arrowheads) in PowerPoint 2013 for Windows
Learn how to format arrowheads for lines in PowerPoint 2013 for Windows.

Changing Location of Slide Numbers in PowerPoint 2010
Learn how to change location of slide numbers in PowerPoint 2010.

Text Alignment within Table Cells in PowerPoint 2013 for Windows
Learn about the options for text alignment within Table cells in PowerPoint 2013 for Windows.


Night Sky Starlit Backgrounds

The ZIP file that you will download contains five Night Sky Starlit Backgrounds in three resolutions: Full Size: 4000x2250 pixels (16:9), Widescreen Size: 1365x768 pixels (16:9), and Standard Size: 1024x768 (4:3). Also included are five PowerPoint Presentations with Night Sky Starlit Backgrounds, set to work with the Morph transition. Yes, these background designs can also animate between slides using PowerPoint's Morph transition.

Go ahead and get this product! You’ll see the price on the order page


Microsoft and the Office logo are trademarks or registered trademarks of Microsoft Corporation in the United States and/or other countries.

Home | PowerPoint | Photoshop | PowerPoint Templates | PowerPoint Tutorials | Blog | Notes | Ezine | Media Kit | Feedback | Site Map | About Us | Contact Us

Link to Us | Privacy | Testimonials

PowerPoint Backgrounds | Christian PowerPoint Backgrounds | Business PowerPoint Presentation Templates

Plagiarism will be detected by Copyscape

©2000-2023, . All rights reserved.