Indezine Logo


Ungroup a Table in PowerPoint 2013 for Windows

Learn how to ungroup a table in PowerPoint 2013 for Windows. Ungrouping can help if you want to animate a table, or if you want to format your table content differently.


Author:

Product/Version: PowerPoint 2013 for Windows

OS: Microsoft Windows 7 and higher


Learn PowerPoint

Do you know how to use animation for individual bullets by using multiple text boxes in PowerPoint?


Tables are essentially a group of cells arranged in a proper way. So, typically you would expect that ungrouping a table into individual cells should be a piece of cake, right? Nothing can be further from that! Before we explore ways to ungroup a table, let us understand why you would want to ungroup a table in the first place. One of the main reasons why you may consider ungrouping a Table within PowerPoint is to animate it segment by segment. In all PowerPoint versions, either the entire table can be animated or nothing can be! The workaround is to ungroup the table so that your table gets converted into a bunch of individual shapes, and you can animate every individual shape as you want. So let us look at some ideas to understand ungrouping Tables better.

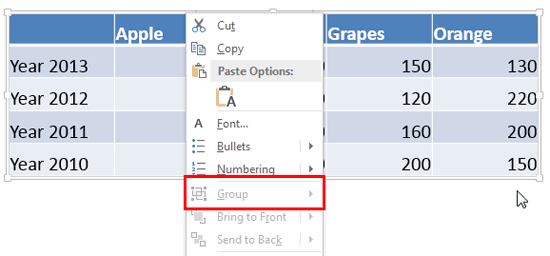
Look at Figure 1 which includes a Table in PowerPoint 2013 for Windows. Carefully right-click the table, and the resultant menu will show the Group option grayed out (highlighted in red).
Group option greyed out for the Table in PowerPoint 2013
Figure 1: Group option greyed out for the Table in PowerPoint 2013

To successfully ungroup, we will take an unconventional approach. However, in this process, even the lines within the table will get converted to individual shapes. So, make sure to apply a Table Style that includes as fewer lines as possible, or doesn't include any line. Thereafter, follow these steps to ungroup a table in PowerPoint 2013:
  1. Make a backup copy of the table that you want to ungroup (or just duplicate the slide that contains the table). This is highly recommended because after ungrouping, the table will no longer be editable in its tabular form.
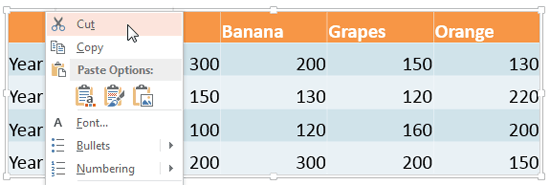
  2. Select the table and right-click to access a contextual menu shown in Figure 2. Within in menu, select either the Cut or Copy options.
  3. Cut option selected
    Figure 2: Cut option selected
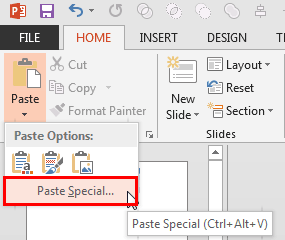
  4. Preferably, add a new slide. Then select the Home tab of the Ribbon, click the small down-arrow beneath the Paste button, and choose the Paste Special option, as shown highlighted in red within Figure 3.
  5. Paste Special option
    Figure 3: Paste Special option
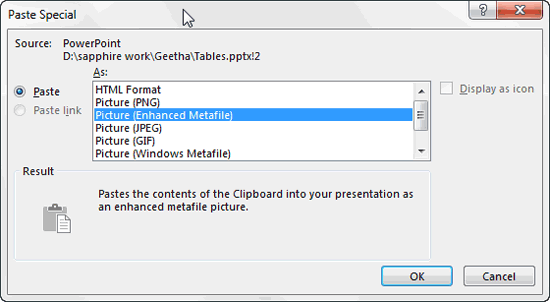
  6. This brings up the Paste Special dialog box that you can see in Figure 4. Scroll down the options until you find Picture (Enhanced Metafile) option. Select this option and click the OK button.
  7. Paste Special dialog box
    Figure 4: Paste Special dialog box
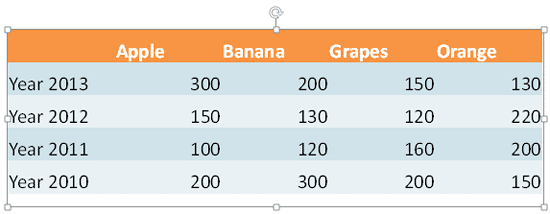
  8. PowerPoint will place an instance of the table which is now converted into a graphic, right in the center of the slide as shown in Figure 5. Reposition the instance as required.
  9. Table converted into a graphic
    Figure 5: Table converted into a graphic
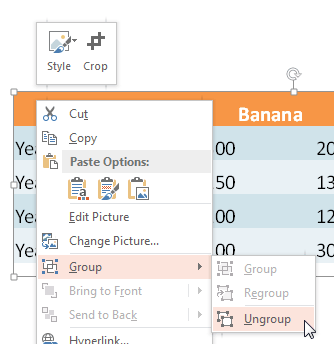
  10. Now, right-click the table graphic carefully to bring up the contextual menu, as shown in Figure 6. Now within this menu, you will find the Group | Ungroup option as shown in Figure 6 (compare with the contextual menu in Figure 1). Select this Group | Ungroup option.
  11. Group | Ungroup option
    Figure 6: Group | Ungroup option
  12. PowerPoint will warn you that the picture (graphic) will get converted to a Microsoft Office drawing object within a message window, as shown in Figure 7. Click the Yes button to proceed.
  13. Microsoft PowerPoint message window
    Figure 7: Microsoft PowerPoint message window
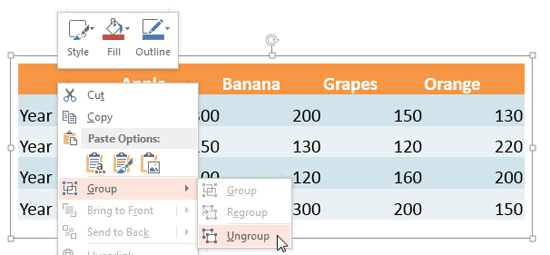
  14. Then, with the ungrouped table graphic still selected, right-click once again carefully and choose the Group| Ungroup option from the contextual menu as shown in Figure 8.
  15. Table graphic being ungrouped second time
    Figure 8: Table graphic being ungrouped second time
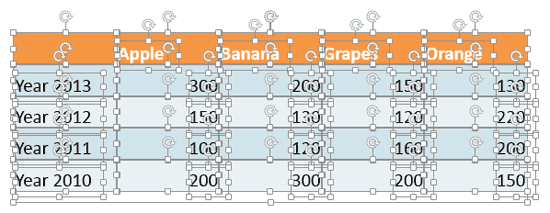
  16. Now, you'll see that all your table cells (and also text) are individual shapes (see Figure 9). Click anywhere outside the table area to deselect these shapes.
  17. Table components converted into individual shapes
    Figure 9: Table components converted into individual shapes
  18. You'll find that the actual table cell, and the text contained within are now separate slide objects. You can either select them both and group them or you can delete the text altogether, and type it within its container shape (cell) again.
  19. If you find any other extra shapes and line segments, delete them.

At this point of time, you can format these individual shapes as required, and also animate them individually or in groups as required.


See Also:

Advanced Table Techniques: Ungroup a Table in PowerPoint (Glossary Page)

Ungroup a Table in PowerPoint 2007 for Windows
Ungroup a Table in PowerPoint 2003 for Windows

You May Also Like: Keyboard Shortcuts in PowerPoint 2013 for Windows | 6 Reasons Why Your PowerPoint Presentations (Still) Look Boring


Popular Posts

Create Animated GIFs from PowerPoint Slides
Explore ways to create animated GIFs from PowerPoint slides.

PowerPoint Tutorials
These PowerPoint tutorials have many screen shots that show you exactly what you see in your computer!

Use Safe Fonts Available on All Systems in PowerPoint
Learn about using safe fonts in PowerPoint.

10 Tips for Pecha Kucha
Read 10 amazing Pecha Kucha tips that will help you create and deliver a better Pecha Kucha presentation.


Organic Shapes with Brush Edges

You get 8 shape types plus lines as part of this Organic Shapes collection. Each of these 8 shape types have 10 variants. So you end up with 80 hand-drawn shape options! Again each of these 80 shapes have 12 brush stroke styles! Plus you get the lines and arrows in 12 brush stroke styles too. Combine all variations to end up with more than 3000 possibilities.

Buy and Download for $99+ (83 MB)


Microsoft and the Office logo are trademarks or registered trademarks of Microsoft Corporation in the United States and/or other countries.

Home | PowerPoint | Photoshop | PowerPoint Templates | PowerPoint Tutorials | Blog | Notes | Ezine | Media Kit | Feedback | Site Map | About Us | Contact Us

Link to Us | Privacy | Testimonials

PowerPoint Backgrounds | Christian PowerPoint Backgrounds | Business PowerPoint Presentation Templates

Plagiarism will be detected by Copyscape

©2000-2023, . All rights reserved.