Indezine Logo


Using Custom Textures as Fill for Text in PowerPoint 2013 for Windows

Learn how to use custom textures as fill for text in PowerPoint 2013 for Windows. All textures are not created equal though.


Author:

Product/Version: PowerPoint 2013 for Windows

OS: Microsoft Windows 7 and higher


Learn PowerPoint

Learn how to change alignment of numbers in a PowerPoint chart.


When you consider using textures to fill up your text, you need not limit yourself to the default textures that PowerPoint offers. You can always explore some third party custom textures including our own Scribble Custom Textures that provide your text with an organic look, as if someone scribbled lines with a pencil to fill them! You can also try some more custom textures from our Ppted Background Texture Collection. In this tutorial you will learn how to use custom textures as fills for your text in PowerPoint 2013 for Windows:
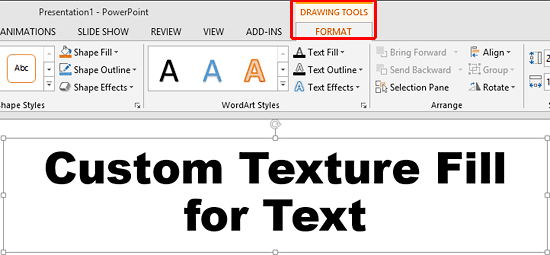
  1. Select text to which you want to apply a texture fill. Alternatively, if you just want to follow this tutorial step-by-step, insert a text box on a blank slide and type some text in it. Also, change the text font to something blockier, such as Arial Black (see Figure 1). Select the text, or the entire text box to bring up the Drawing Tools Format tab on the Ribbon as shown highlighted in red within Figure 1.
  2. Drawing Tools Format tab of the Ribbon
    Figure 1: Drawing Tools Format tab of the Ribbon
  3. Note: The Drawing Tools Format tab is a Contextual tab. These Contextual tabs are special tabs in the Ribbon that are not visible all the time. They only make an appearance when you are working with a particular slide object which can be edited using special options within these tabs.
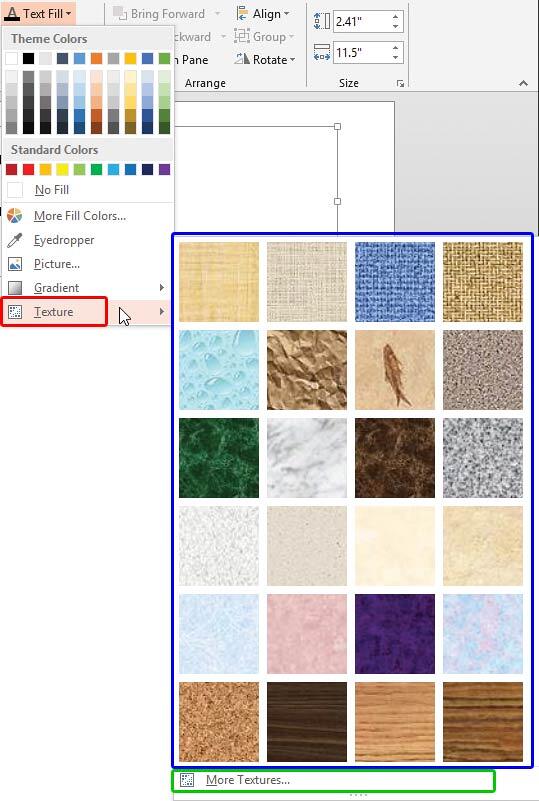
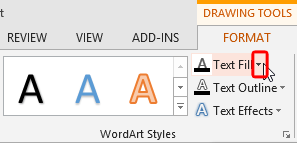
  4. Within the Drawing Tools Format tab, locate the Text Fill button and click the down-arrow, as shown highlighted in red within Figure 2.
  5. Text Fill button
    Figure 2: Text Fill button
  6. This opens the Text Fill drop-down gallery. In this drop-down gallery, select the Texture option (highlighted in red within Figure 3) to open Texture sub-gallery as shown in Figure 3 (highlighted in blue).
  7. Texture sub-gallery
    Figure 3: Texture sub-gallery
  8. You have already learned about how to select PowerPoint's default textures (highlighted in blue within Figure 3) for your text fill in our Texture Fill for Text in PowerPoint 2013 for Windows tutorial. Now, to select a Custom Texture for your text fill, click the More Textures option that can be found right below all the texture previews (highlighted in green within Figure 3).
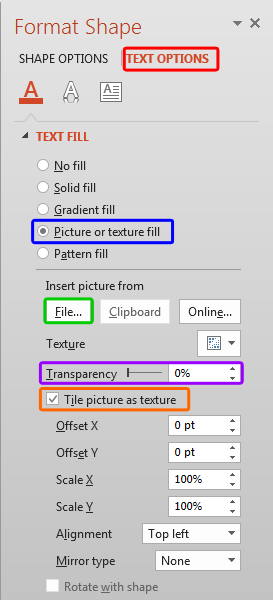
  9. This opens the Format Shape Task Pane, as shown in Figure 4. Make sure that the Text Options tab is selected, as highlighted in red within Figure 4. Make sure to select the Text Fill & Outline button. Then, select the Picture or texture fill radio button as shown highlighted in blue within Figure 4. And then click the File button, highlighted in green.
  10. Format Shape Task Pane
    Figure 4: Format Shape Task Pane
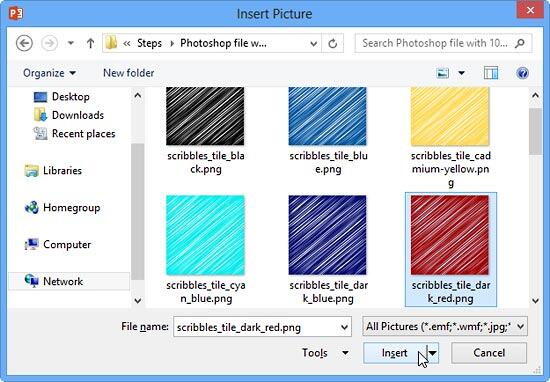
  11. This opens the Insert Picture dialog box as shown in Figure 5 . Navigate to the folder where you have saved textures to be used as text fills, and select a texture. After selecting the texture in the Insert Picture dialog box, click the Insert button.
  12. Insert Picture dialog box
    Figure 5: Insert Picture dialog box
  13. This takes you back to the In the Format Shape Task Pane (shown in Figure 4). Here, make sure you select the Tile picture as texture check-box (highlighted in orange within Figure 4, earlier on this page). You'll also find several Tiling options. These are explained in our Tiling Options in PowerPoint 2013 for Windows tutorial. Although the linked tutorial pertains to shapes, the concepts are similar enough.
  14. Optionally, you can set the transparency value of the texture fill using the Transparency slider, shown highlighted in purple within Figure 4, earlier on this page. You, can also enter the transparency value in digits within the box next to the slider. Figure 6 shows the selected text with a custom texture fill applied. Compare Figures 1 and 6 to see the difference.
  15. Text with a custom texture fill applied
    Figure 6: Text with a custom texture fill applied
  16. Remember to save your presentation often.

See Also:

Using Custom Textures as Fill for Text in PowerPoint 2011 for Mac
Using Custom Textures as Fill for Text in PowerPoint 2010 for Windows

You May Also Like: Leadership Storytelling: Conversation with Ronan Dunne | Professions PowerPoint Templates


Popular Posts

Crop Pictures (Mask to Shape) in PowerPoint 2011 for Mac
Learn how to crop pictures using Mask to Shape option in PowerPoint 2011 for Mac.

Playing Video Across Slides in PowerPoint 2016 for Windows
Play a video clip across slides in PowerPoint 2016 for Windows.

Set Document Resolution in PowerPoint 2016 for Windows
Learn how to set document resolution in PowerPoint 2016 for Windows.

Creating Anchor Points for Connectors in PowerPoint 2010 for Windows
Learn how to create Anchor Points for connectors in PowerPoint 2010.


Polygon Center Circles for PowerPoint

These special circles have polygon centers: the centers are made of triangles, squares, pentagons, and hexagons! And based on the sides of the polygon, the rest of the circle has that many segments.

Download and use these Polygon Center Circles in your slides for just $4.99


Microsoft and the Office logo are trademarks or registered trademarks of Microsoft Corporation in the United States and/or other countries.

Home | PowerPoint | Photoshop | PowerPoint Templates | PowerPoint Tutorials | Blog | Notes | Ezine | Media Kit | Feedback | Site Map | About Us | Contact Us

Link to Us | Privacy | Testimonials

PowerPoint Backgrounds | Christian PowerPoint Backgrounds | Business PowerPoint Presentation Templates

Plagiarism will be detected by Copyscape

©2000-2023, . All rights reserved.