In PowerPoint, if you want to enhance the look of your inserted video, you are certainly not limited to the options we have already explored including Corrections, Recolor, Video Styles, and Video Borders. In addition to these options, you can also apply Video Effects such as shadows, glows, bevels, 3-D rotation, etc. to your video clip.
Follow these steps to explore Video Effects in PowerPoint 2016 for Windows:
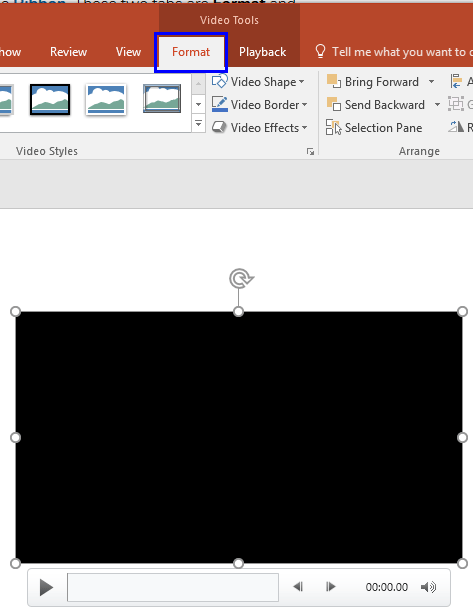
- Open your presentation, and navigate to the required slide where you have already inserted a video clip. Select or double-click the video clip to bring up the two Video Tools tabs in the Ribbon. These two tabs are Format and Playback. Click the Format tab to activate it, as shown highlighted in blue within Figure 1, below.

Figure 1: Video Tools Format tab of the Ribbon
Contextual Tab
- The Video Tools Format tab is a Contextual tab. These tabs are special tabs in the Ribbon that are not visible all the time. They only make an appearance when you are working with a particular slide object which can be edited using special options.
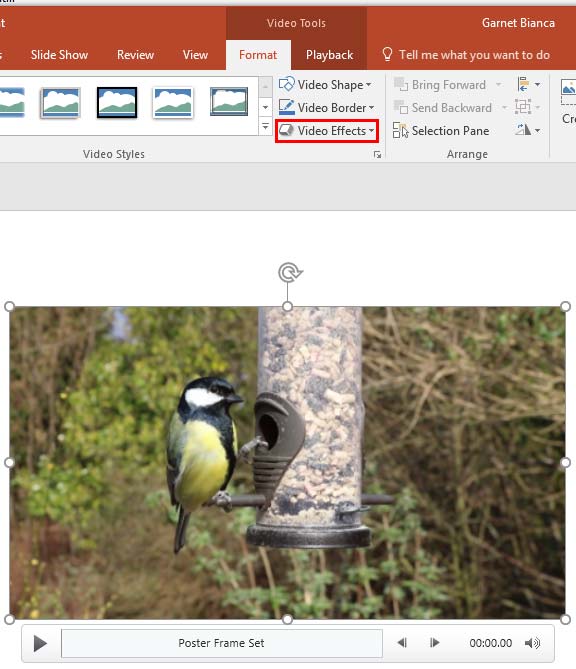
- When you insert a video on your slide, it may display a black rectangle on the slide as shown in Figure 1, above. If your video clip does not show a black rectangle, then directly proceed to Step 3. If you see just a black rectangle on your slide when you insert video, a Poster Frame can be applied to your video clip, as shown in Figure 2, below. When you are choosing different Video Effects, it is good to see a Live Preview of the actual video clip applied with those Video Effects, rather than seeing a black rectangle. Anyhow, applying a Poster Frame is entirely optional, and has no relation to your being able to follow the rest of this tutorial.

Figure 2: Video Effects button within the Video Styles group - Once the video frame is made visible, select the Video Tools Format tab, and click the Video Effects button, as shown highlighted in red within Figure 2, above.
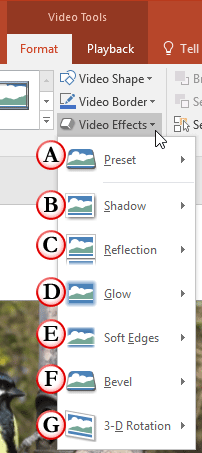
- Doing so opens the Video Effects drop-down gallery, as shown in Figure 3, below.

Figure 3: Video Effects drop-down gallery - Let us explore these Video Effects as marked in Figure 3, above. For more information on how to apply these effects, refer to the linked tutorials below. Although these linked tutorials discuss the Effect options for Shapes, the procedures explained applies to Videos as well:
A. Preset
- This option enables you to use the preset combinations of various effects available. These work well most of the time. Refer to our Apply Preset Effects tutorial for more information on how to use and edit the Preset Effects.
B. Shadow
- Applies a shadow to the selected video. PowerPoint provides three types of shadows: outer, inner, and perspective. You can apply any of these, or customize them to meet your requirements. Refer to our Apply Shadow Effects tutorial for more information on how to use the Shadow Effect.
C. Reflection
- Adds a reflection to the selected video clip, and you can choose from several reflection styles. Remember, you may want to avoid using Shadow and Reflection for the same video clip. Refer to our Apply Reflection Effects tutorial.
D. Glow
- Provides a hazed, blurred color perimeter outside the video area. PowerPoint provides several glow variations; the glow colors are based on the Theme colors, although you can also choose any other color as well. Refer to our Apply Glow Effects tutorial.
E. Soft Edges
- This effect type makes the video's edges feathered. There are some soft edges variations available. Refer to our Apply Soft Edges tutorial.
F. Bevel
- Applies bevel effects to the selected video clip. You can also customize the applied bevel. Refer to our Apply Bevel Effects tutorial.
G. 3-D Rotation
- Imparts parallel, perspective, and oblique 3-D effects to the selected video clip. Refer to our Apply 3-D Rotation tutorial.
- Choose and apply any of the Video Effects to your video. You can apply multiple effects to the same video. Figure 4, below, shows the selected video clip with two effects applied (Bevel and 3-D Rotation). Compare Figures 2 and 4.

Figure 4: Multiple Effects applied to one video clip - Play your video clip to see the difference and remember to save your presentation often.


