![]()
This is the print version of this page. All content is copyright Indezine.com 2000-2023.
![]()
Author: Robert Lane
 Robert Lane is a presentation design consultant specializing in visually interactive communication techniques
and is the primary contact person for this article. References, visual examples, and additional resources
are available here on the Aspire Web site.
Robert Lane is a presentation design consultant specializing in visually interactive communication techniques
and is the primary contact person for this article. References, visual examples, and additional resources
are available here on the Aspire Web site.
Why Hide Slides in PowerPoint?
Using Hidden Slides
Hidden Slides Tutorial
When you “hide” a slide in PowerPoint, it doesn’t display while scrolling through the presentation in Slide Show mode. So,
why in the world would you ever want to do that … have slides in your deck that the audience can’t see? In this article, we’ll
look at several wonderful reasons that can greatly increase your flexibility and effectiveness as a speaker, giving talks a
more personalized, conversational, audience-friendly feel.

Figure 1: “Busy” PowerPoint Slide
To set the stage, let’s start with common PowerPoint slide. It contains a lot of information—packed from top to bottom with topics to be discussed. A presenter normally walks through point after point, slide after slide until reaching final conclusion slides.
Well, that happens in a perfect world, anyway. All too often, our talks don’t go quite that smoothly. We start running out of time partway through and desperately wish some of those bullet points, or even entire slides, could be skipped along the way to reach more important content. Maybe you’ve been in situations like me where unexpected circumstances cut your speaking slot in half! Many of us also find ourselves facing uncertainty, realizing along the way that some of the carefully planned agenda is not relevant to our viewers—especially common in sales contexts.
In all cases, wouldn’t it be great to have a fast, easy way of making adjustments? Actually, you have that power at your fingertips right now, even with a standard PowerPoint deck. This is where hidden slides become your best friend. Here’s how.

Figure 2: Summary Slide That Links to Hidden Detail
Earlier I mentioned that a hidden slide doesn’t display when normally scrolling through a show, but it DOES display if accessed via hyperlink. In other words, you can create a simple summary slide like the one shown in Figure 2 that links to additional detail on subsequent hidden slides (Figure 3).
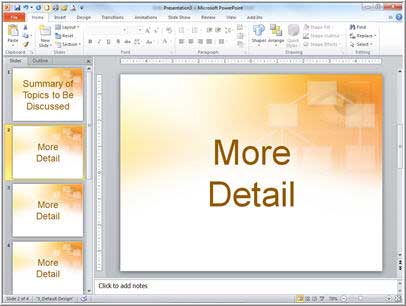
Figure 3: Extra Detail on Subsequent Hidden Slides
The presenter then has the option of displaying any amount of extra detail desired, or skipping that detail altogether with a normal scroll. Entire topics can be nestled away like this and shown only if, and when, needed. The added flexibility gives you enormous versatility to adjust timing and relevance, in an instant.
For example, try these ideas. Use hidden slides for on-demand display of:
You might even load a show with far more topics than will be needed during a particular talk, and have that content in reserve, just in case. Then it’s easy to pick and choose what viewers see, customizing a message on-the-fly.
Want to try it? The steps below walk you through building a simple hidden-slide presentation, using techniques that can be easily adapted to your own materials.
Create a slide show containing four slides. Leave the first slide white, but format the backgrounds of the remaining slides to be red, blue, and yellow respectively by right clicking each slide thumbnail, choosing Format Background from the options, and changing background colors accordingly (Figure 4). We’re doing this simply to tell the slides apart.
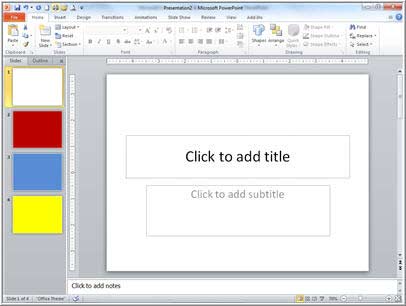
Figure 4: We Will Hide the Red and Blue Slides
Let’s hide the red and blue slides, slides 2 and 3. Do so by selecting the slide thumbnails and then clicking the Hide Slide button on the Ribbon’s Slide Show tab (PowerPoint 2007 and 2010), or right click the selected slide thumbnails and choose Hide Slide from the options (Figure 5).

Figure 5: Two Methods for Hiding Slides
Microsoft and the Office logo are trademarks or registered trademarks of Microsoft Corporation in the United States and/or other countries.