Indezine Logo


Drawing Arcs in PowerPoint

Explore how you can draw an arc shape in PowerPoint. The arc is different than the similar pie shape.


Author:

Product/Version: PowerPoint

OS: Microsoft Windows and Mac OS X


Learn PowerPoint

Explore guidelines about the smallest font size for PowerPoint Slides.


PowerPoint offers so many shapes, from simple rectangles and ovals to playful options like pies and smiley faces. While you can use these shapes as-is, you can also get creative by using the Merge Shape commands to design your own unique shapes. But even without creating new designs, there are endless possibilities for using existing shapes in innovative ways. Today, we want to focus on one of these versatile options: the Arc shape. With its curved lines and customizable size, this shape can be a useful tool for adding dimension and visual interest to your presentations.

The Arc shape is user-friendly and intuitive, with similarities between the Pie and Arc shapes in terms of their appearance and functionality. To begin drawing an Arc shape, there are a few simple steps to follow. Once we've covered that, we can delve into the nuances that distinguish the Arc shape from its Pie counterpart.

Follow these steps to draw an Arc shape in PowerPoint:
  1. Create a new presentation in PowerPoint. You can change the slide layout to Blank by selecting the Home tab | Layout | Blank option.
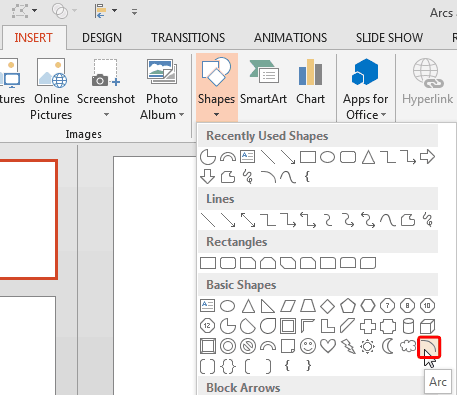
  2. Access the Shapes gallery, as shown in Figure 1, below. Within the Basic Shapes category, you'll find the Arc shape, as shown highlighted in red within Figure 1.
  3. Arc shape selected
    Figure 1: Arc shape selected
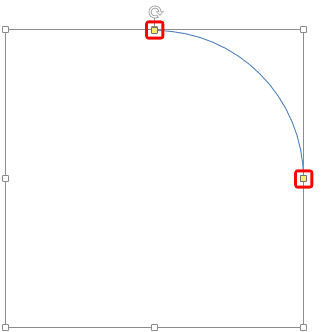
  4. Now, click anywhere on the slide to add the Arc shape in a predefined size (typically 1 inch x 1 inch). Alternatively, click and do not let go off the primary button on your mouse or another input device. Continue dragging until you create a large enough Arc shape on your slide, as shown in Figure 2, below. Let go off the mouse button now.
  5. Two handles at both the ends
    Figure 2: Two handles at both the ends
  6. Notice two handles, as shown highlighted in red within Figure 2, above, placed on both ends of the Arc shape. You can drag any of these handles to increase or decrease the curvature of the inserted Arc shape. Figure 3, below, shows the handle being dragged downwards.
  7. Handle being dragged
    Figure 3: Handle being dragged
  8. What are Manipulating Handles?

  9. Learn more about these handles in our Manipulating Shapes by Dragging Yellow Squares/Diamonds in PowerPoint tutorial.
  10. Drag further upwards to create a Pie shape without a fill, as shown in Figure 4, below.
  11. Pie shape created
    Figure 4: Pie shape created
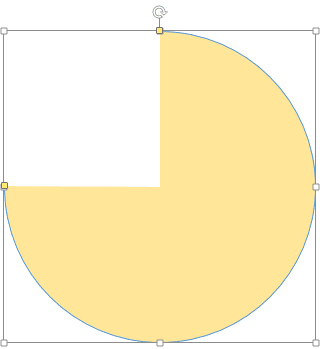
  12. Apply a solid fill to the Arc shape to end up with the shape shown in Figure 5, below. Although this resultant shape looks like a Pie, it really isn't since the outline of the shape doesn't surround it entirely. We will explore this difference later, on this page.
  13. Pie shape with solid fill
    Figure 5: Pie shape with solid fill
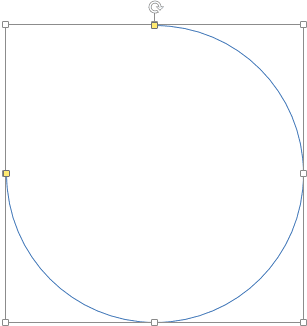
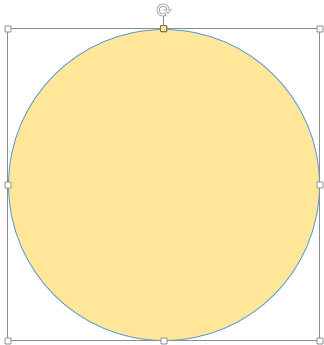
  14. You can even drag the handle to the maximum extent to create a full circle, as shown in Figure 6, below.
  15. Circle created using Arc shape
    Figure 6: Circle created using Arc shape
  16. Save your presentation often.

Difference Between Pie and Arc

In Figure 7, below, you will find the Pie shape on the left while the Arc can be found right-wards. Notice that they look the same except for the partial outline within the Arc shape (pointed by arrows in Figure 7). In comparison, the Pie shape sports a full outline.
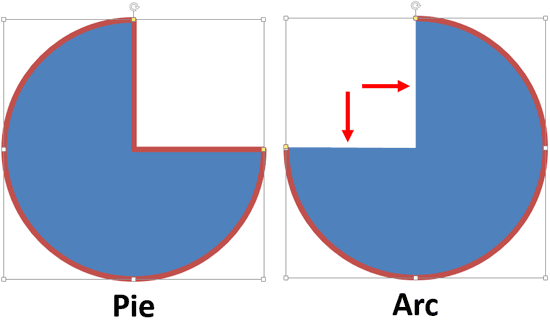
Pie and Arc shapes look similar but can be different
Figure 7: Pie and Arc shapes look similar but can be different

More Ways to Create Arcs

There are other shapes with which you can create an Arc easily. You can use the Freeform drawing tool to create your own individual Arc. You can also use the Block Arc shape within the Shapes gallery, as shown in Figure 8, below.
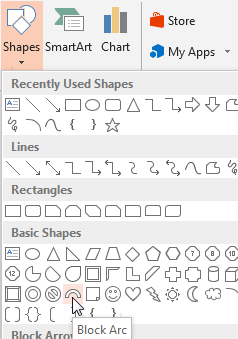
The Block Arc shape
Figure 8: The Block Arc shape

Once drawn, you will see two handles on the Block Arc shape, as shown highlighted in red within Figure 9, below.
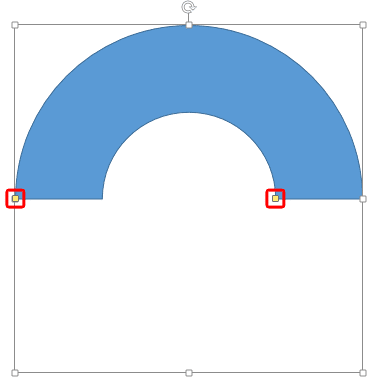
Two handles can be found within the Block Arc shape
Figure 9: Two handles can be found within the Block Arc shape

Drag the left handle to make your Arc smaller or larger, as shown within the top shape within Figure 10, below. The right handle, on the other hand allows you to make your Arc shape thinner or thicker, as shown in the bottom shape within Figure 10.

The Block Arc shape can also create Arcs
Figure 10: The Block Arc shape can also create Arcs


People Also Ask:

How do you draw a half arc in PowerPoint?

In PowerPoint, draw a circle, right-click on it, select "Edit Points." Now, delete half the points to create a semicircle, and adjust the remaining points to form the desired arc shape.

How to draw an angle in PowerPoint?

To draw a line with an angle in PowerPoint, first draw a straight line by using the Shift key. Then right-click the line and choose the Format Shape option. In the resultant Task pane, ensure that you are within Shape Options. Then in the Size and Position tab, type in the rotation angle.

Can I use the Line tool to draw curves in PowerPoint?

The line tool in PowerPoint creates straight lines. To make curves or arcs, you can use the "Curve" tool instead. It allows you to draw freeform curves by clicking and dragging the points to create the desired shape.

06 02 08 - Advanced Shape Techniques: Drawing Arcs in PowerPoint (Glossary Page)

You May Also Like: Outstanding Presentations Workshop 2014: Conversation with Ellen Finkelstein | Plus PowerPoint Templates


Popular Posts

PowerPoint Transitions: Curtains
Explore the Curtains transition effect in PowerPoint.

Pivot Tables in PowerPoint: by Kasper Langmann
One of the most commonly used features in Microsoft Excel is the Pivot Table. A Pivot Table simply allows you to make better sense of data by giving you different options of how to view that data.

Get More SmartArt Graphics
Learn how you can get more SmartArt graphic variants.

Character Spacing in PowerPoint 2013
Explore Character Spacing options in PowerPoint 2013.


Pictures in Presentations

Is a picture is worth a thousand words? You probably have heard this adage so often that we decided not to repeat this phrase throughout this book! Now here’s some more info: the human brain uses a larger part of its area to store visual information rather than textual content. And that’s possibly because a picture describes so much more than text.

Go and get a copy of our Pictures in Presentations ebook.


Microsoft and the Office logo are trademarks or registered trademarks of Microsoft Corporation in the United States and/or other countries.

Home | PowerPoint | Photoshop | PowerPoint Templates | PowerPoint Tutorials | Blog | Notes | Ezine | Media Kit | Feedback | Site Map | About Us | Contact Us

Link to Us | Privacy | Testimonials

PowerPoint Backgrounds | Christian PowerPoint Backgrounds | Business PowerPoint Presentation Templates

Plagiarism will be detected by Copyscape

©2000-2023, . All rights reserved.