Continued on Page 2 >
Introduction
Checking File Sizes
Putting the Squeeze
Introduction
The decline in the prices of digital cameras is directly related to the bloating file sizes of PowerPoint files. If you don't believe us, just insert a few ten megapixel photos inside a PowerPoint presentation and see what happens to the file size. The poor presentation is probably already on its way to the bloat heaven. And the person to whom you send this presentation by email is on his way to download hell! OK, this behavior may no longer happen within the new PowerPoint 2007, but as we'll explain later in this article, the compression settings in 2007 are hardly optimized enough.
Microsoft realized that compression was a large issue many years ago and built picture compression capabilities inside PowerPoint, right from PowerPoint 2002 (XP) onwards. Unfortunately (and you knew this was going to come in somewhere), they placed the compression options so well hidden inside the interface that even people who were using PowerPoint for years failed to discover the feature. And they did rectify this in the new PowerPoint 2007, although they then created the new problem of automatic compression. In this article, we will explore all the compression info that you need to know as a PowerPoint user.
If you are using any version earlier than PowerPoint 2002, you will still benefit from this article since we'll explore third-party compression options. Or maybe you'll end up justifying the cost of an upgrade to the current PowerPoint version!
Back
Checking File Sizes
Whichever version of PowerPoint you use, try this quick exercise:
- First of all, you need a bloated presentation to start with. That's easy. As we already suggested, insert a few (maybe a dozen) megapixel photos inside your PowerPoint presentation. Resize the photos to be no larger than the slide area. Save the file.
- Next, check the file size by summoning the Properties dialog box. PowerPoint 2007 users can choose Office button | Prepare | Properties. This step brings up the Document Properties pane, and you need to again choose Document Properties | Advanced Properties as shown in Figure 1, below.
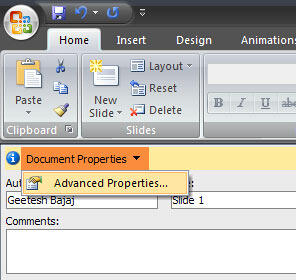
Figure 1: Select Advanced Properties - Users of older PowerPoint versions need to just choose File | Properties to get the same dialog box!
- In this dialog box, choose the General tab as shown in Figure 2, below. This tab provides more info about the file size. Make a note of the file size.
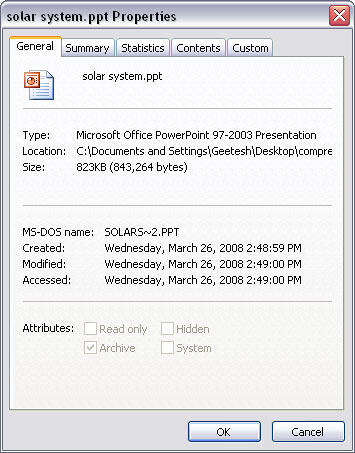
Figure 2: Make a note of the file size
Back
Putting the Squeeze
Now, let's put those pictures on an inch-loss program. In PowerPoint parlance, this means compressing the picture sizes to trim off the excess fat in the presentation. Follow these steps to compress the pictures depending upon your version of PowerPoint:
PowerPoint 2007
- With your active presentation open, save it by choosing Office Button | Save so that any changes you made are saved.
- Now double-click on any picture on any slide to activate the Picture Tools Format tab on the Ribbon.
Contextual Tabs
- The Picture Tools Format tab is a contextual tab. Contextual tabs are special tabs in the Ribbon that are not visible all the time. They only make an appearance when you are working with a particular slide object which can be edited using special options.
- Within this new tab, click the Compress Pictures button as shown in Figure 3, below.
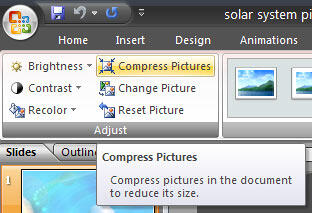
Figure 3: Compress Pictures button - Doing so brings up the Compress Pictures box that you can see in Figure 4, below. Make sure that the Apply to selected pictures only option is deselected, and click the Options button.

Figure 4: Compress Pictures dialog - This step summons the Compression Settings dialog box that you can see in Figure 5, below.

Figure 5: Compression Settings - Choose your compression settings as required. You could leave the Automatically Perform Basic Compression on Save and the Delete Cropped Areas of Pictures options selected, but you'll want to deselect the former option if you don't want automatic compression active.
- Also, change your Target output to E-mail (96 ppi). This choice works best unless you need to print your slides to high res printers.
- Click the OK button twice in successive dialog boxes to get back to your PowerPoint slides. If your computer feels sluggish at this time, that's because PowerPoint is working hard to apply the compression settings you just chose.
- Preferably, save your presentation as a new file, and then compare file sizes with the older file to ascertain if compression helped in reducing the file size.
PowerPoint 2002 and 2003
- With your active presentation open, save it by choosing the File | Save option so that any changes you made are saved.
- Select any one picture in your presentation.
- Right-click the picture and choose the Format Picture option from the resultant fly-out menu. Doing so will open the Format AutoShape dialog box with six tabs that you can see in Figure 6, below.
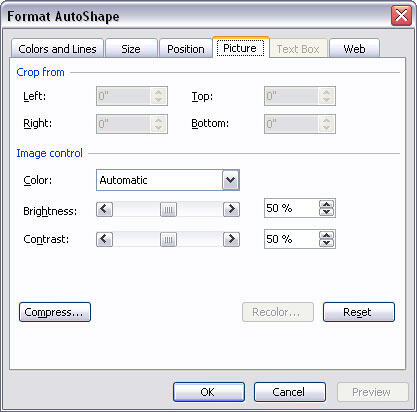
Figure 6: Picture tab in the Format Picture dialog box - Choose the Picture tab in the Format AutoShape dialog box and click the Compress button to open the Compress Pictures dialog box that you can see in Figure 7, below.
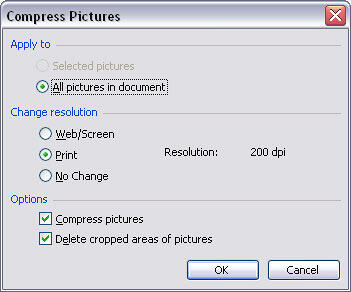
Figure 7: Compress Pictures - Within the Change Resolution area, choose the Web/Screen option. In the Apply to section, choose the All pictures in document option. Also leave the options for Compress pictures and Delete cropped areas of pictures checked.
- Click OK and then Apply in the successive dialog box. Ignore any warnings. Doing so will get you back to the Format Picture dialog box. If your computer feels sluggish at this time, that's because PowerPoint is working hard to apply the compression settings you just chose.
- Click OK to dismiss the Format AutoShape dialog box. Now save your presentation.
- Make a trip again to the Properties dialog box and check the new file size against the earlier file size, as shown in Figure 8. Now only if reducing waist sizes was this easy!
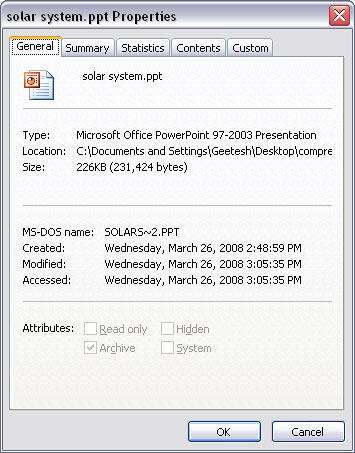
Figure 8: Check Properties again to compare file sizes
Back
Continued on Page 2 >


