Indezine Logo


ToolBook Instructor 9.5

Read the Indezine review of ToolBook Instructor 9.5.


Author:

Product/Version: PowerPoint


Learn PowerPoint

Learn how you can use presets in Shape Styles in PowerPoint and Microsoft Office.


Introduction
About ToolBook Instructor
Download and Installation
Using ToolBook Instructor
Pricing and Support
Conclusion


Introduction

The amount of content available in the form of PowerPoint slides is amazing -- almost every computer literate person has a bank of slides, be it at their company, home, school, university, or elsewhere. Most of this content won't work too well when saved as a document -- but since slides typically have (or should have) small portions of large sized text with contrasting backgrounds and visuals, they end up becoming perfect as content for PDAs and Smartphones.

Products like ToolBook Instructor do a whole lot more than just such conversion, but in this review, we will focus on the PowerPoint capabilities of Toolbook Instructor, which will help you to convert your PowerPoint files into online, interactive learning course content with ToolBook's rapid eLearning content creation capabilities.

Back

About ToolBook Instructor

ToolBook is a division of SumTotal Systems, Inc. (NASDAQ: SUMT) a global provider of talent and learning management solutions. With ToolBook, SumTotal took an early, decisive lead in the content development market with a solution that enables corporations to create content for effective eLearning initiatives. Today, organizations use ToolBook produced content across many industries including financial services, high-tech, healthcare, pharmaceutical, communications, manufacturing, government, and human resource consulting. You can learn more about the Toolbook Instructor, and download a free trial version of the product from their site.

ToolBook Instructor helps users and large companies create interactive content, quizzes, assessments, and software simulations. Content is deployed as HTML for distribution on the Internet or an intranet, delivered through SumTotal Learning Management solution, or any SCORM or AICC-compliant Learning Management System (LMS). All the learning courses created can be viewed interactively on major operating systems, web browsers, mobile phones and devices.

ToolBook Instructor comes as standalone application and is bundles with a capable PowerPoint add-in. In this review we are going to cover the add-in part, and show you how you can import your PowerPoint presentation into the ToolBook workflow, and add interactivity.

My contact at SumTotal Systems for this review was Brad Crain and Sujit Reddy - thank you, Brad and Sujit. Brad was also interviewed by this site.

Back

Download and Installation

You can download the installer for either the full or trial version. Run the setup routine and follow the instructions. You'll end up with a ToolBook group under Home tab of the ribbon in PowerPoint 2007, as shown in Figure 1.

ToolBook group under home tab
Figure 1: ToolBook group under home tab

Back

Using ToolBook

Follow these steps to import Microsoft PowerPoint files into ToolBook Instructor 9.5:
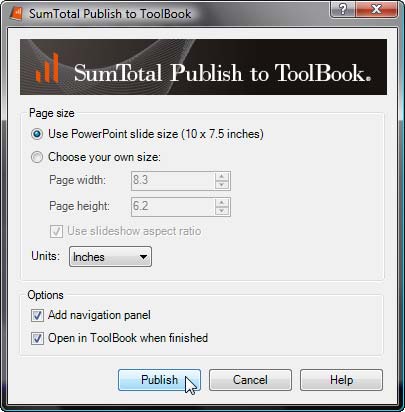
  1. Open any presentation in PowerPoint and click the Publish to ToolBook button in the Home tab of the Ribbon (refer to Figure 1 above).
  2. This launches the Publish to ToolBook dialog box (see Figure 2 below).
  3. Publish to ToolBook
    Figure 2: Publish to ToolBook
  4. Here you can decide whether you want to use the default PowerPoint slide size (slide dimensions), or choose your own size. You also opt to add navigation buttons, etc., and open the converted result in ToolBook. Click Publish to go ahead with the conversion.
  5. This brings up the Save As ToolBook file dialog box -- save the file in the desired location.
  6. Based on the presentation size, the publishing can take a while. Once this is done, it opens as a ToolBook file, as you can see in Figure 3.
  7. Published ToolBook file
    Figure 3: Published ToolBook file
  8. In the published ToolBook file, choose View | Author, as shown in Figure 4.
  9. Author
    Figure 4: Author
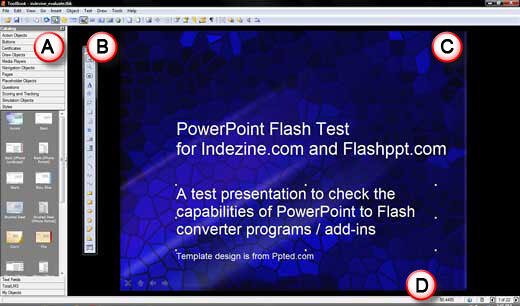
  10. This brings up the ToolBook interface with the converted PowerPoint presentation opened (see Figure 5 below).
  11. ToolBook interface
    Figure 5: ToolBook interface
  12. The interface is broadly explained below:
  13. A. Catalog

    pane is a library which provides all the elements which is used to create learning courses such as draw objects, navigation objects, questions, pages, etc.

    B. Tool Bar

    provides some basic objects such as shapes, lines, radio buttons, check buttons, etc.

    C. Edit Area

    is the area where you can make edits and add elements to the individual pages, and even preview them.

    Note:

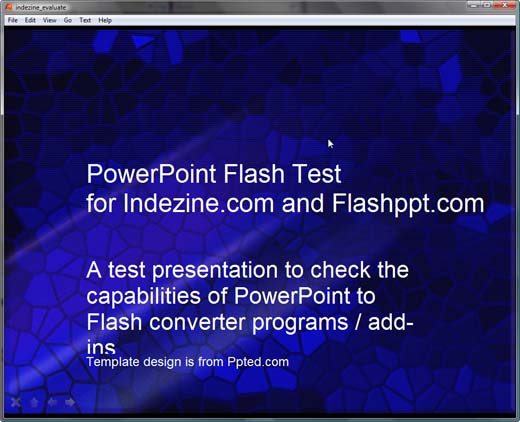
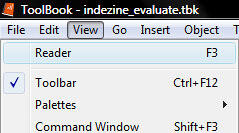
    When edits are made, or elements are added to the page, you can switch to Reader view to see how the output will look like. To do so, choose the View | Reader option, as shown in Figure 6.
    Reader
    Figure 6: Reader

    D. Navigation

    allows you to navigate to next and previous pages.
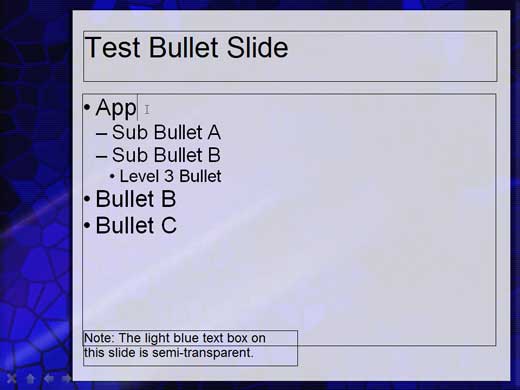
  14. Once the presentation in converted into a ToolBook file all the PowerPoint objects are fully editable within the ToolBook interface – including text, images, and hyperlinks as shown in Figure 7. This is important since now you can use ToolBook's native features to add, edit, and enhance page elements thus bring interactivity into your courses.
  15. Editable text
    Figure 7: Editable text
  16. Beyond mere editing, ToolBook enables you to add more objects such as images including transparent PNG files.
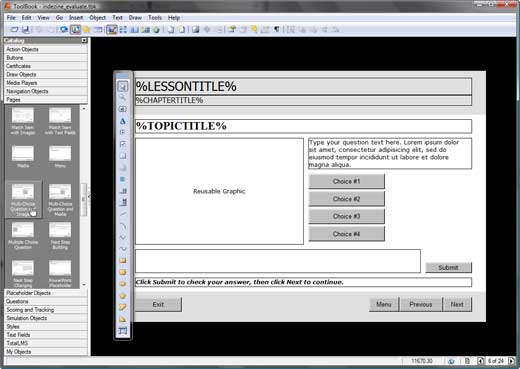
  17. You can also add assessments, interactivity, quizzes, media, and rich media effects using ToolBook. Figure 8 shows a multiple choice question page added to the presentation. You can even choose styles (SmartStyles feature) from the Catalog pane and make the interactive pages look more professional. There are readymade styles available for specific outputs like the iPhone -- do play with these.
  18. Multiple choice question
    Figure 8: Multiple choice question
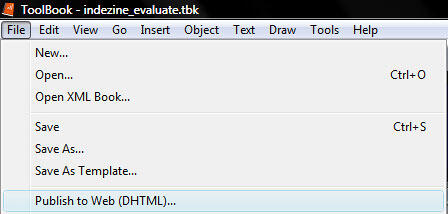
  19. Once you are done, choose File | Publish to Web (DHTML), as shown in Figure 9.
  20. Publish to Web
    Figure 9: Publish to Web
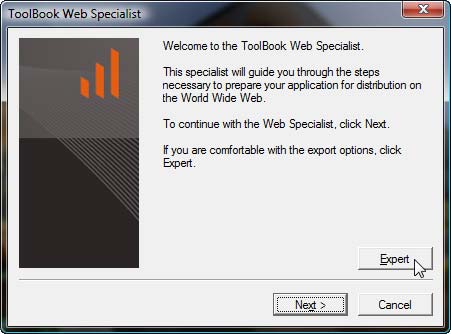
  21. This opens the ToolBook Web Specialist window that assists you with publishing options, as shown in Figure 10.
  22. ToolBook Web Specialist
    Figure 10: ToolBook Web Specialist
  23. There are two publish options Basic and Expert. Choose the Basic option if you want to do a quick export. The Expert option provides more publishing options.
Back

Pricing and Support

ToolBook Instructor 9.5 costs $2795.00.

Support options include an online learning center, e-mail and phone support, and online documentation.

Back

Conclusion

ToolBook Instructor is among the most able products in its class -- and the PowerPoint specific capabilities allow you to create quick mobile content from your slides. In addition, there's so much more you can create with Toolbook Instructor -- the product works with many file formats so you can import almost anything within the product, add interactivity, and export to various devices, online browsers, and also to traditional distributable CDs and DVDs.

Back

You May Also Like: Poland Flags and Maps PowerPoint Templates | OfficeOne ProTools Color Picker


Popular Posts

Character Spacing in PowerPoint 2013
Explore Character Spacing options in PowerPoint 2013.

Add Secondary Value Axis to Charts in PowerPoint 2013 for Windows
Learn how to add a Secondary Value axis to charts in PowerPoint 2013 for Windows.

Ten Easy Topics for Pecha Kucha
But what are simple topics, that excite you, and are interesting to your audiences? Of course, if you already have a topic, you need not read further, but if you are still looking for ideas, here are ten easy topics that you can use for your Pecha Kucha presentations.

Drawing Arcs in PowerPoint
Explore how you can draw an Arc shape in PowerPoint.


Feature List 01 (Layout with Tabs)

The Feature List Layout comprises three sample PowerPoint presentations: one each to create a visual list for 4 features, 5 features, and 6 features. These work great when you have too much information to fit within one slide. This solution lets you use multiple slides, but the visual result is still that of one single slide!

Buy and Download Feature List 01 (Layout with Tabs) for $4.99+ (671 kb)


Microsoft and the Office logo are trademarks or registered trademarks of Microsoft Corporation in the United States and/or other countries.

Home | PowerPoint | Photoshop | PowerPoint Templates | PowerPoint Tutorials | Blog | Notes | Ezine | Media Kit | Feedback | Site Map | About Us | Contact Us

Link to Us | Privacy | Testimonials

PowerPoint Backgrounds | Christian PowerPoint Backgrounds | Business PowerPoint Presentation Templates

Plagiarism will be detected by Copyscape

©2000-2023, . All rights reserved.