Introduction
Using PixSwap
Pricing and Support
Conclusion
Introduction
While PowerPoint 2003 and previous versions provided you with an option to
recolor your pictures easily, this option
was removed in PowerPoint 2007 and also did not make it to the subsequent PowerPoint 2010. This was indeed one of the very
cool options in PowerPoint and many long-time users were not too amused with its absence. Yes, if you have a copy of PowerPoint 2003
or an older version installed, you can easily still recolor the pictures in that version -- and then bring that content to any of
the newer PowerPoint versions -- but doing that often can be cumbersome and boring -- especially now that PixSwap, a third-party
PowerPoint add-in brings back the Recolor option to PowerPoint 2007 and 2010.
Like the older Recolor option, PixSwap also limits the recolor to vector clip art formats -- while the PixSwap documentation
lists only WMF as the supported format for clip art, we were able to use this feature with both EPS and EMF files as well! Of course,
you won't have luck recoloring any bitmap file formats like JPG or PNG -- but that's because Recolor only works with vector file
formats. Learn more about differences between vectors and bitmaps here.
PixSwap is from PPTAlchemy, a UK based company. You can learn more about the product, and
download a trial version of PixSwap from their site.
My contact at PPTAlchemy for this review was John Wilson - thank you, John.
Back
Using PixSwap
Before installing the add-in, make sure you enable the Developer tab of the Ribbon within PowerPoint -- these links will
help you:
Enable the Developer tab in PowerPoint 2010
Enable the Developer tab in PowerPoint 2007
Once the Developer tab is active within your
Ribbon, close PowerPoint and then run the
PixSwap installer. If you use PixSwap in demo mode, you will find it to be fully functional and it may do all you need – the only
difference in the demo and the full version is that the demo has a 20 use limit. Thereafter follow these steps for a small walkthrough:
- Launch PowerPoint and insert some clip art (any WMF or EMF file will work) on your slide. Figure 1
shows a picture of a flower placed on the slide.
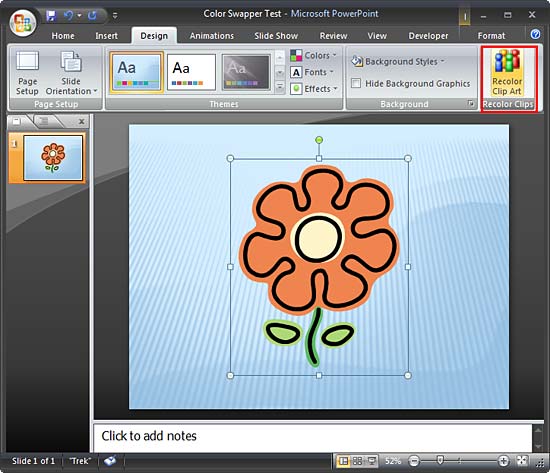
Figure 1: Picture of a flower placed on the slide- Select the graphic, and ungroup it so that PixSwap can now do recoloring -- if you do not ungroup, PixSwap will show
an error message. These links will help you learn more about ungrouping:
-
Ungrouping Slide Objects in PowerPoint 2007
- Make sure you only ungroup once and not twice!
- Select the ungrouped clip art picture which still shows as one selection. Access the Design tab of the
Ribbon, locate the new Recolor Clips
group and click the Recolor Clip Art button (highlighted in red in Figure 1 above).
- This will open the Color Swapper dialog box, as shown in Figure 2.
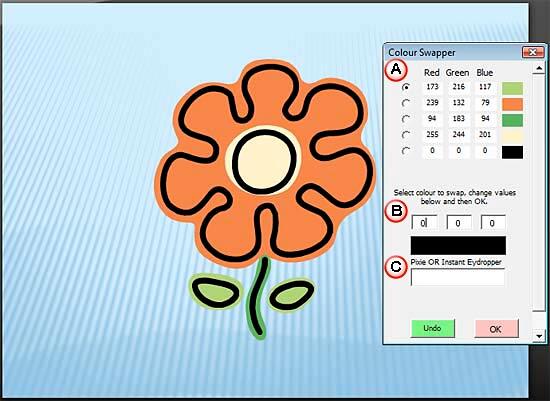
Figure 2: Color Swapper dialog box- The Color Swapper dialog box basically has three sections which are explained below:
A. Color Selection
- Displays a swatch for every color in your clip art picture (RGB values and a swatch of the color). To
change any color, you first need to select the radio button for that color.
B. Change Color
- Once you select the color you want to change, just enter the RGB values of the new color you want to change
to. You can add the RGB (Red, Green, Blue) values within the three boxes you see. If you do not want to use the Pixie option we
discuss next, you can click the OK button now to apply the changed color.
C. PIXIE OR Instant Eyedropper
- This input box lets you insert the color value from
Pixie, a free color picker application that works
with PixSwap to make accurate color choices simple. It is recommend to install this free application so that you can pick any
color from the screen. You can also
insert a picture within the same slide as
where your clip art graphic is inserted and let Pixie pick colors that match the overall look of your presentation slides.
- When Pixie is running, the color beneath your cursor's location (highlighted in red in
Figure 3) will be picked up by Pixie (highlighted in green in Figure 3). As you can see in
Figure 3, Pixie displays all sorts of values of the color in different color modes.
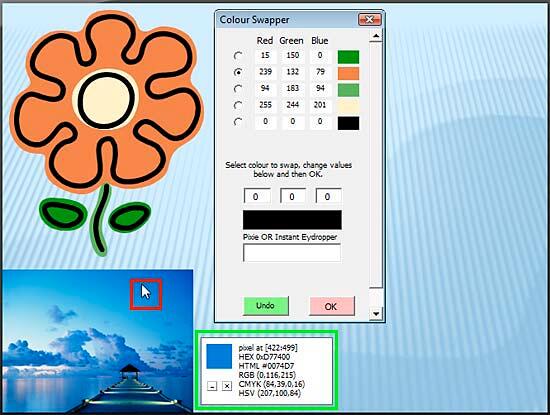
Figure 3: Slide with PIXIE active- To copy a color's values, just press Ctrl+Alt+C. Then paste (press Ctrl+V) these values within the Color
Swapper dialog's Pixie or Instant Eyedropper input box. This will change the color value of the selected color to
be changed and the HTML color value also appears within the input box (highlighted in red in Figure 4).
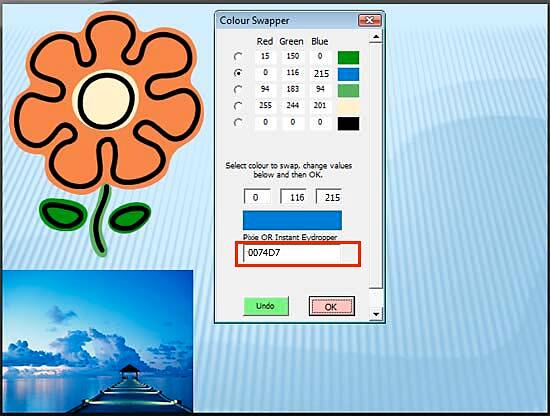
Figure 4: HTML color value within the input box- Click the OK button to apply the changed color.
- Pixie also lets you choose color from the Color dialog box (see Figure 5) -- to launch the Color
dialog, just press Ctrl+Alt+X when Pixie is active.
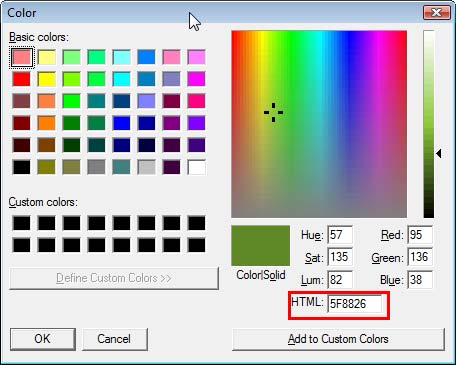
Figure 5: Pixie's Color dialog box
Note: The Color dialog may open behind PowerPoint interface! To avoid this, try clicking on the PIXIE dialog
first to pass control to PIXIE. Then press Ctrl+Alt+X. Alternatively, you can use the taskbar to bring it to the front when required.
- Whichever way you choose to change the color - Pixie or PixSwap, once the replace color values are input, click the
OK button within the Color Swapper dialog box. Figure 6 shows how we changed all the colors within our inserted
clip art graphic to reflect the overall look of the slide (compare to Figure 4 above).
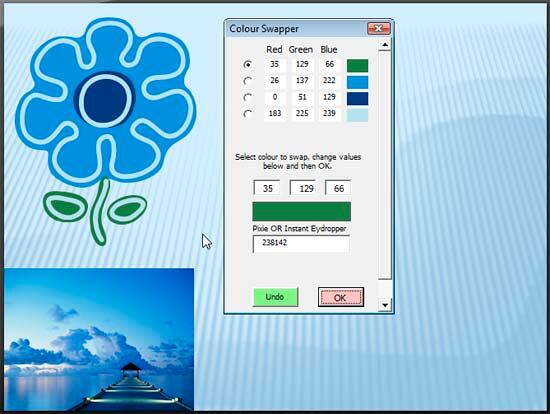
Figure 6: Colors changed for your clip art graphic- Save your presentation.
Back
Pricing and Support
PixSwap costs US$19.99. Support is through e-mail.
Back
Conclusion
PixSwap is a great option if you need more control over the color of your vector graphics in PowerPoint -- the Pixie integration
is a genius move that lets you sample colors from the background or other graphic elements within your slides -- thus letting you
create graphics that look restrained, understated, and matching in look with the rest of your presentation slides.
Back


